The BXGY Bundle—also commonly known as BOGO (Buy One, Get One)—is a powerful and flexible promotional tool that enables businesses to create compelling, reward-based discount structures. BXGY stands for "Buy X, Get Y", where customers are incentivized to purchase a specific quantity of one or more products (X) in order to receive another product (Y) either for free or at a discounted price.
This type of promotion is widely used across eCommerce and retail platforms to increase sales, enhance customer experience, and encourage repeat purchases. Whether it’s “Buy one, get one free,” “Buy Product A and get Product B for $5,” or “Buy any 3 items and get the 4th free,” BXGY campaigns can be customized to meet various business goals and customer needs.
BXGY/BOGO promotions are not only effective in driving short-term sales but also in building long-term customer relationships. In the following section, we’ll walk you through how to create a BXGY Bundle and start reaping these benefits for your store.
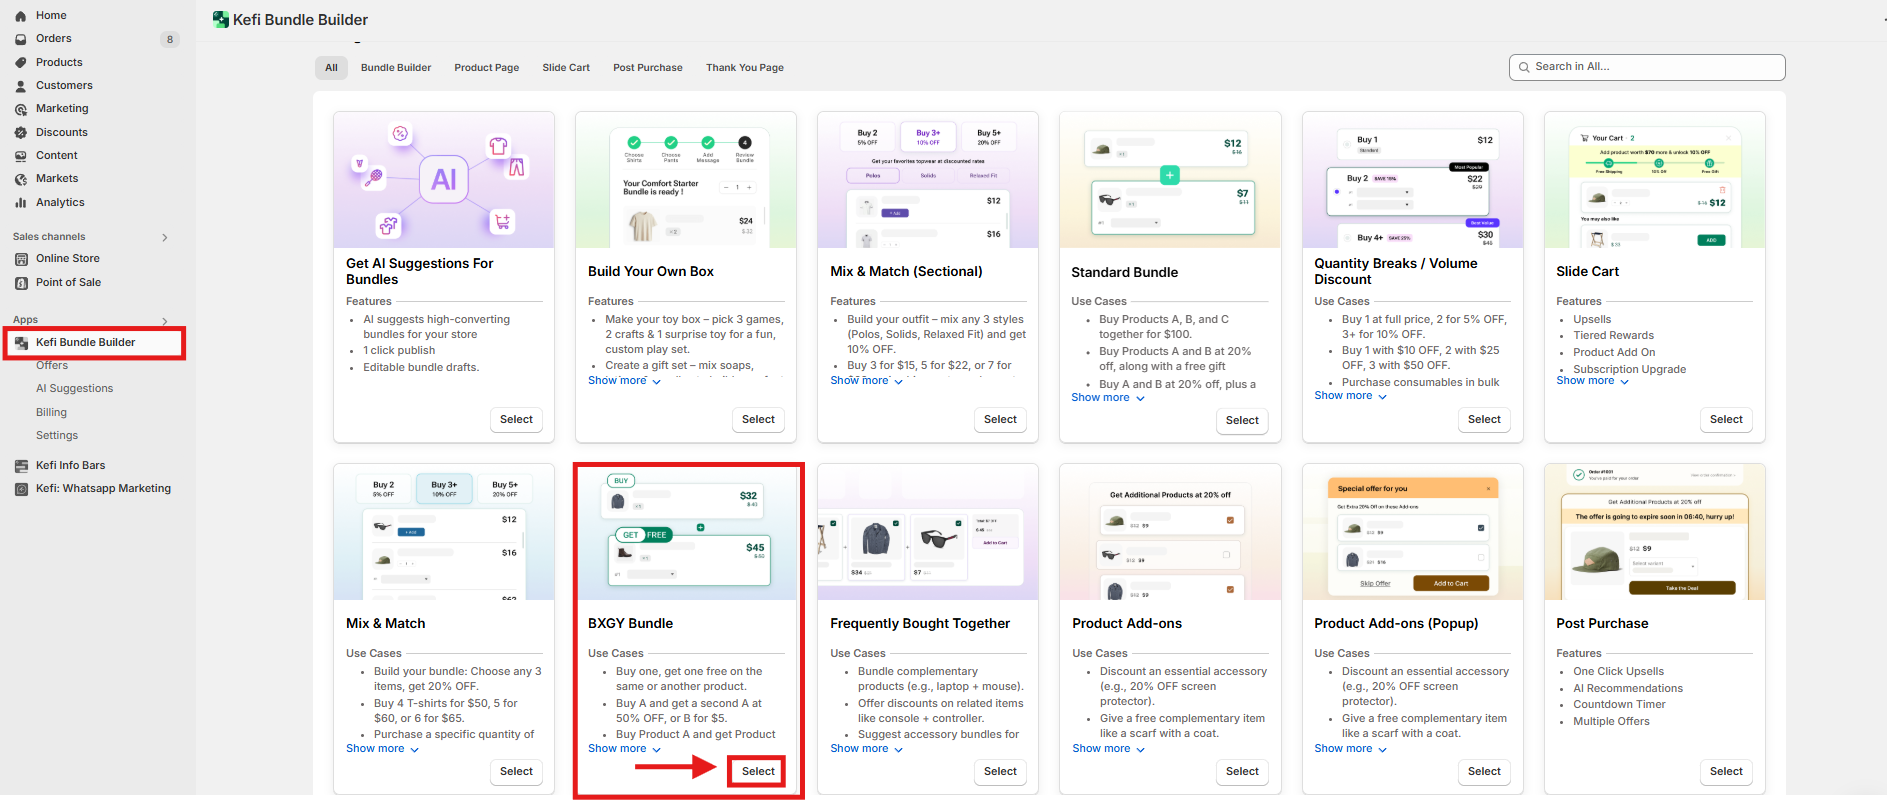
Go to the homepage and select the BXGY Bundle. Click “Select”
Select one of the available template options for your bundle:
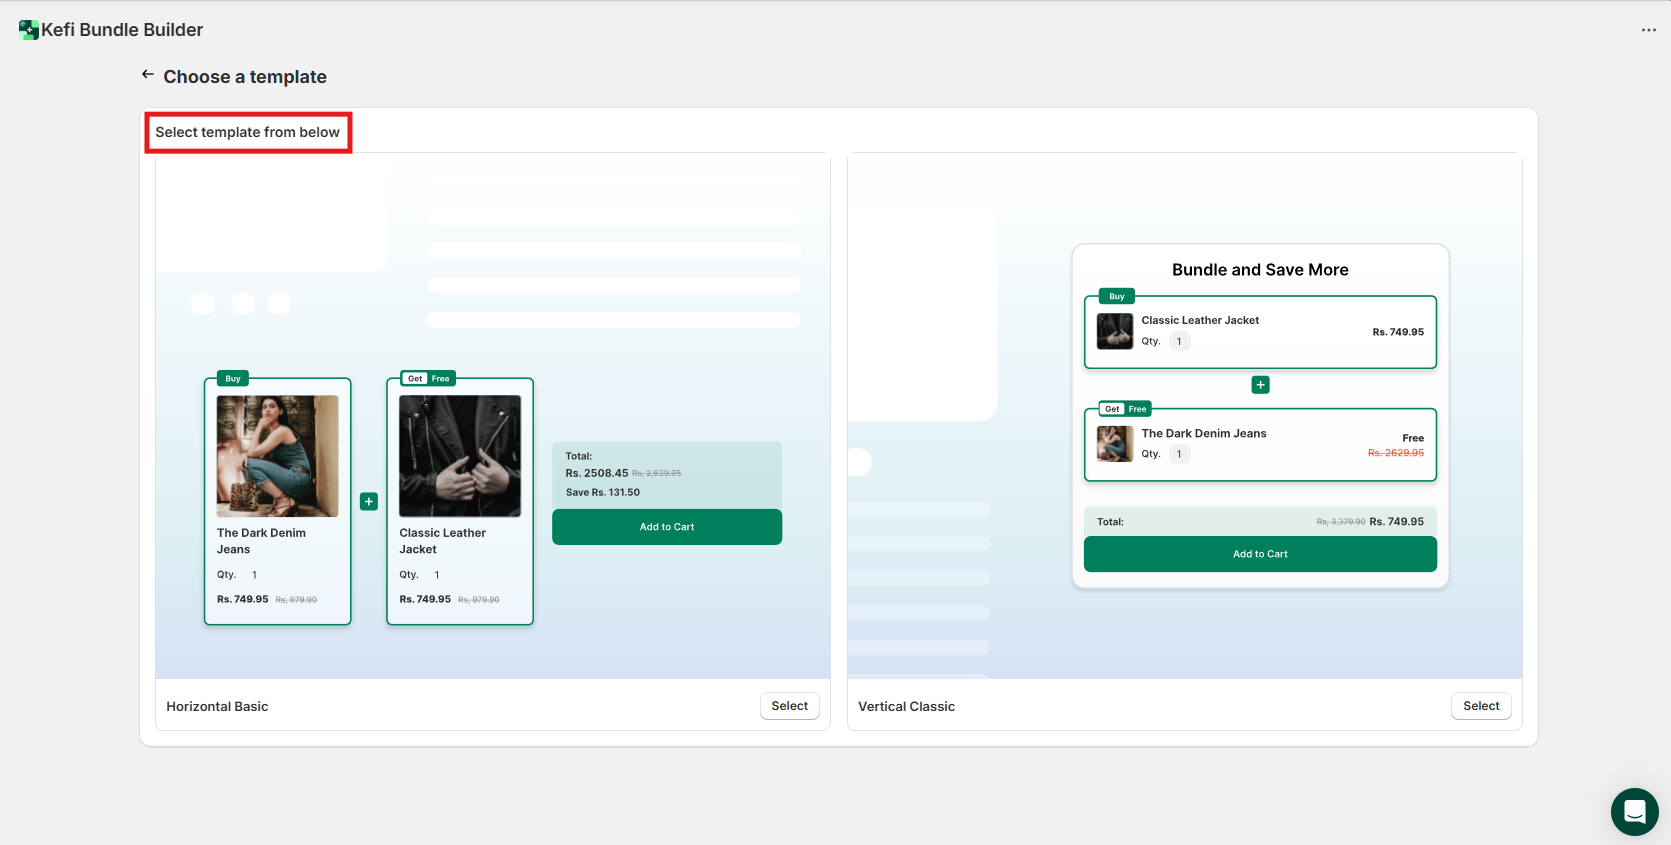
Once you’ve chosen your preferred template, proceed to the next step.
After selecting BXGY Bundle, you'll be redirected to the Content Section, where you can set up your bundle. This section includes:
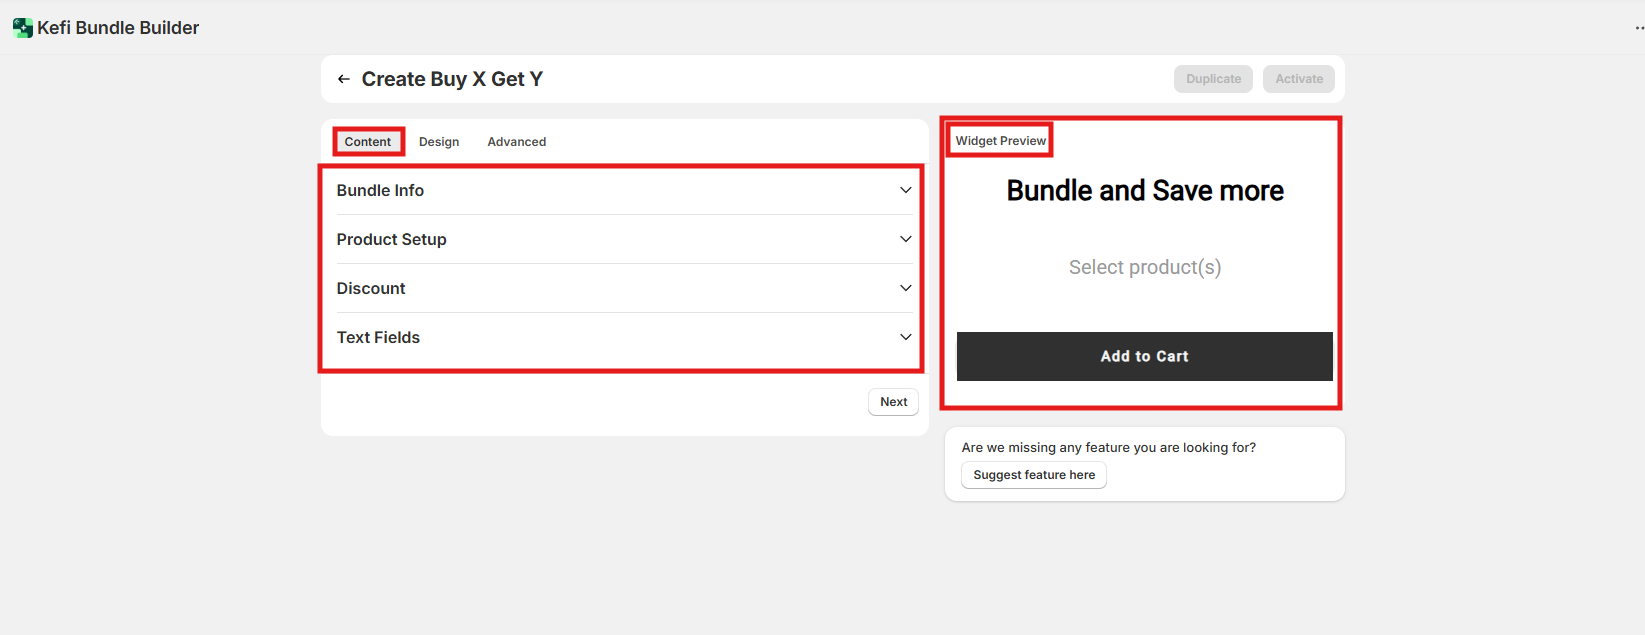
Now, Let’s break down each section :
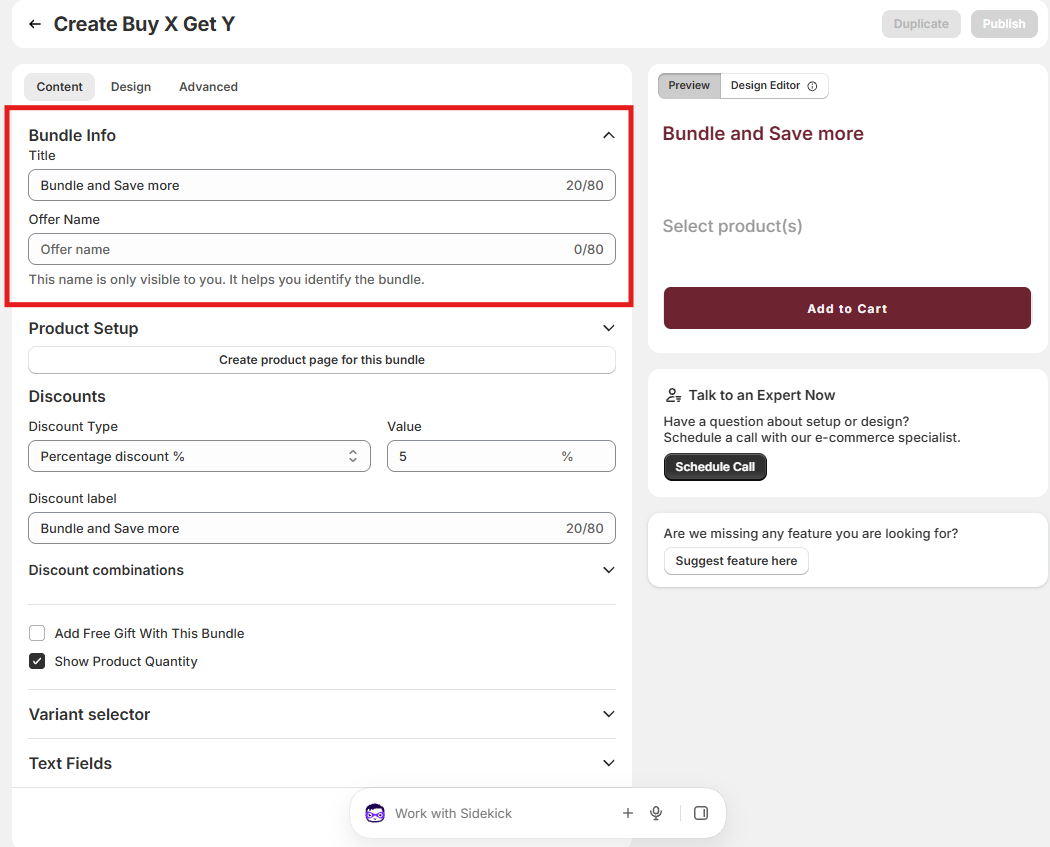
In this section, you can configure the main details for your Mix and Match (sectional) bundle:
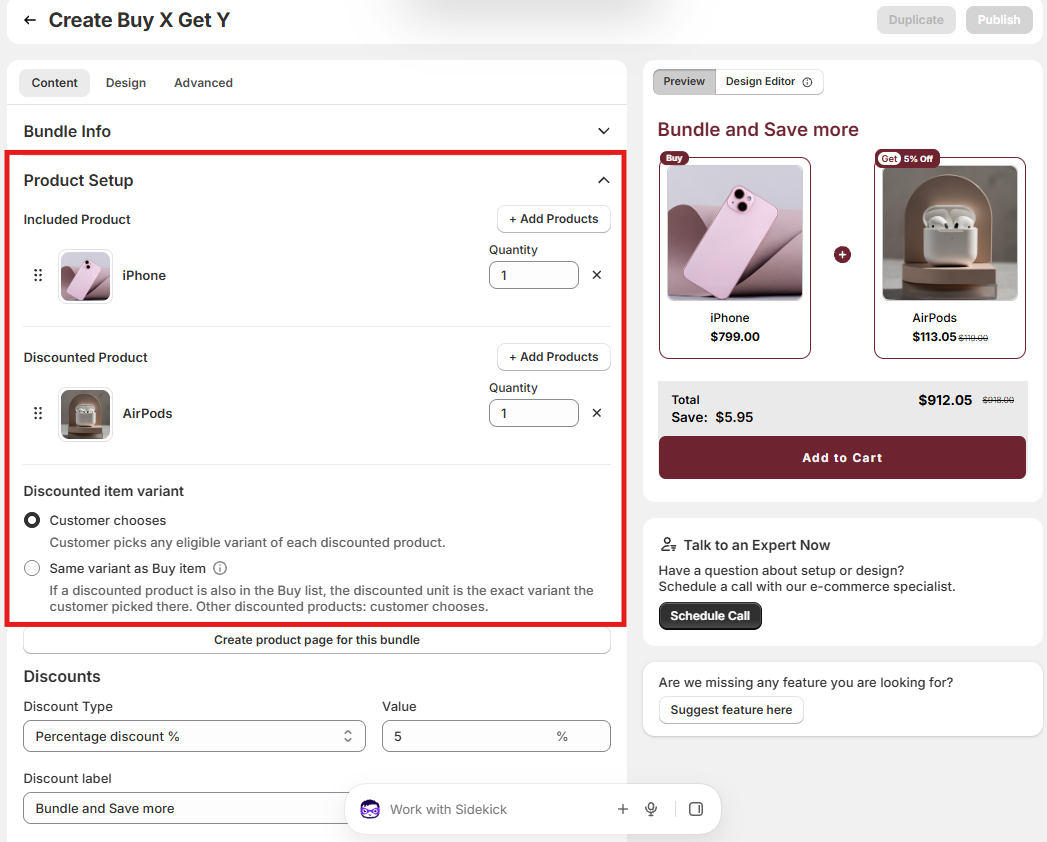
In this section, you'll configure the products involved in your BXGY (Buy X Get Y) Bundle. You’ll define which products fall under the X category (the products customers need to buy) and the Y category (the reward products customers will receive, either at a discount or for free).
These are the products that the customer must purchase to qualify for the offer. Click + Add Products to select one or multiple items, depending on how you want the bundle to work.
These are the products the customer will receive as part of the offer—either at a discount or for free. Click + Add Products to choose which items serve as the reward.
Choose how variant selection (e.g., size, color) works for the discounted reward items:
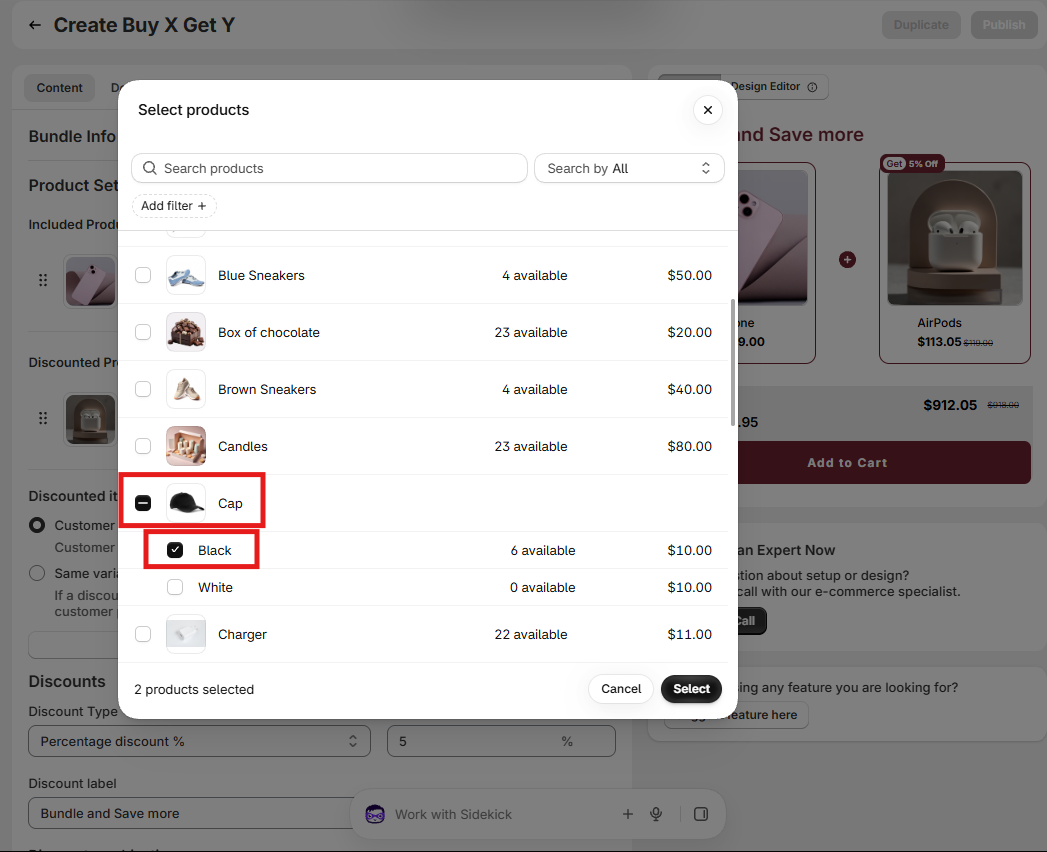
Instead of including all variants of a product, this feature gives you granular control by allowing you to choose specific individual variants—such as particular sizes, colors, or styles—directly during product selection. This ensures customers can only select from the exact variant options you want to make available in the bundle.
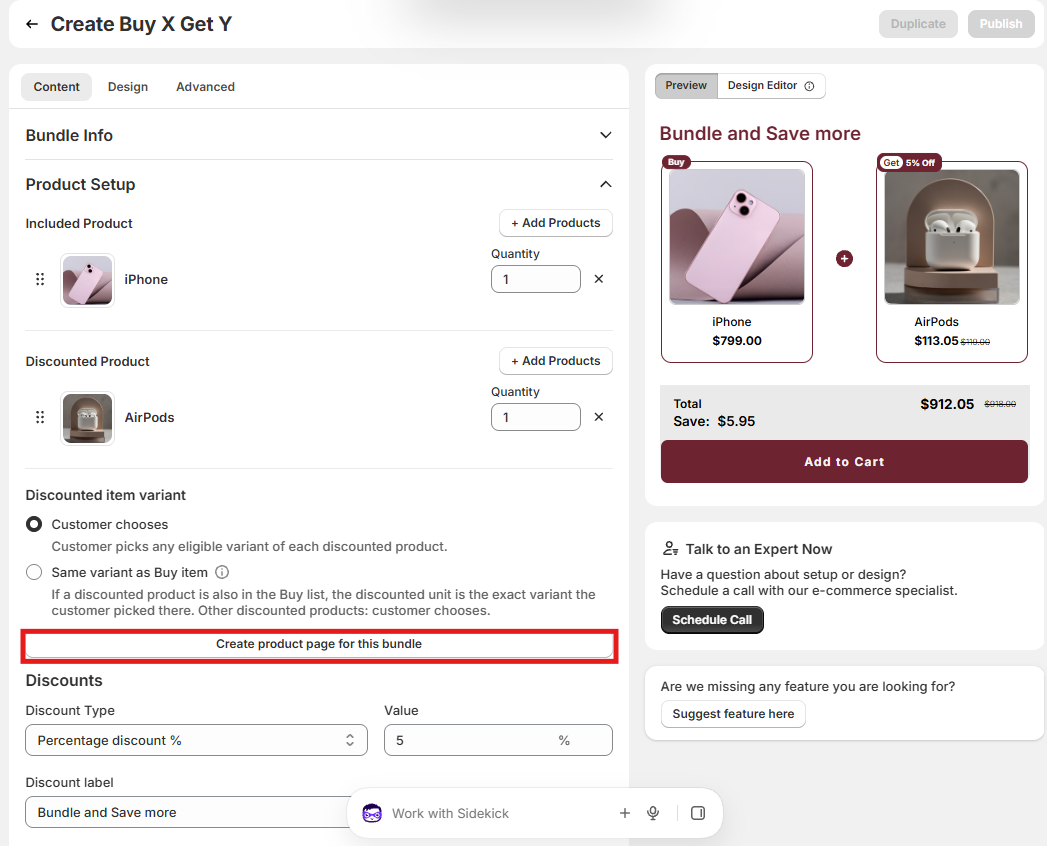
Once you've created your sections, you’ll also have the option to generate a dedicated product page for your Mix & Match (Sectional) Bundle.
This page serves as a central location where customers can view and complete the entire bundle experience—ideal for directing traffic via email campaigns, ads, or navigation menus.
With this option, you can:
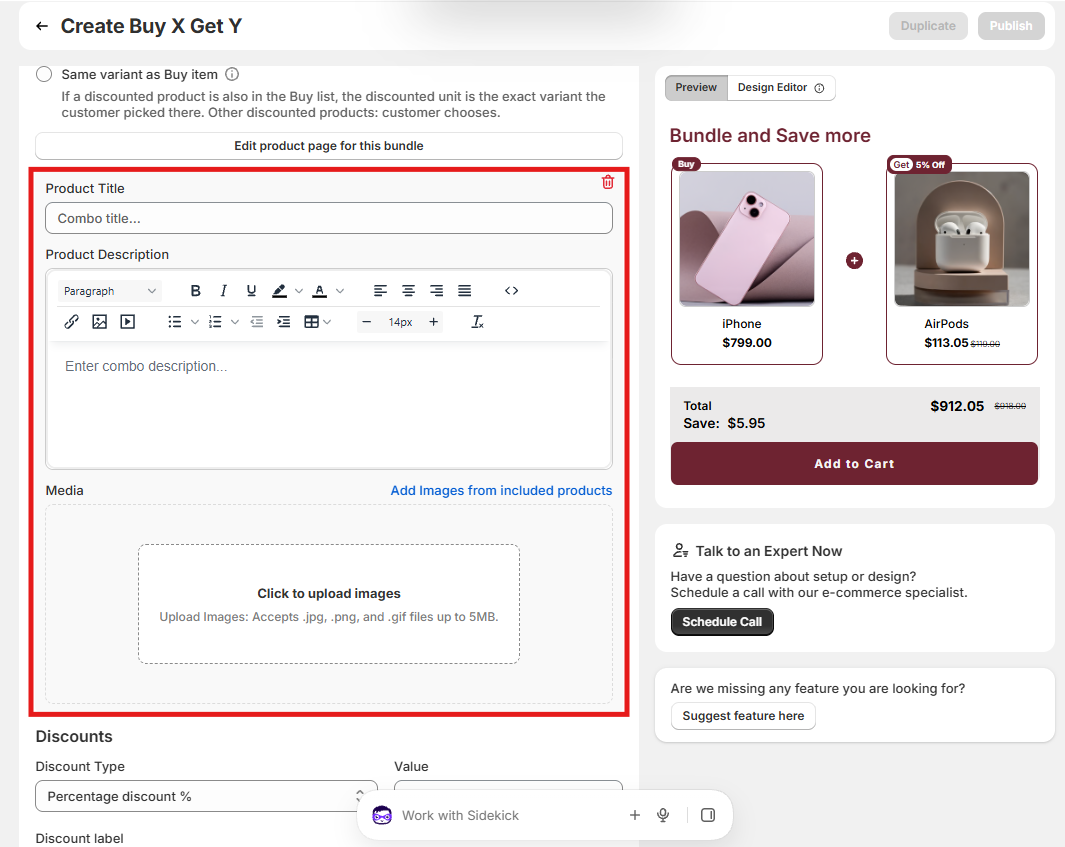
When you click “Create Product”, you’ll be prompted to set up the key details for your Mix & Match (Sectional) Bundle product page. This allows you to fully customize how the bundle appears in your storefront.
You’ll be able to configure the following:
In this section, you can choose how the discount is applied to the Y product (the reward item).
Discount Label: Enter a custom badge or text label to highlight the savings in your store (e.g., "Bundle and Save more").
Character Limit: Up to 80 characters.
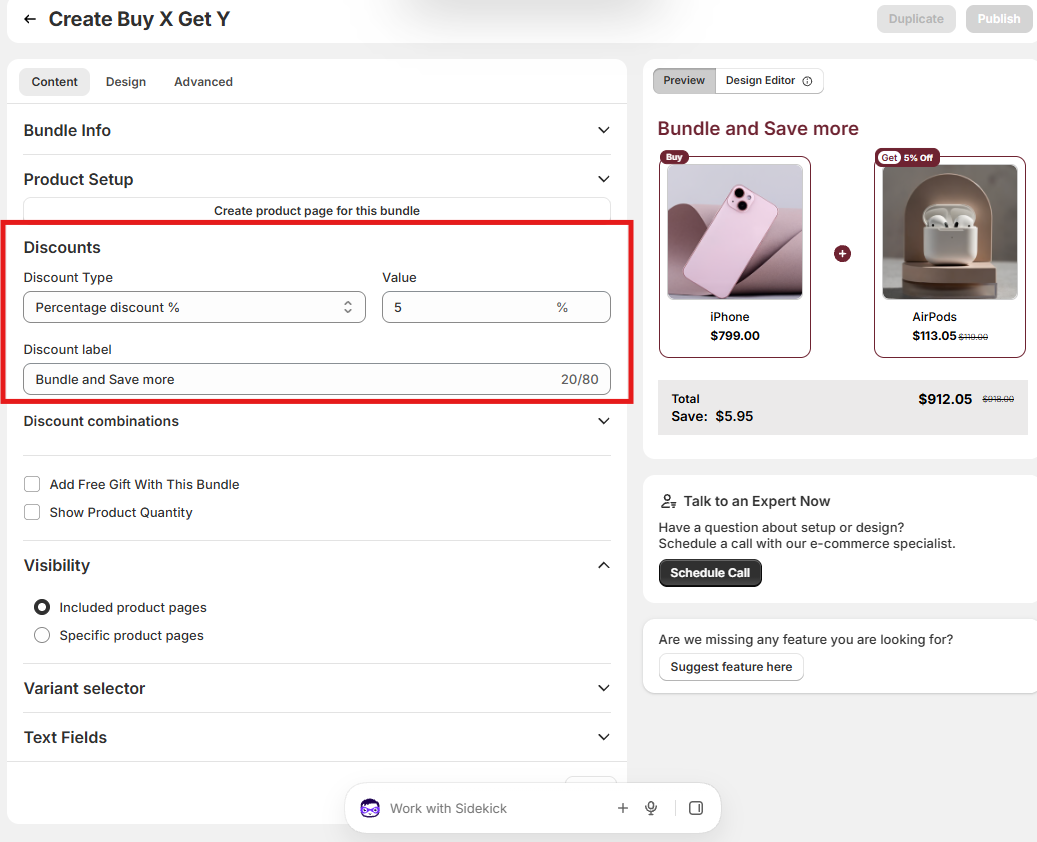
As an additional discount offer, you can also include Product Y for free. To do this, simply select the percentage discount option and set it to 100% - this will allow you to offer Product Y at no cost.
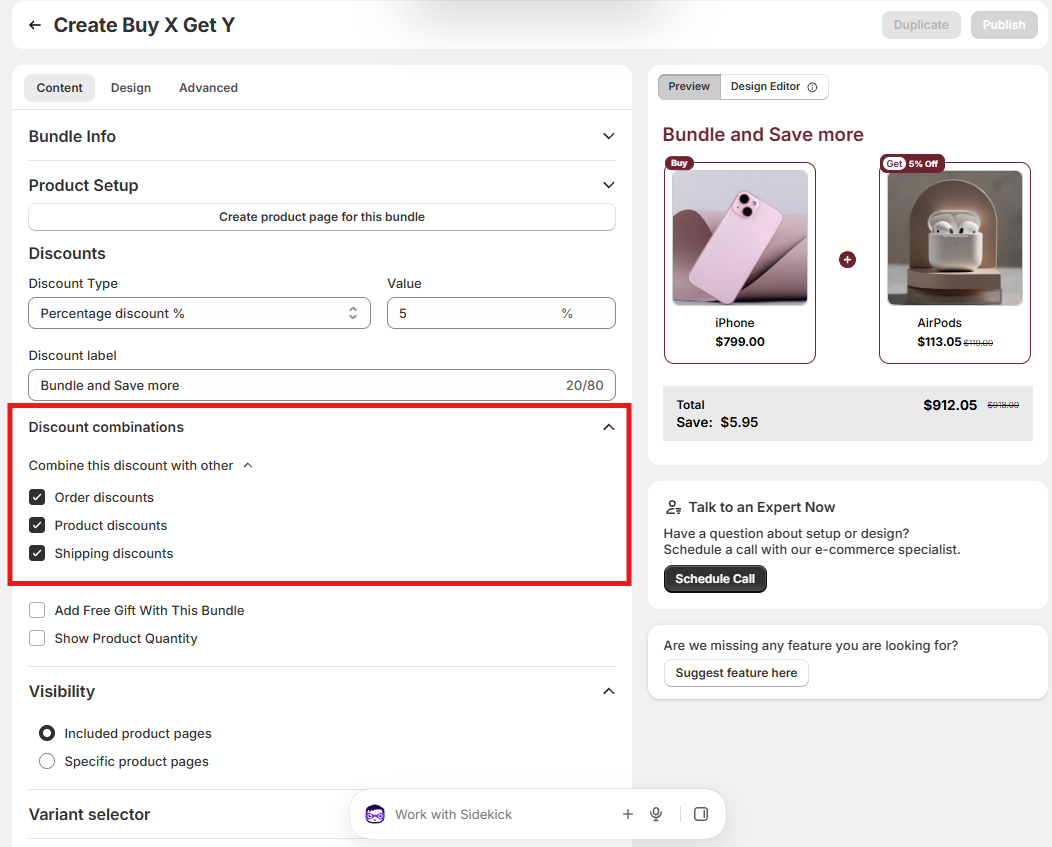
You can choose to combine your add-on discount with other types of discounts active in your store, including:
This allows you to create more compelling promotions by layering multiple incentives for your customers.
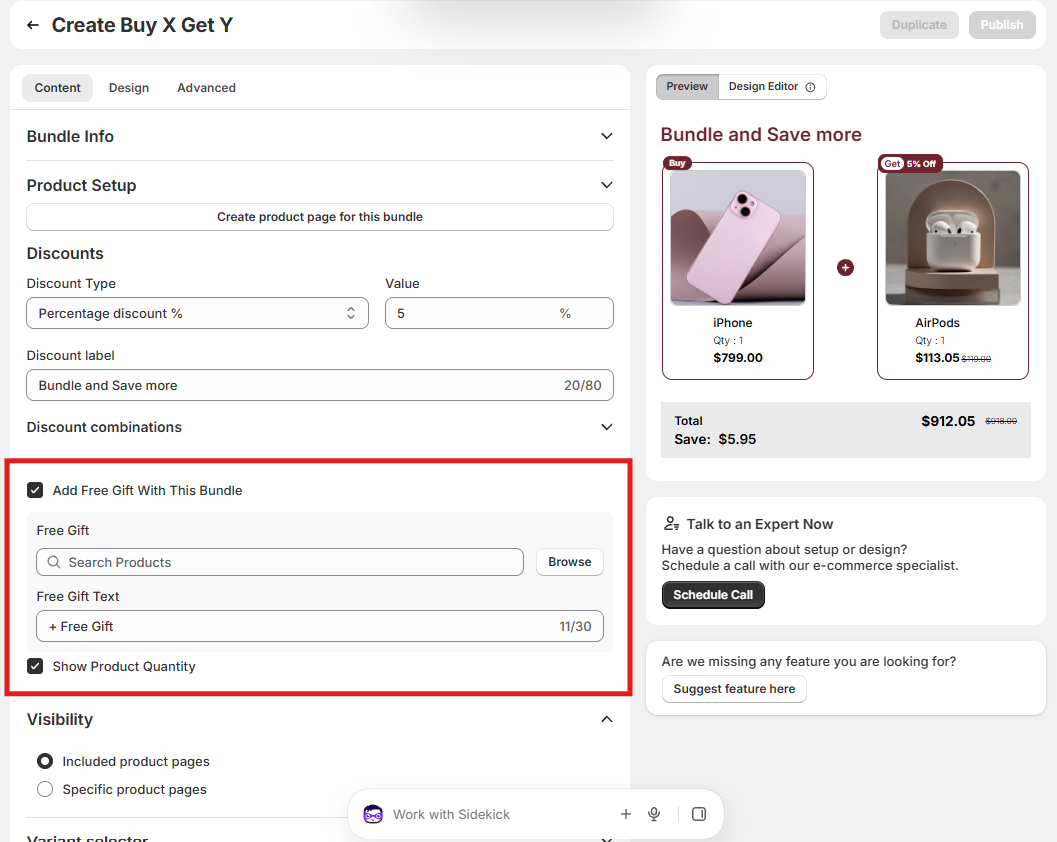
In addition to discounted products, you can also choose to add a free gift to your bundle. This could be a low-cost item or something that complements the products in the bundle.
Example:
Offer a free gift with a purchase, like "Buy a Laptop, get a Free Mouse."
Customize the free gift based on the quantity or type of product purchased.
Quantity Selection
You can define the quantity of each product that the customer needs to buy to qualify for the offer. This ensures flexibility in how much customers need to purchase to unlock the deal.
Example:
"Buy 2 T-Shirts, Get 1 Free" allows you to set the quantity for the X product (T-shirts).
Adjust the quantity for both the included and discounted products to tailor the promotion to your needs.
This section gives you full control over how you want the BXGY bundle to function, letting you customize the offer based on the products you want to promote and the reward structure.
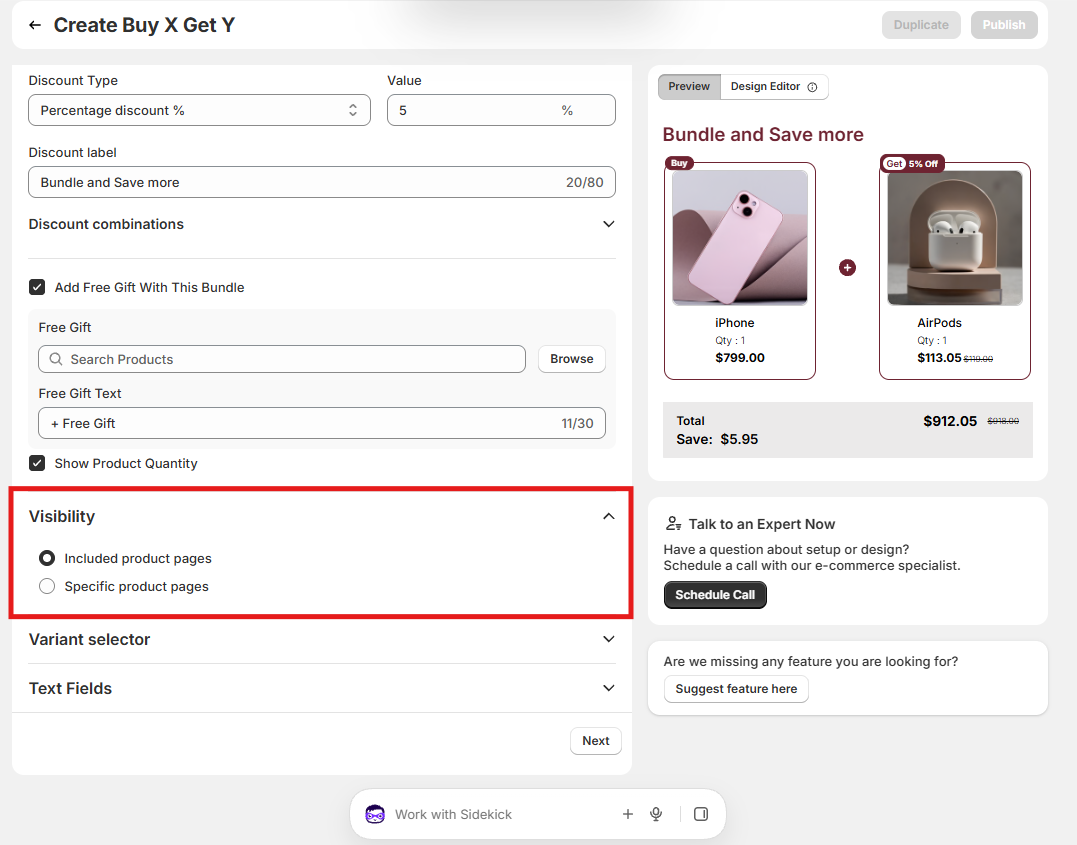
Choose how customers pick product options inside the bundle:
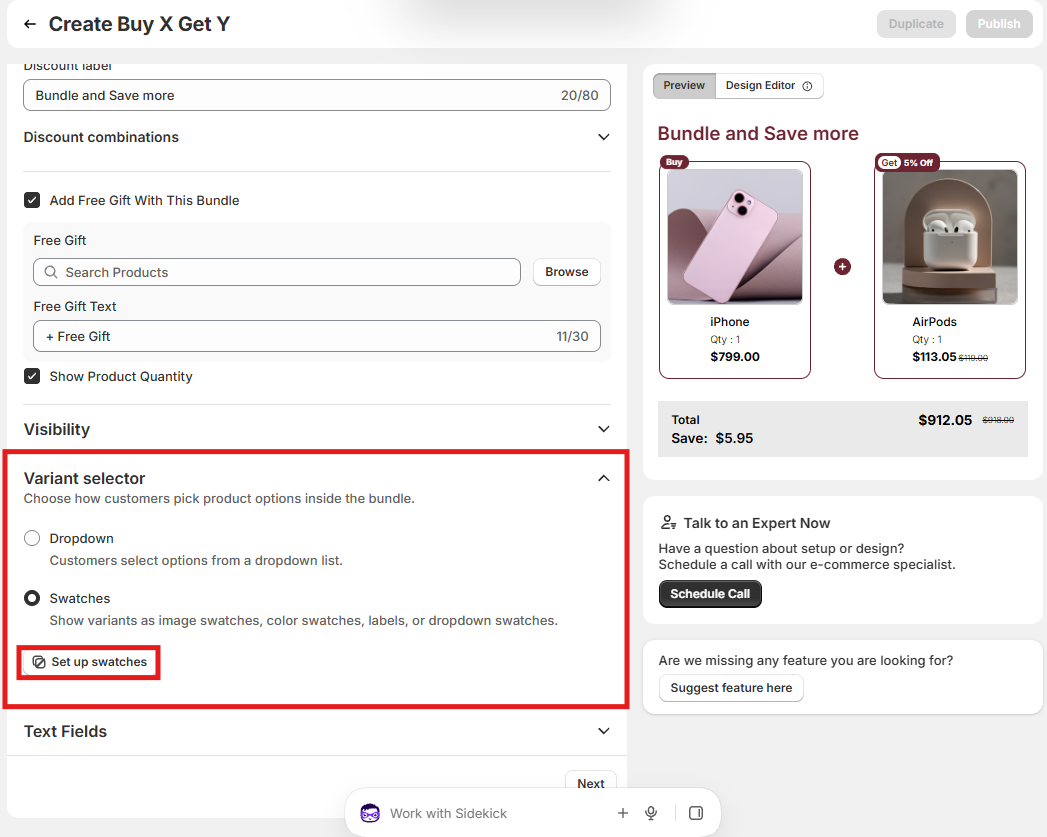
To further personalize how these options appear, click on Set up swatches. Here, you can customize the swatch layout, labels, and appearance—for example:
This section allows you to customize all the text displayed on the BXGY bundle widget, helping you align the messaging with your brand’s voice or localize content for different regions. You can easily edit key elements such as:
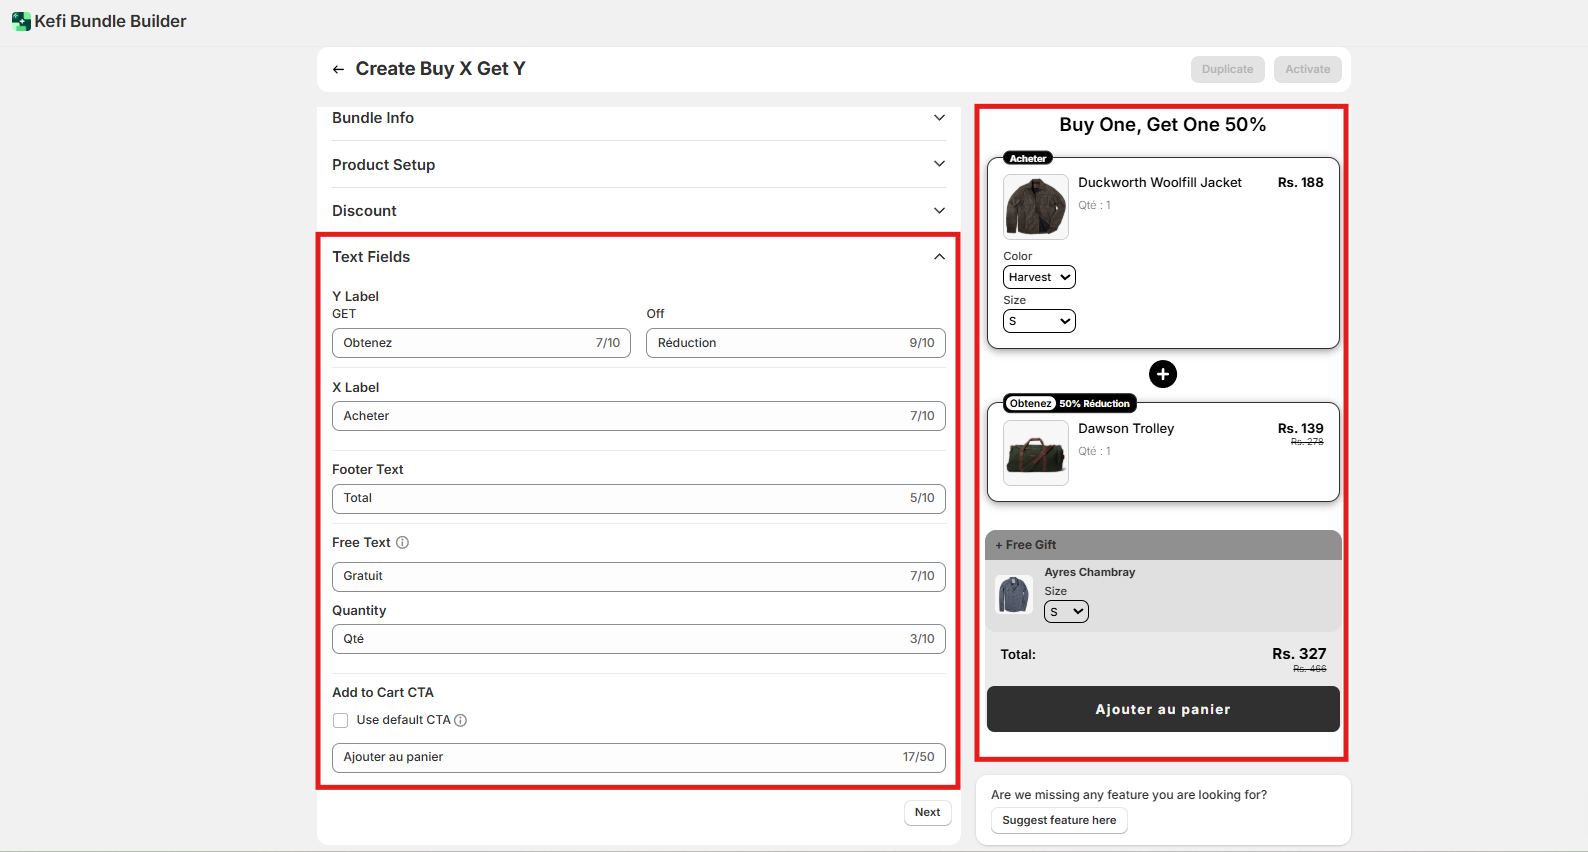
Now , click on the “Next” button to proceed to the next section .
After clicking the next you would be redirected to the next section that is Design
The Design section allows you to fully customize the look and feel of your bundle widget, ensuring it aligns perfectly with your store’s branding and layout. From background colors and typography to product cards and buttons, you have complete control over the visual presentation of your bundles.
Let’s explore the available customization options:
Tailor the overall widget appearance and set the tone for your bundle design.
General
Title
Special Text
Used for highlights or key labels (like badges or promo tags).

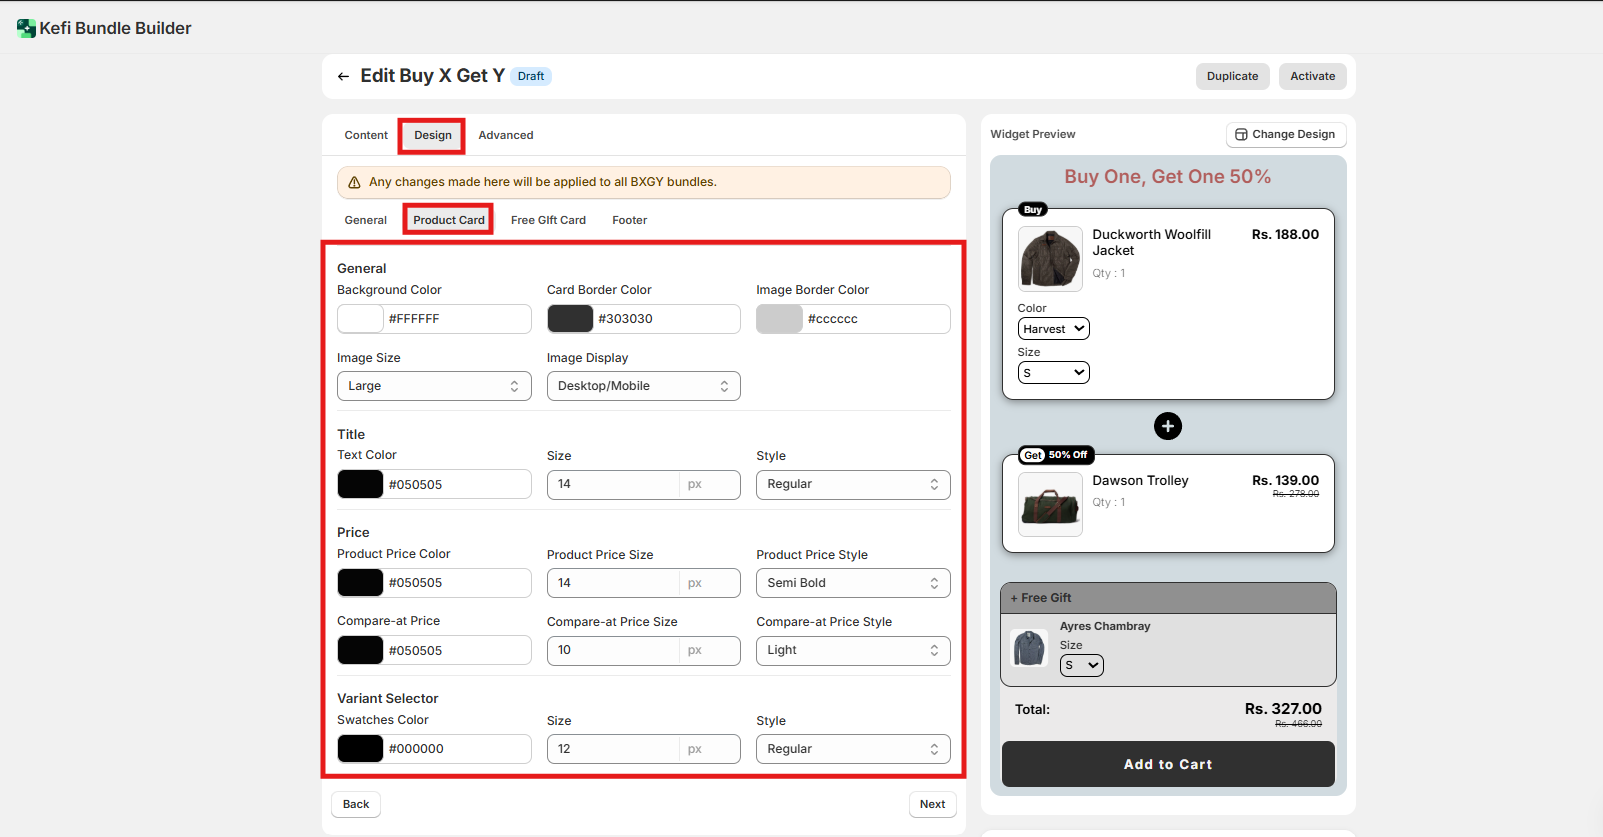
Customize each product’s display within the bundle to match your design and layout preferences.
General
Title
Price
Compare-at Price
Variant Selector
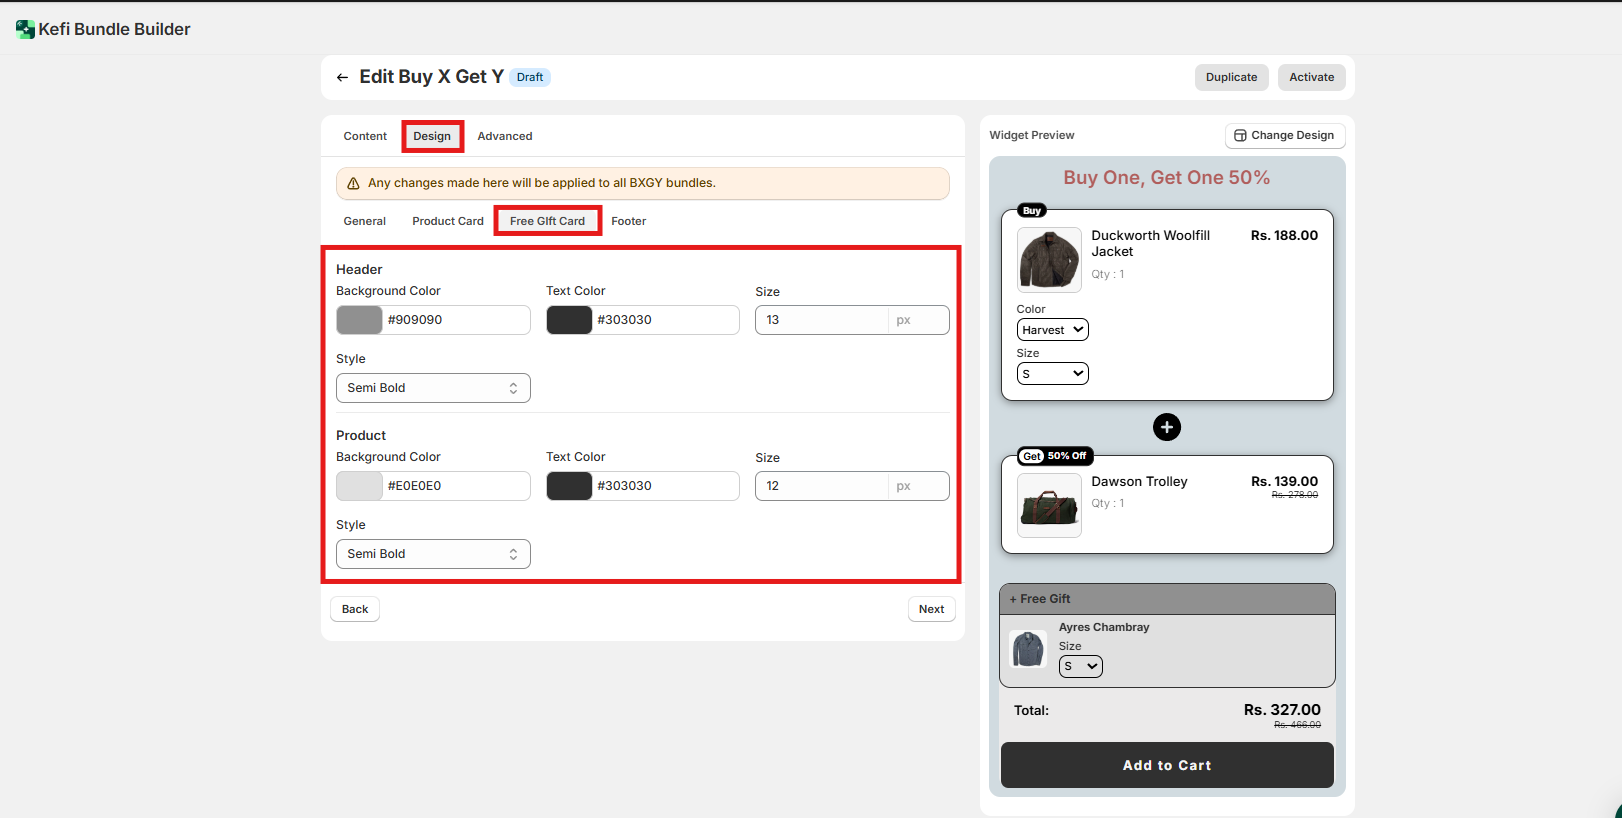
Design the appearance of the Free Gift section to make it clear, engaging, and consistent with your brand.
Header
Product
Customize the bottom section of the widget, where pricing details and the Add to Cart button appear.
Total Section
Save Price
Add to Cart Button
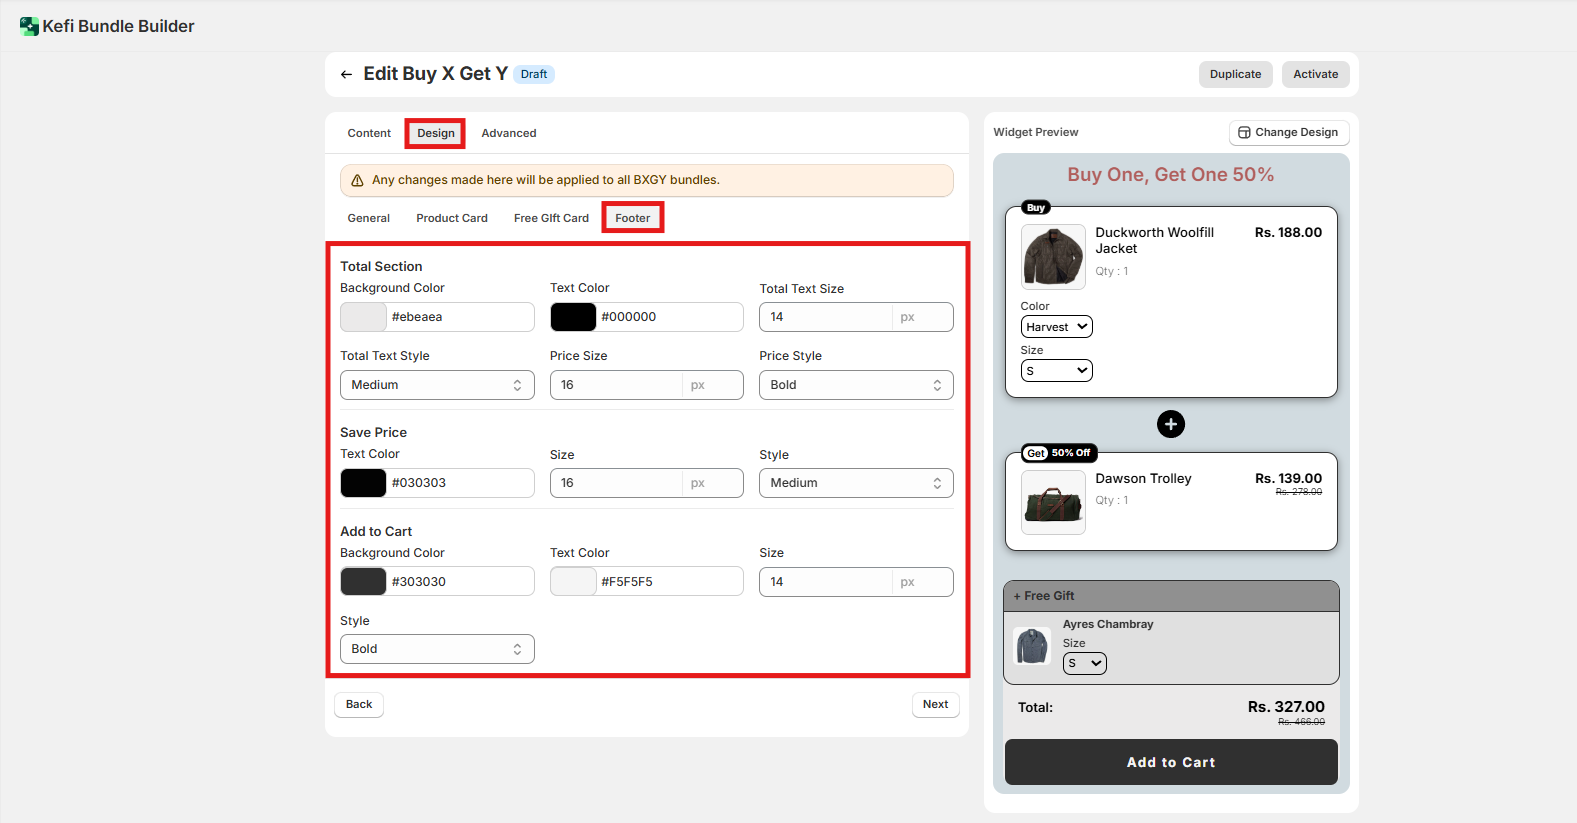
With these powerful design tools, your bundle widget can visually integrate with your storefront—resulting in a professional, branded, and user-friendly experience for your customers.
Now , click on the “Next” button to proceed to the next section .
After clicking the next you would be redirected to the next section that is “Advance”
Advanced Settings
The Advanced section gives you greater control over when, where, and to whom the bundle widget is shown. These settings are useful for precise targeting and scheduling. Let’s dive into each option:
By default, the widget will appear below the Add to Cart button.
To change its position, open the Shopify Theme Editor, and simply drag the app block to your preferred location on the product page—no coding required.

Embed Bundle via HTML
You can also embed this bundle manually on any page using HTML.
Display the bundle wherever you like by placing the provided HTML tag directly into your theme file.

Hide Shopify Elements
You have the option to hide specific Shopify elements (like the default Add to Cart button or product price) to reduce redundancy when showing bundles.
Simply enter the CSS selectors of the elements you'd like to hide.
For example:
This helps create a cleaner, more focused layout around your bundle widget.

For a detailed step-by-step guide, refer to this help article:
How to Position Bundles on Your Product Page
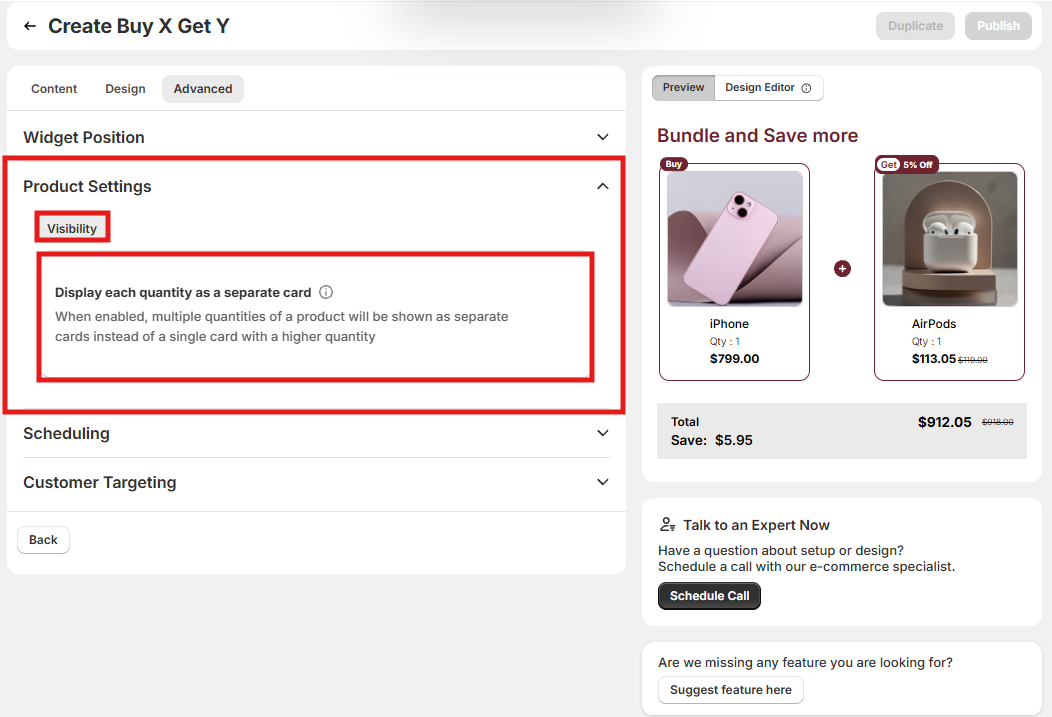
In this section, you can configure visibility and display rules for how products and quantities are presented inside your bundle builder:
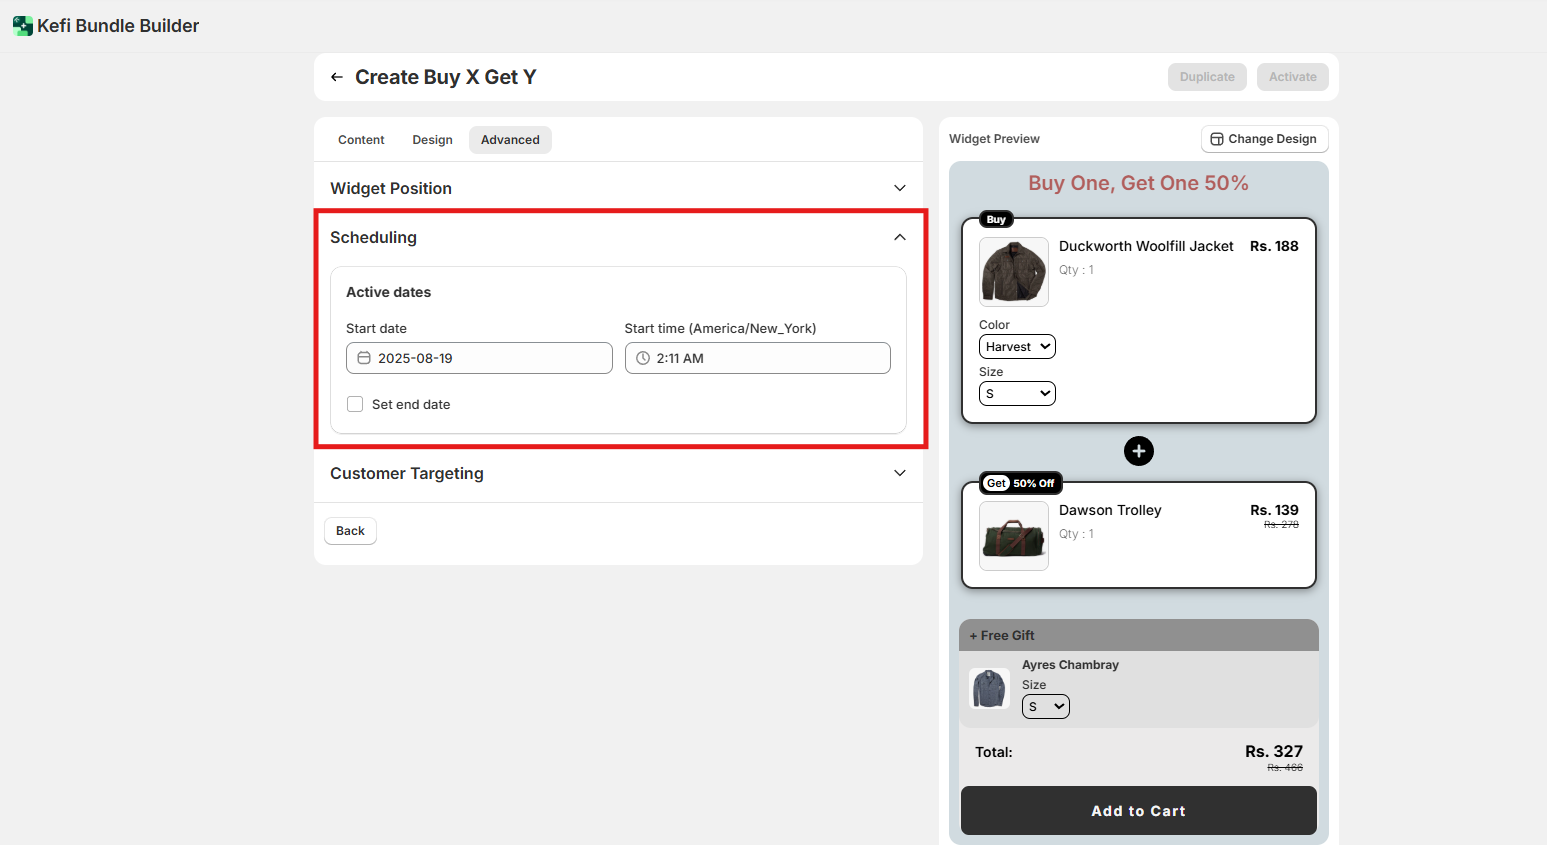
Set a start and end date for your bundle campaign. This is perfect for time-sensitive promotions, seasonal offers, or flash sales. The widget will only display during the defined period.
Control who sees the bundle by targeting:
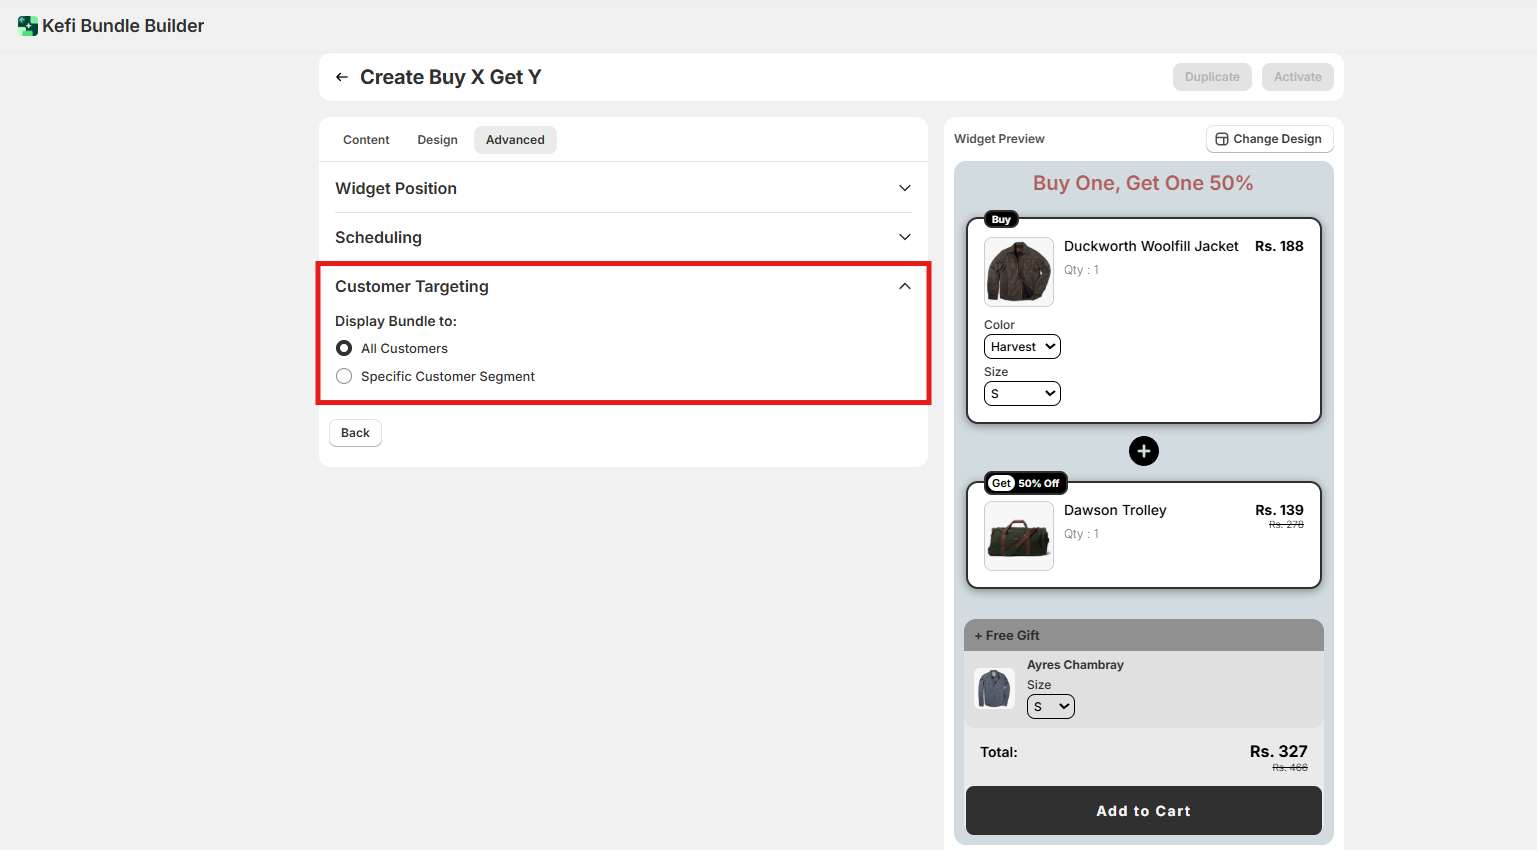
In case of Specific Customer Segment -

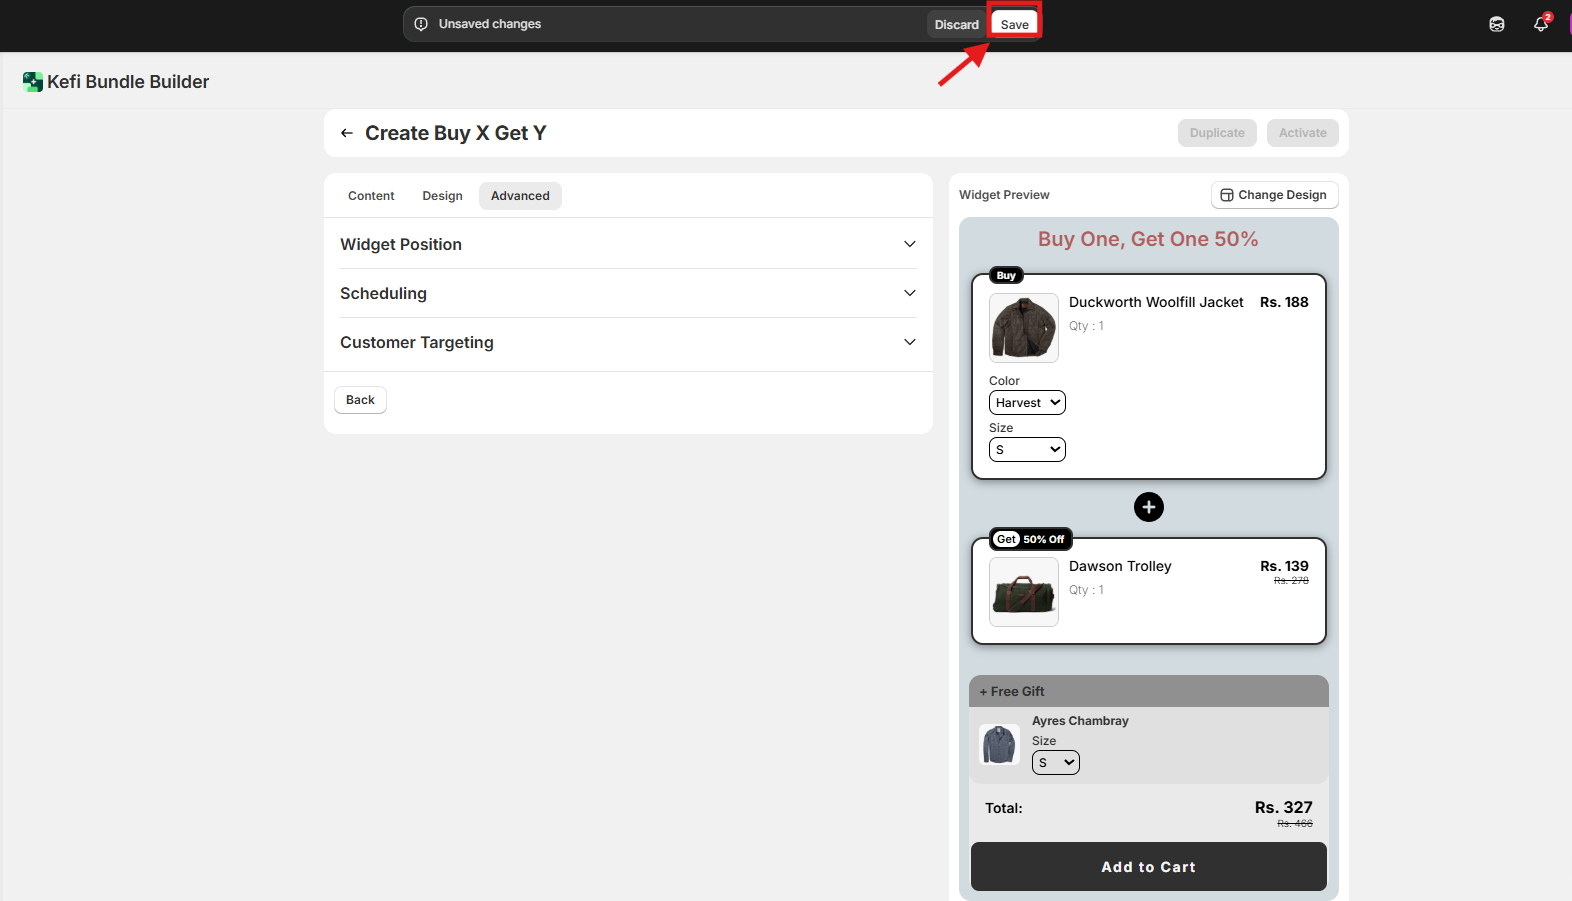
Click on “Save” button to save all the changes
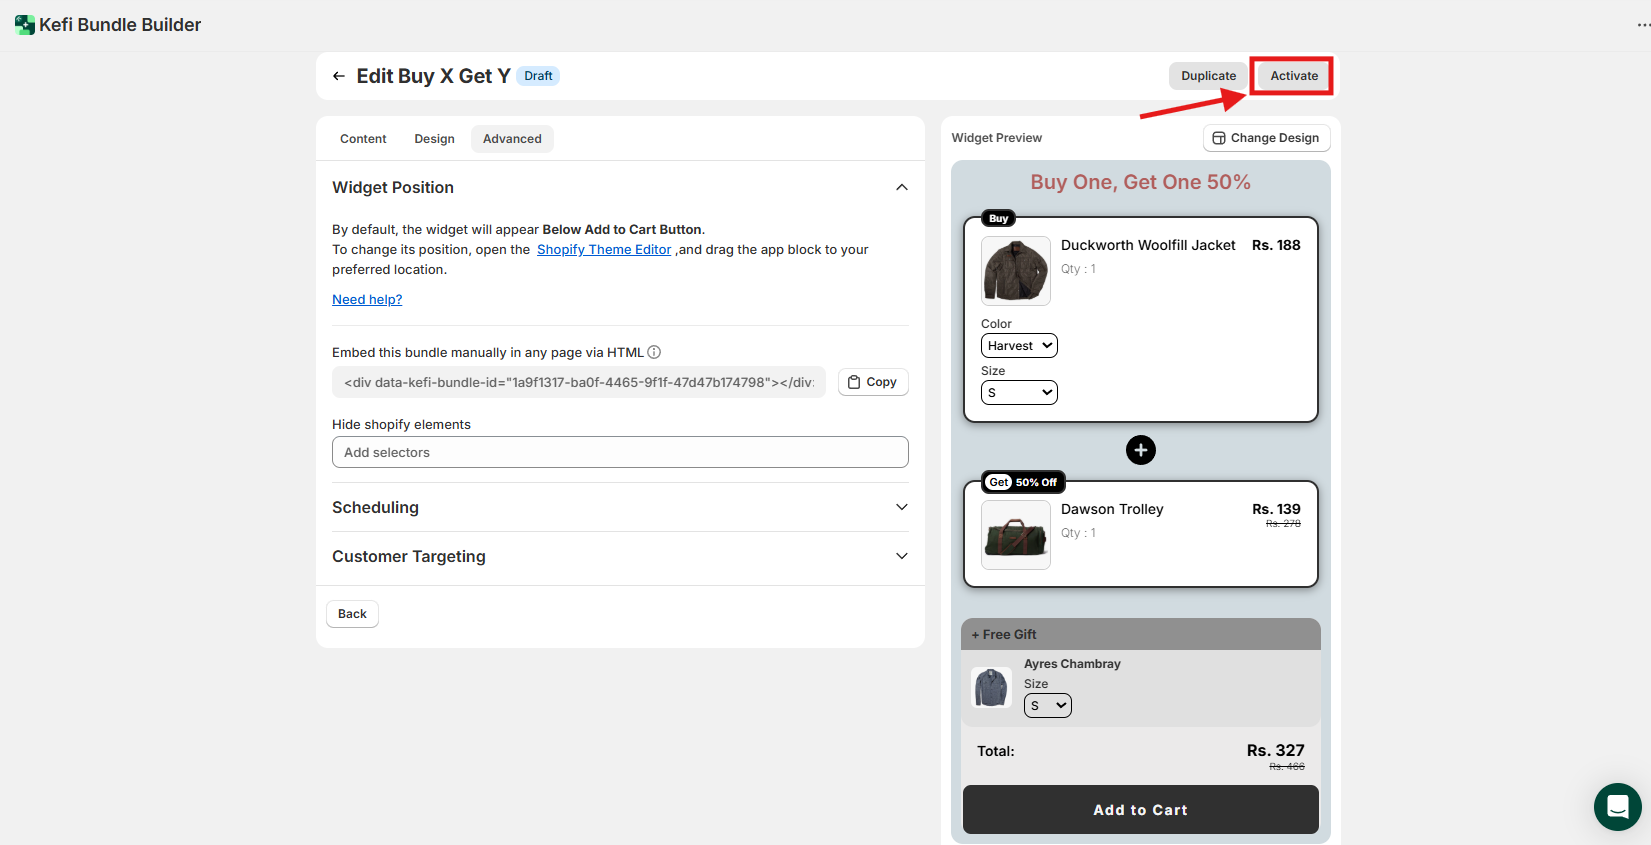
Click on “Activate” to activate the widget on your shopify store(make sure you have enabled the core snippet button in order to see the bundles on your store).
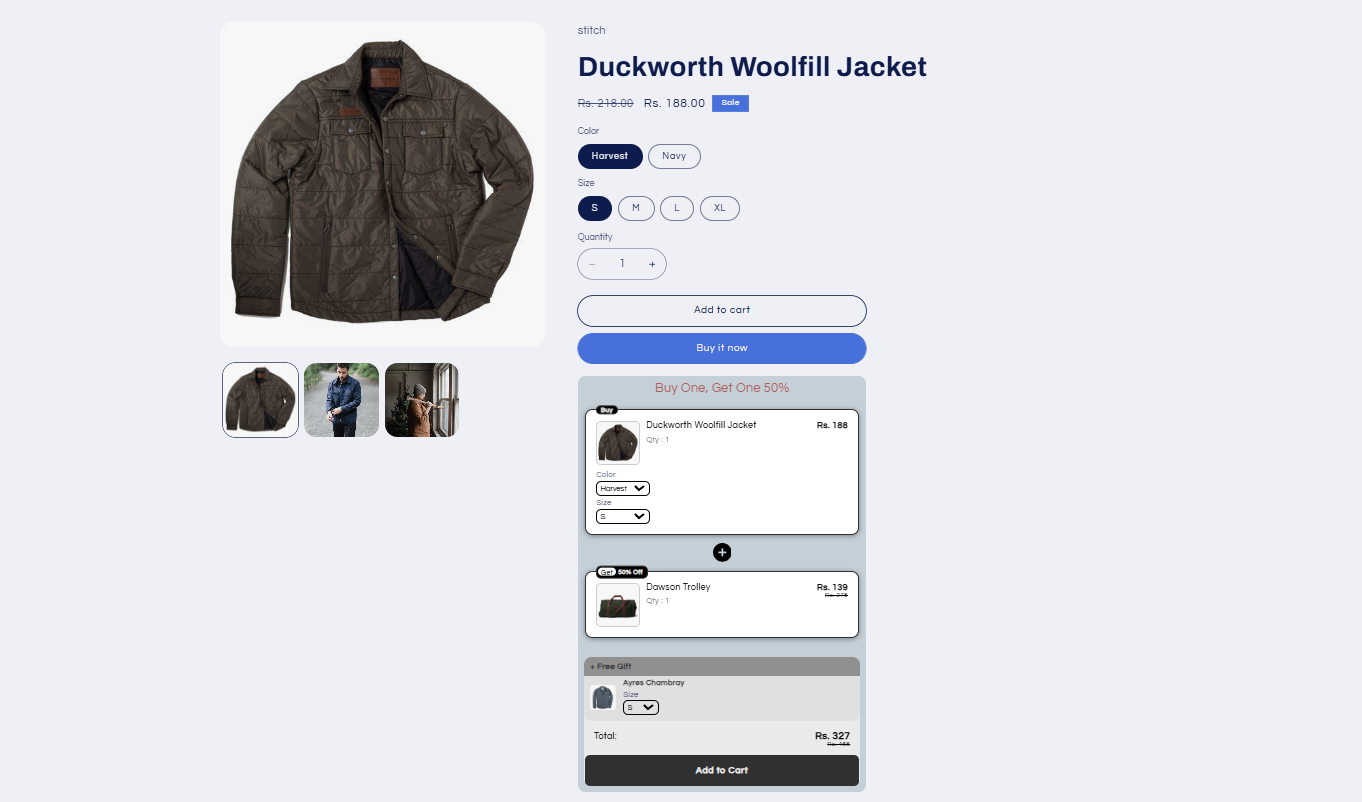
Your BXGY Bundle is Now Live! Click the “Show on Store” button to Preview the bundle as it appears to your customers

Now, head over to your storefront to see the BXGY Bundle live in action.
If you have any questions or need assistance, feel free to contact us:

