How to Set Up Mix and Match Bundle

Get Started with Mix & Match Bundles

Give your customers the power to build their perfect bundle! With the Mix & Match Bundle feature from the Kefi Upsells App, you can offer an interactive shopping experience that boosts engagement and increases average order value. Instead of fixed sets, let shoppers mix their favorites from a curated list - more freedom for them, more conversions for you.

Setting Up Your Mix and Match Bundle: A Step-by-Step Guide

Ready to set it up? Let’s dive in.

This step-by-step guide will walk you through everything you need to configure and launch your Mix and Match bundle - from choosing the right settings to customizing how it appears on your store.

STEP 1

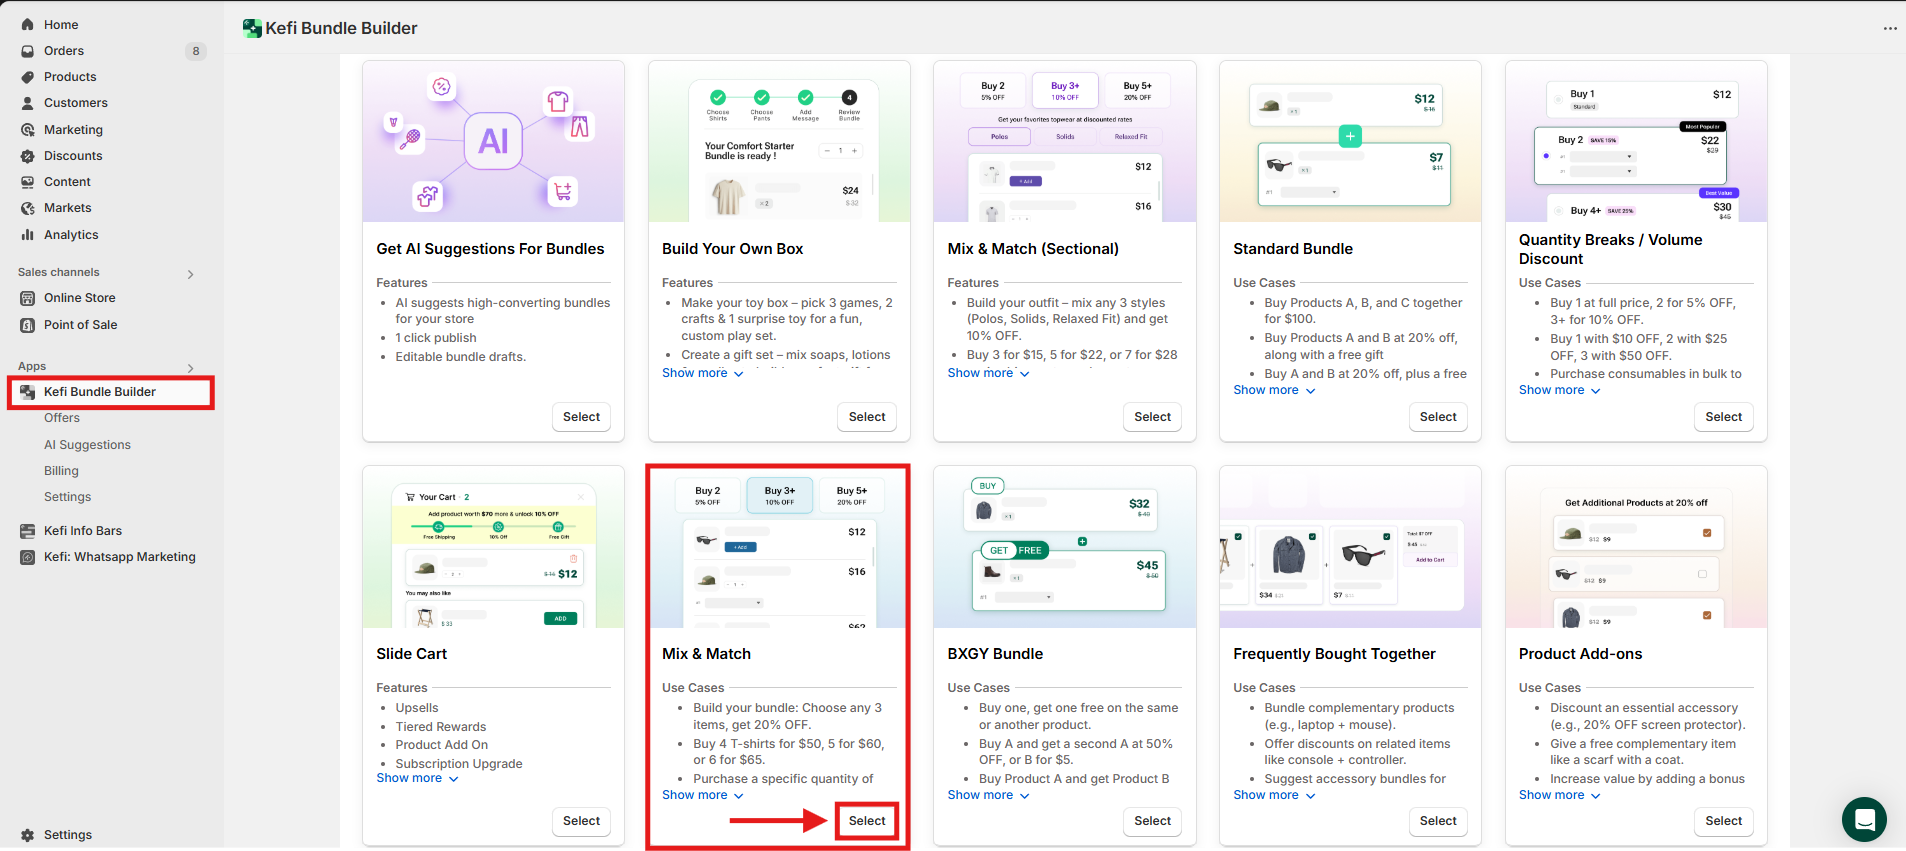
Go to the homepage and select the Mix and Match. Click “Select”
STEP 2: 

After selecting Mix and Match, you'll be redirected to the Content Section, where you can set up your bundle. This section includes:
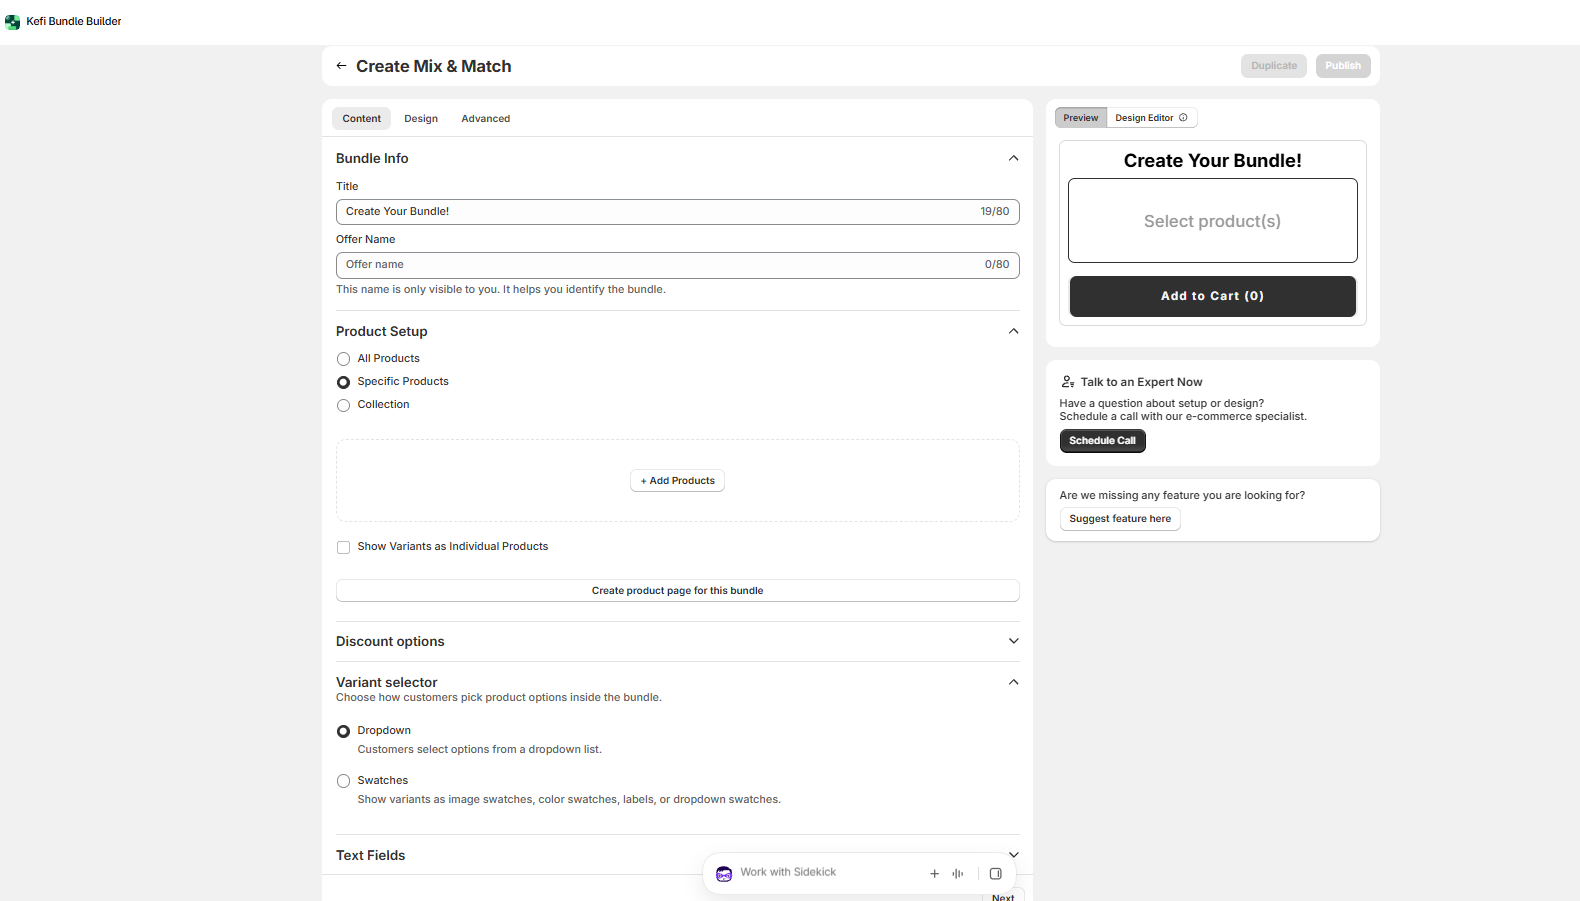
  • Bundle Info: Name your bundle and add a description.
  • Product Setup: Choose which products customers can mix and match.
  • Discount Options: Set percentage, fixed, or tiered discounts.
  • Variant Selector: Choose how product options appear inside the bundle (Dropdown or Swatches). 
  • Text Fields: Customize messaging like headings and button labels.
  • Widget Preview: On the right-hand side, see a live preview of how your bundle will appear to customers.

1. Bundle Info

In this section, you can add a title for your Mix and Match Bundle. This title will be visible to customers, so make it clear and appealing.
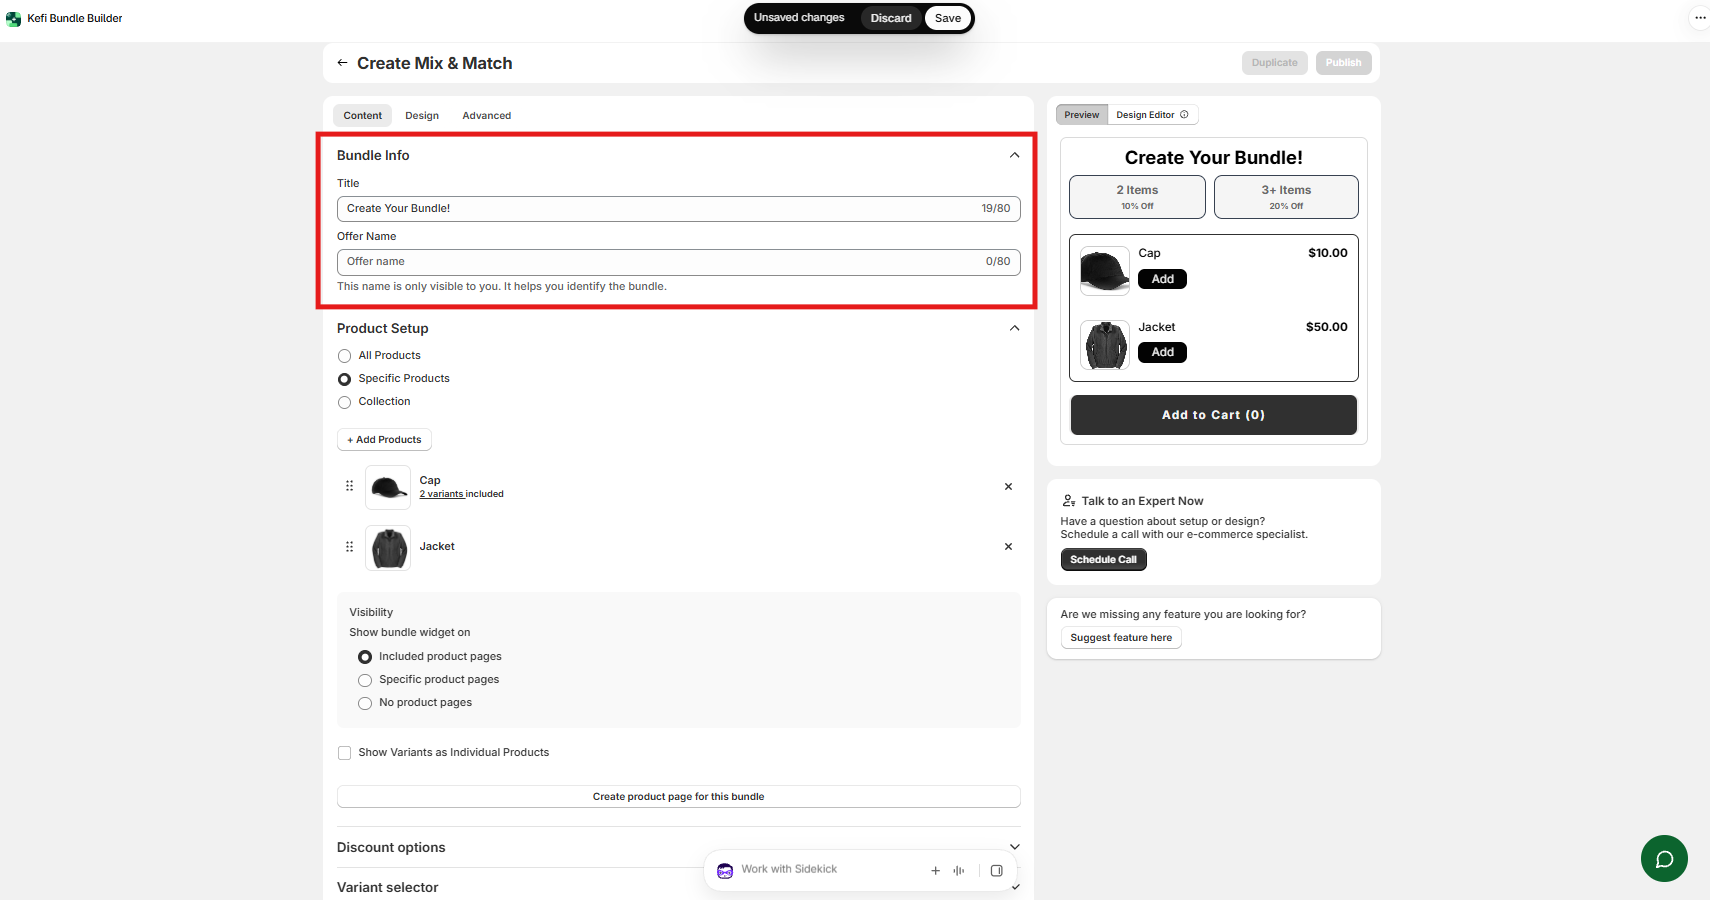
  • Character Limit: You can enter up to 80 characters.
  • Tip: Use titles like "Build Your Own Snack Box" or "Pick & Save Fashion Bundle" to attract attention.

‍

2. Product Setup

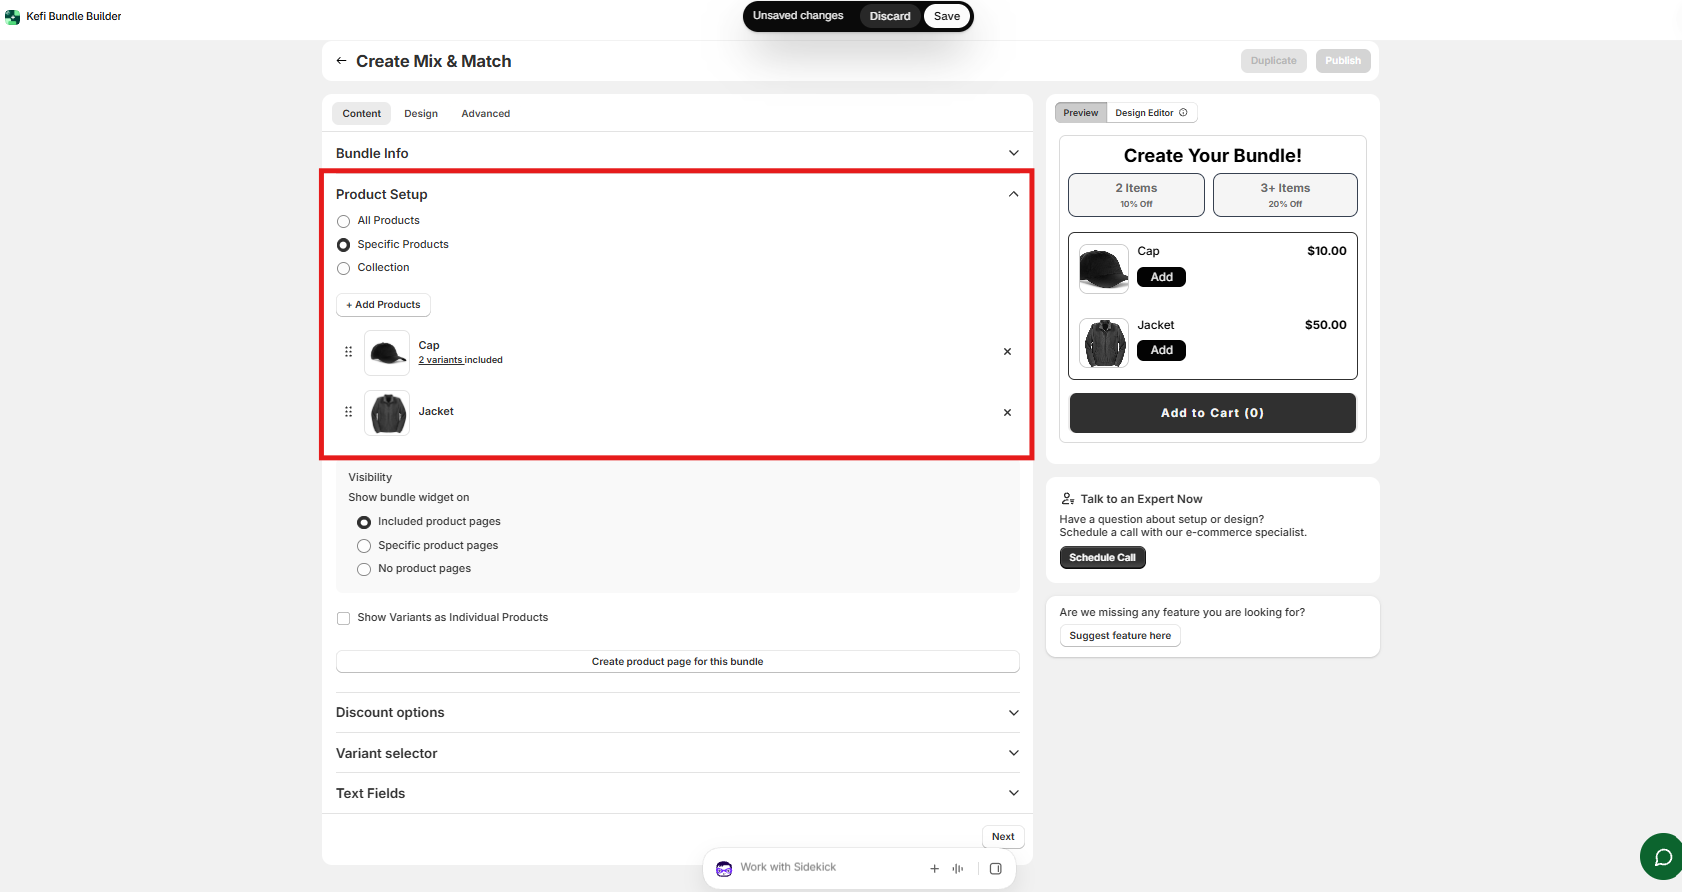
This section allows you to select which products will be part of your Mix and Match offer. You have three flexible options to choose from:

  • All Products: Include your entire product catalog in the bundle.
  • Specific Products: Manually select individual products from your store.
  • Collection: Choose an existing collection to group related products together.

For this guide, we’ve selected “Specific Products” and included 2 products from the store to demonstrate how the bundle works in a focused setup.
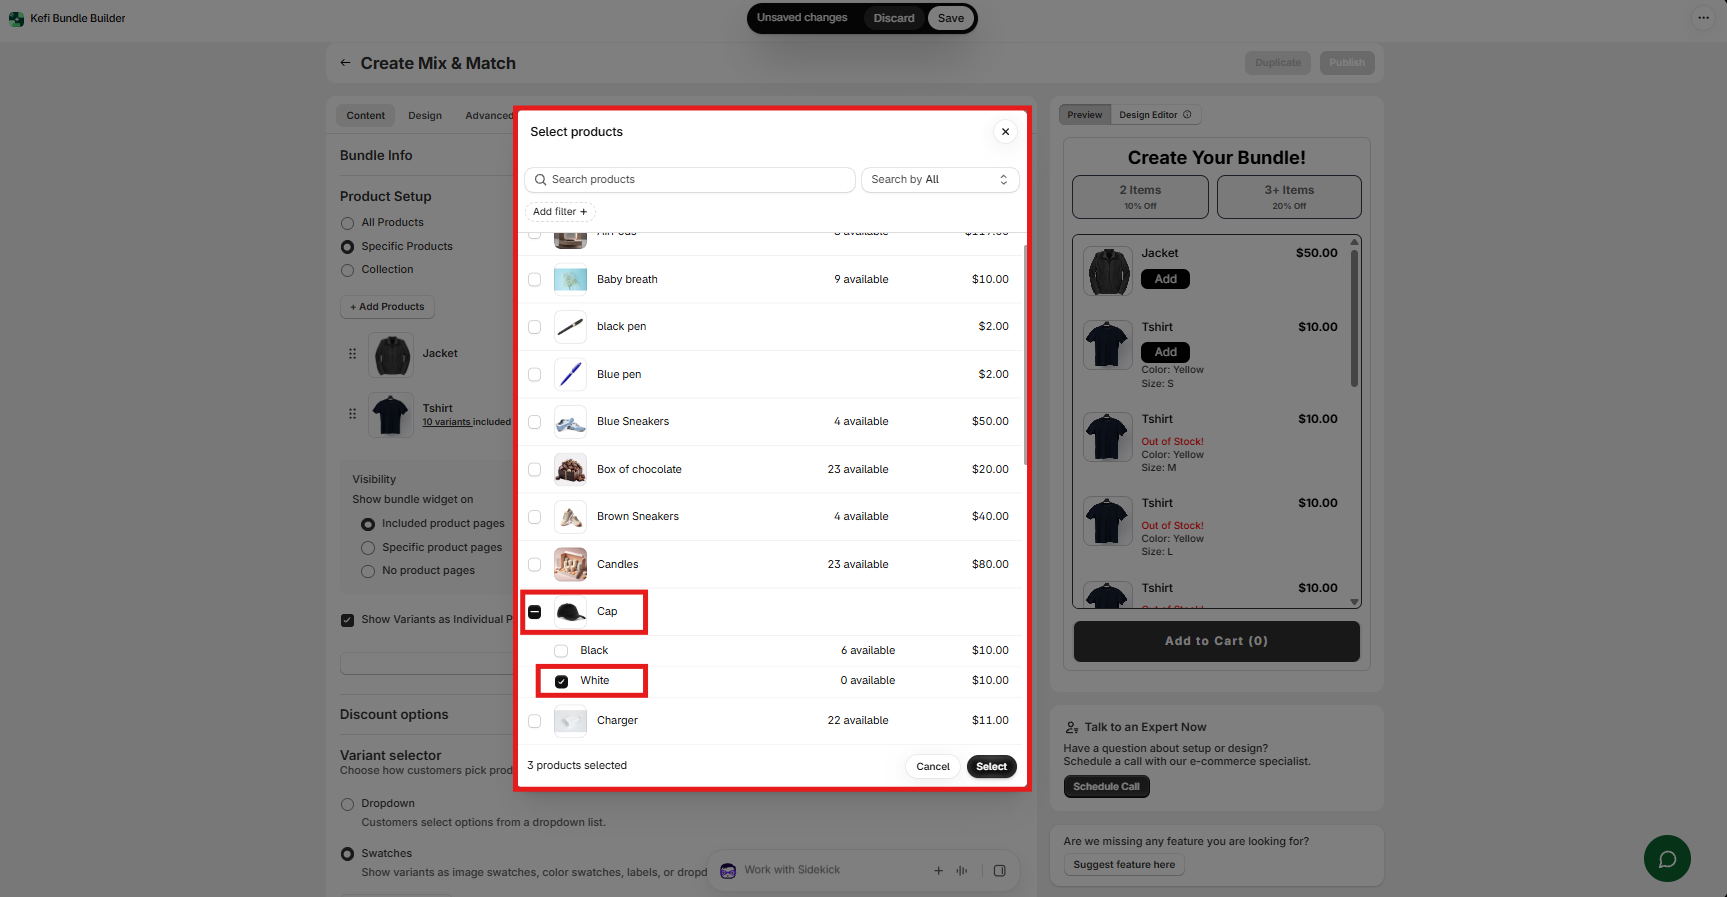
Variant-Level Product Selection

Instead of including all variants of a product, this feature gives you granular control by allowing you to choose specific individual variants—such as particular sizes, colors, or styles—directly during product selection. This ensures customers can only select from the exact variant options you want to make available in the bundle.
‍

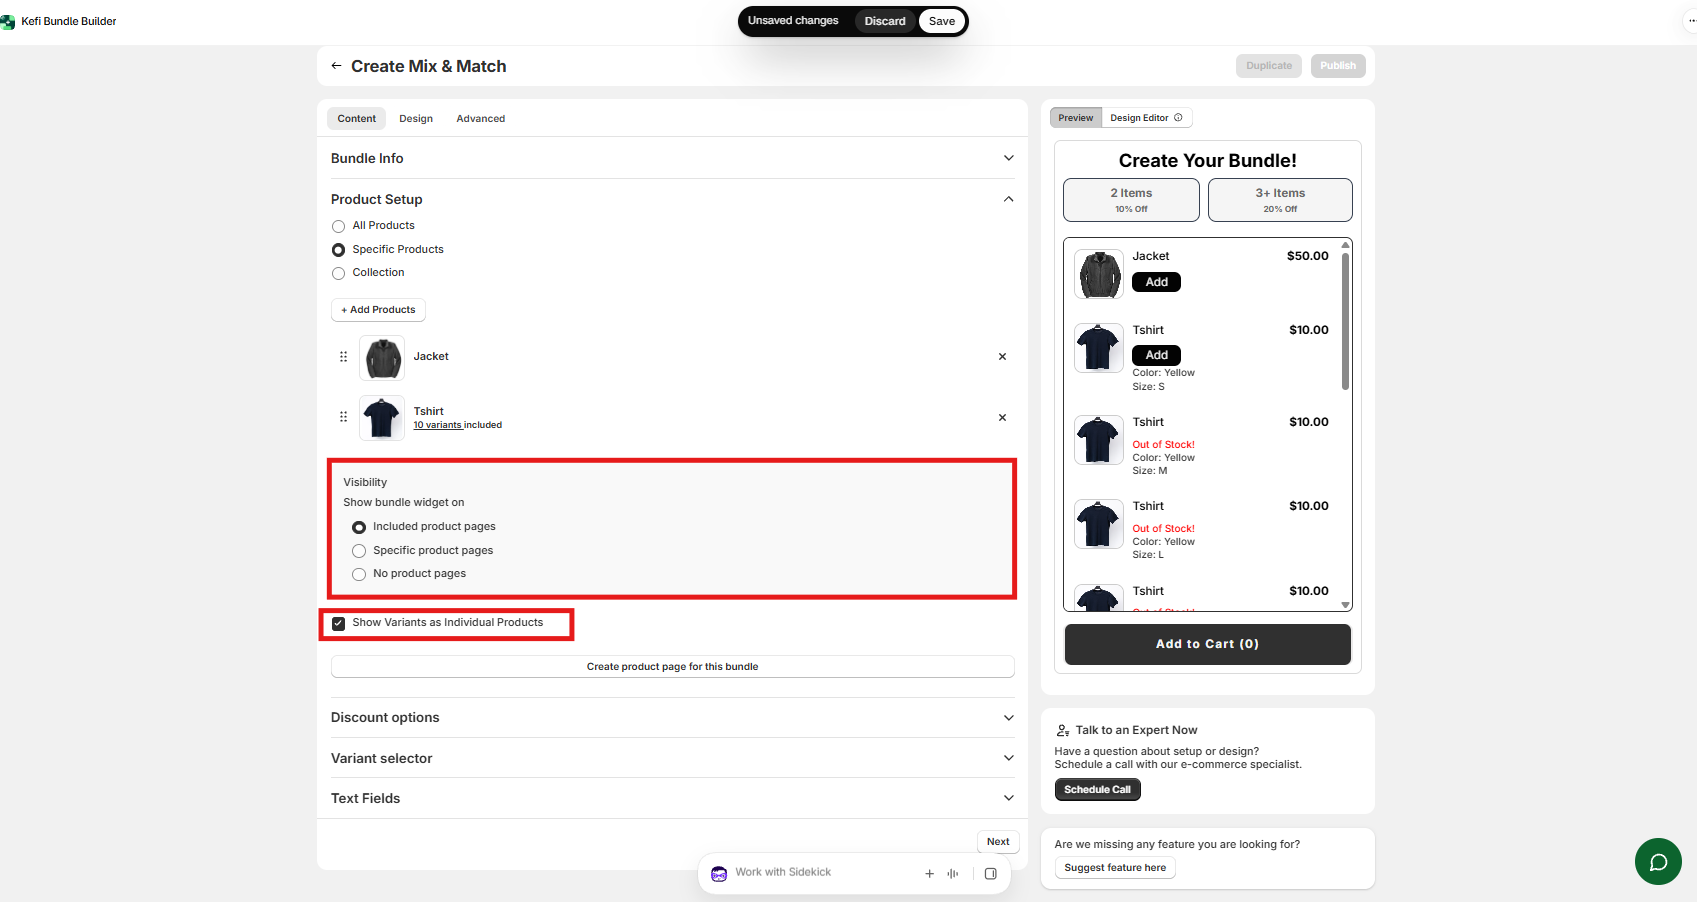
Widget Visibility Options

Decide where the Mix and Match bundle widget should appear:

  • On all included product pages – Display the bundle wherever the selected products are listed.
  • On specific product pages – Show the bundle only on chosen product pages for more control over placement.
  • No product pages – Hide the widget from product pages entirely (ideal if you only want to display or promote the bundle on custom/dedicated pages, cart drawers, or via direct links). 

Show Variants as Individual Products: Display each product variant (e.g., specific sizes or colors) as a separate item in the bundle selection rather than grouping them under a single product listing. 
‍

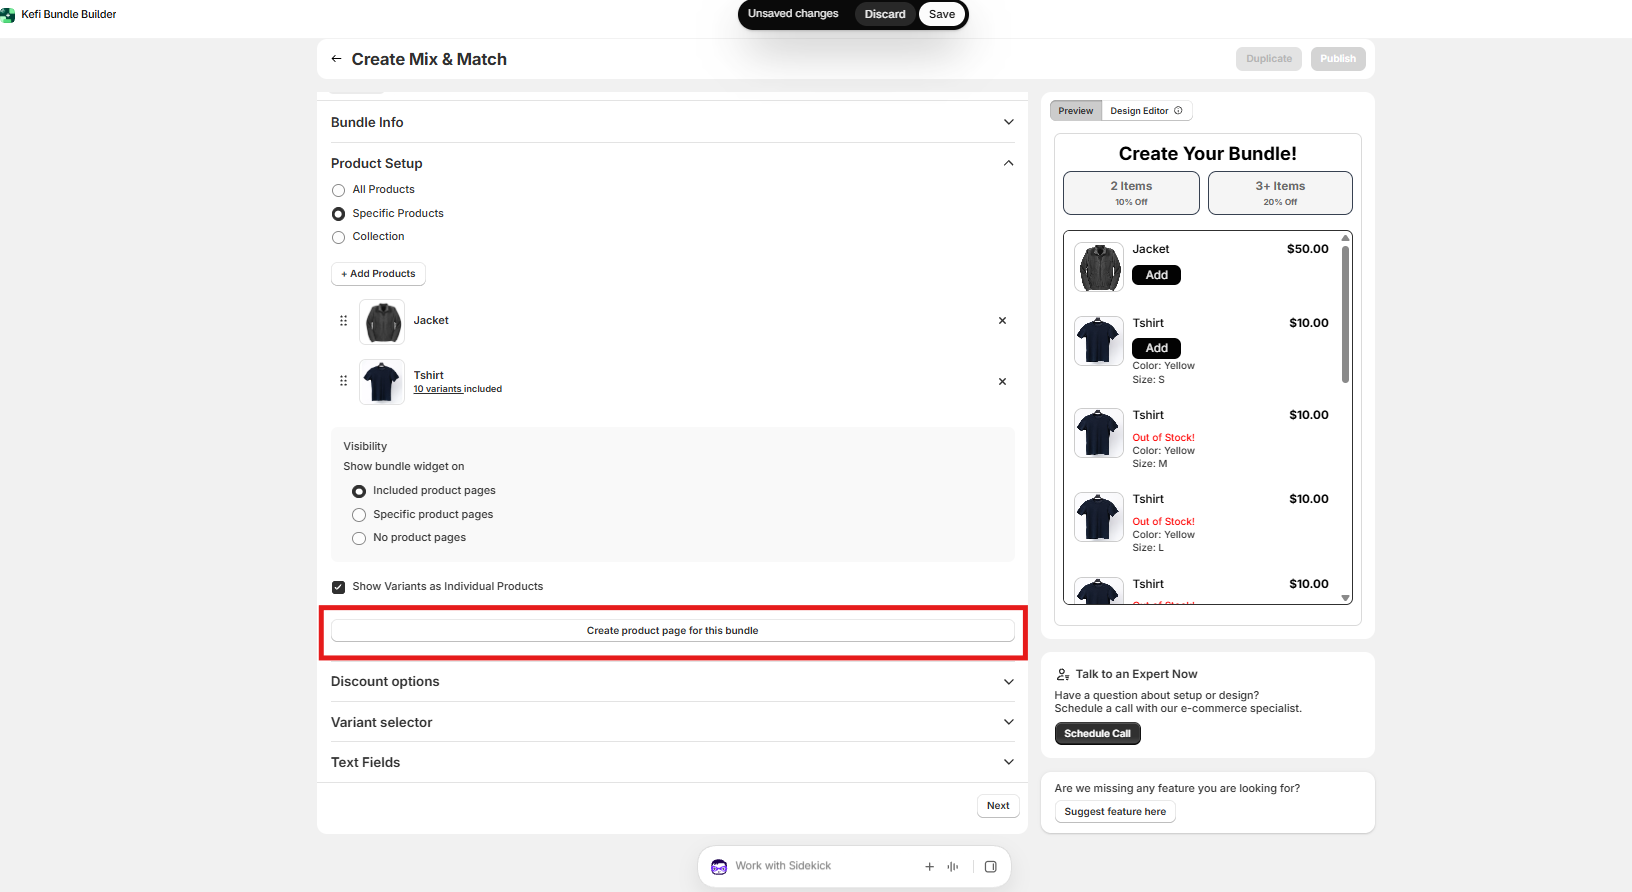
Create Product Page for This Bundle

Clicking the "Create product page for this bundle" button allows you to generate a dedicated, standalone product page in your Shopify store specifically for this bundle offer.

Instead of showing the Mix & Match widget on existing product pages, this feature creates a dedicated page complete with its own URL, product details, and marketing messaging—making it ideal for targeted campaigns, ad landing pages, or featured promotions.
‍

Once clicked, the button changes to "Edit product page for this bundle", opening customizable fields directly in your setup panel:
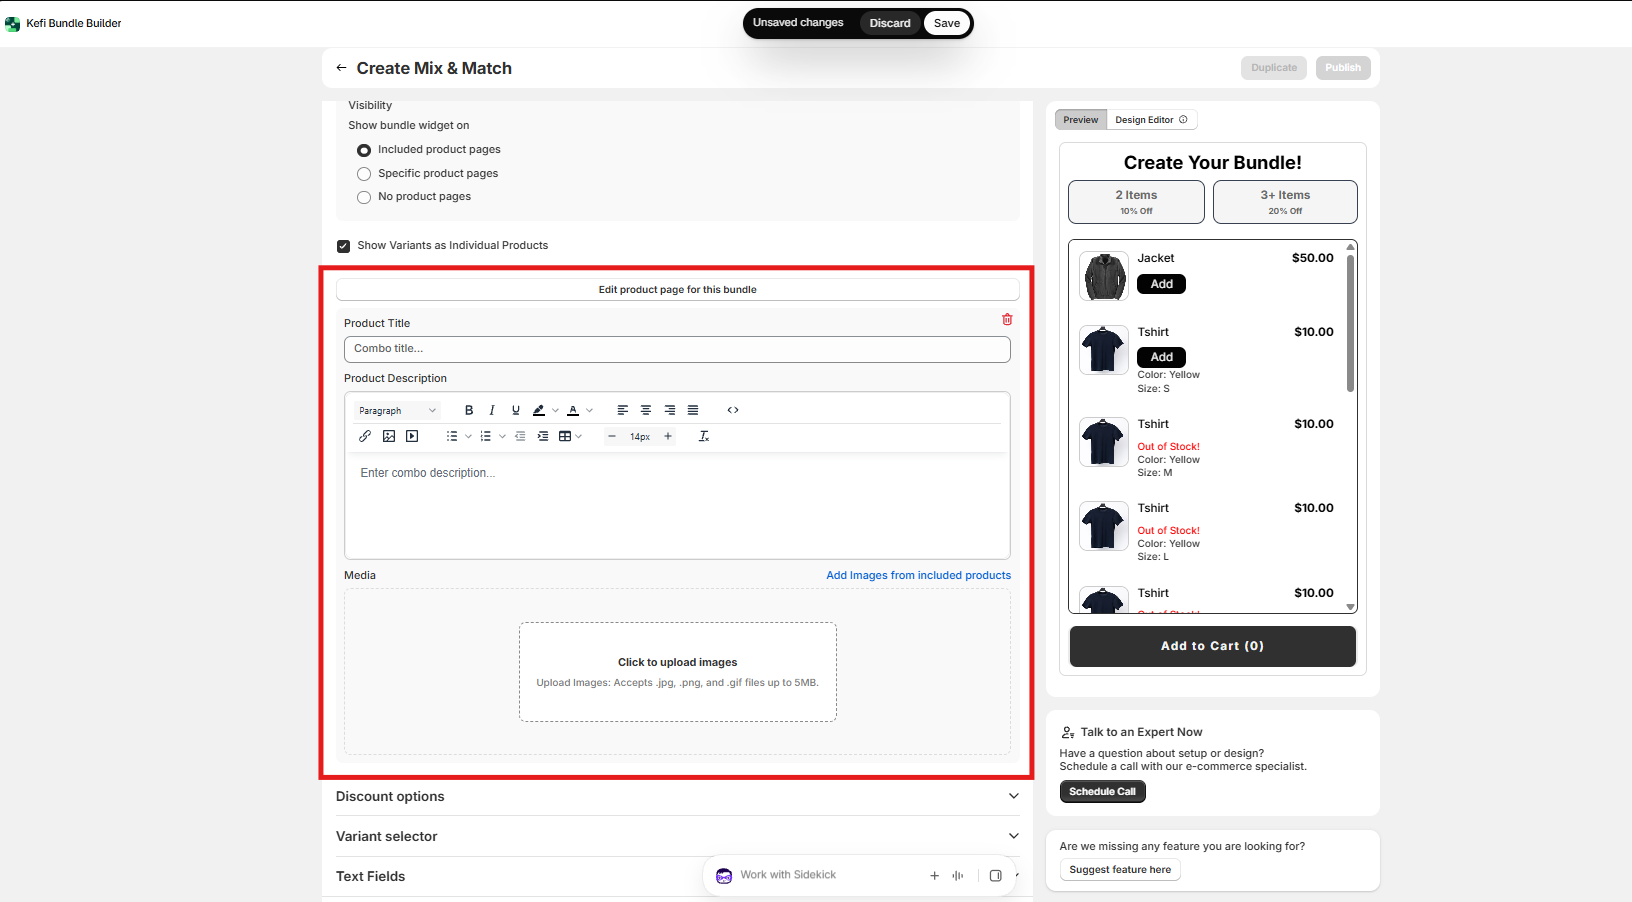
  • Product Title: Enter a custom title for the bundle (e.g., "Ultimate Winter Style Combo" or "Mix & Match Summer Pack").
  • Product Description: Provide detailed copy explaining what's included in the bundle, highlight savings, or add promotional details using the built-in rich text editor.
  • Media: Upload dedicated banner images or product graphics for the bundle page. You can also click "Add Images from included products" to instantly pull high-quality media directly from the selected bundle items.

‍

3. Discount Option

This section allows you to set up the discount for your Mix and Match Bundle. Choose the discount type that best suits your promotion strategy:

  • Percentage Discount – e.g., “Get 20% off when you buy 3 items.”
  • Fixed Amount Discount – e.g., “Save $10 on a bundle of 4 products.”
  • Fixed Bundle Price – Set a single price for the entire bundle, e.g., “Buy 5 T-shirts for $60.”
  • Without Discount – Let customers build bundles without any price reduction, ideal for personalization-only offers.

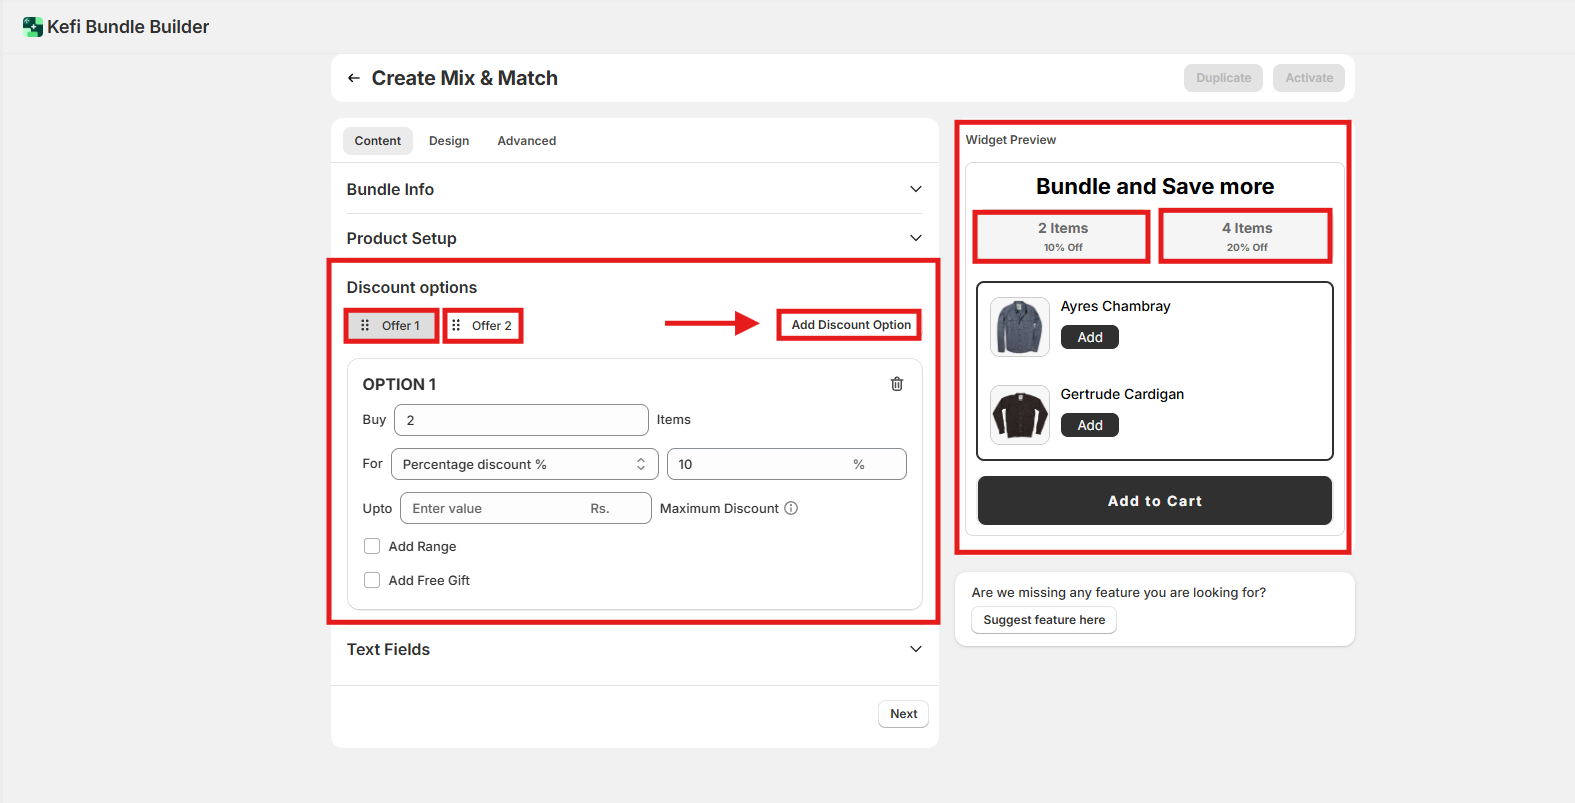
For this guide, we’ve created 2 percentage-based discount offers to demonstrate how tiered pricing works:

Offer 1: Buy 2 items – 10% Discount

Offer 2: Buy 4 items – 20% Discount

You can add additional discount tiers by clicking the “Add Discount Offer” button.
‍

Advanced options

Expand this section inside any discount offer tier to access additional settings for finer control over your promotions:
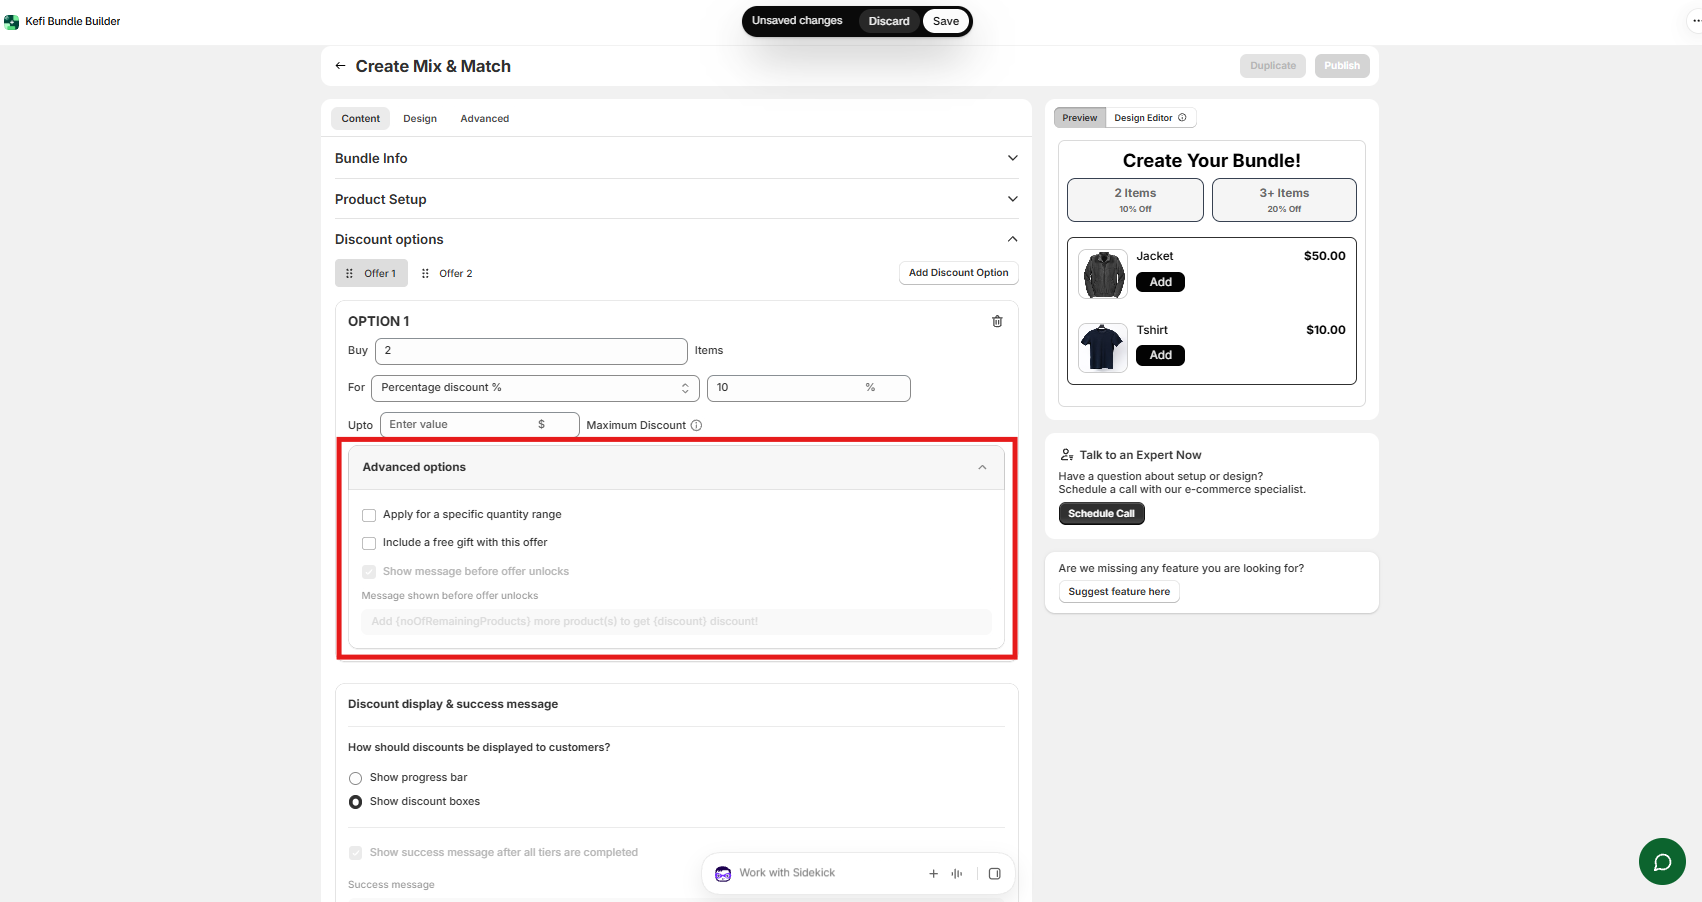
  • Apply for a specific quantity range – Set a maximum item limit for the discount offer so it applies strictly within a defined quantity window (e.g., Buy 2 to 3 items to get 10% off).
  • Include a free gift with this offer – Reward shoppers by automatically adding a complimentary item when they qualify for this specific offer tier.
  • Show message before offer unlocks – Display a motivational banner or prompt encouraging customers to meet the requirement.

‍

Discount display & success message

Configure how your discount offers and milestones are presented to shoppers inside the bundle widget.

Select your preferred display format to encourage customers to add more items to their bundle:
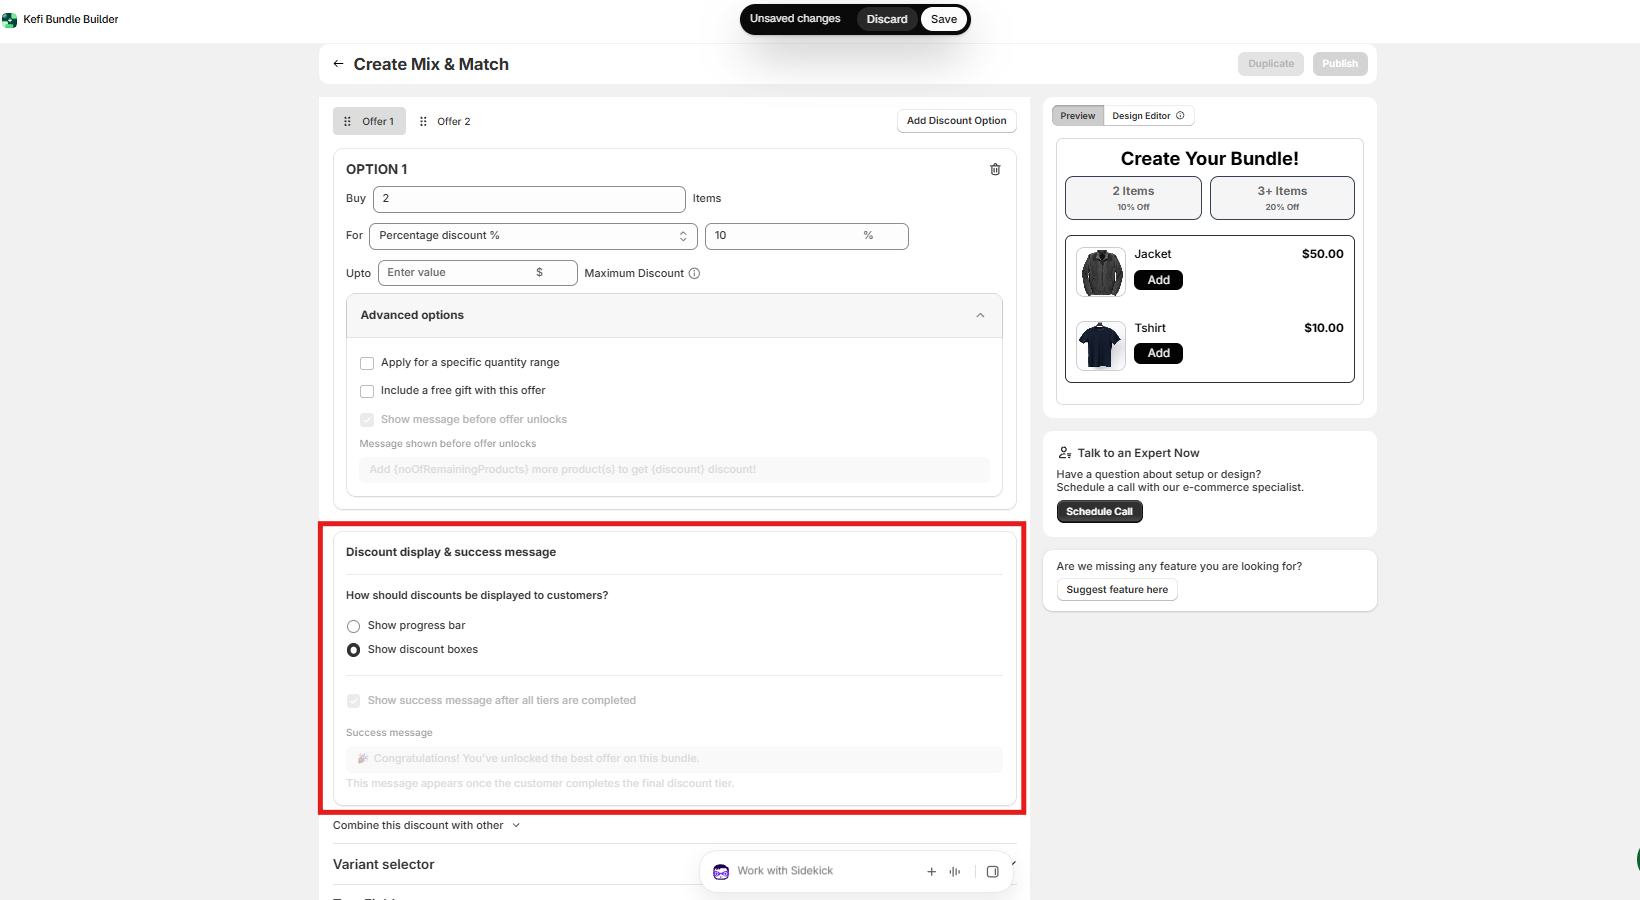
  • Show progress bar – Display a dynamic visual progress bar that updates as customers add products, showing them how close they are to unlocking the next discount tier.
  • Show discount boxes – Display clear, clickable/highlighted offer boxes representing each discount tier directly in the widget.

Success Message Settings

  • Show success message after all tiers are completed – Enable this option to trigger a celebratory notification once a shopper unlocks the maximum available discount tier.
  • Success message text – Customize the exact message displayed upon reaching the top tier (e.g., "Congratulations! You've unlocked the best offer on this bundle."). This message appears automatically as soon as the customer completes the final discount tier.

‍

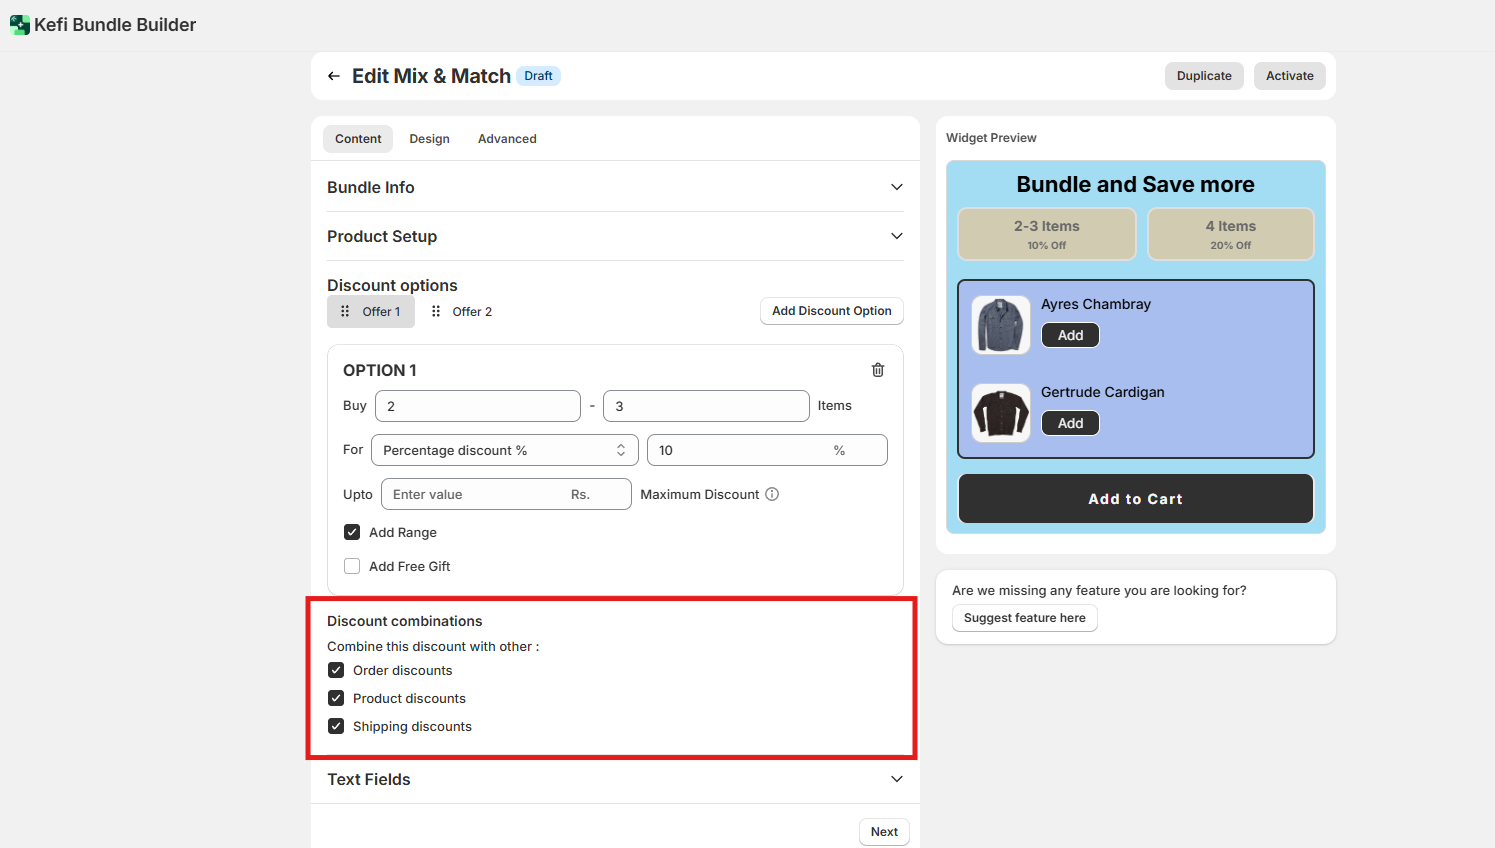
Combine this discount with other:

You can choose to combine your add-on discount with other types of discounts active in your store, including:

  • Order Discounts – Overall discounts applied to the total order value.
  • Product Discounts – Discounts applied to individual products in the cart.
  • Shipping Discounts – Reduced or free shipping offers applied at checkout.

This allows you to create more compelling promotions by layering multiple incentives for your customers.
‍

4. Variant selector

Choose how customers pick product options inside the bundle:
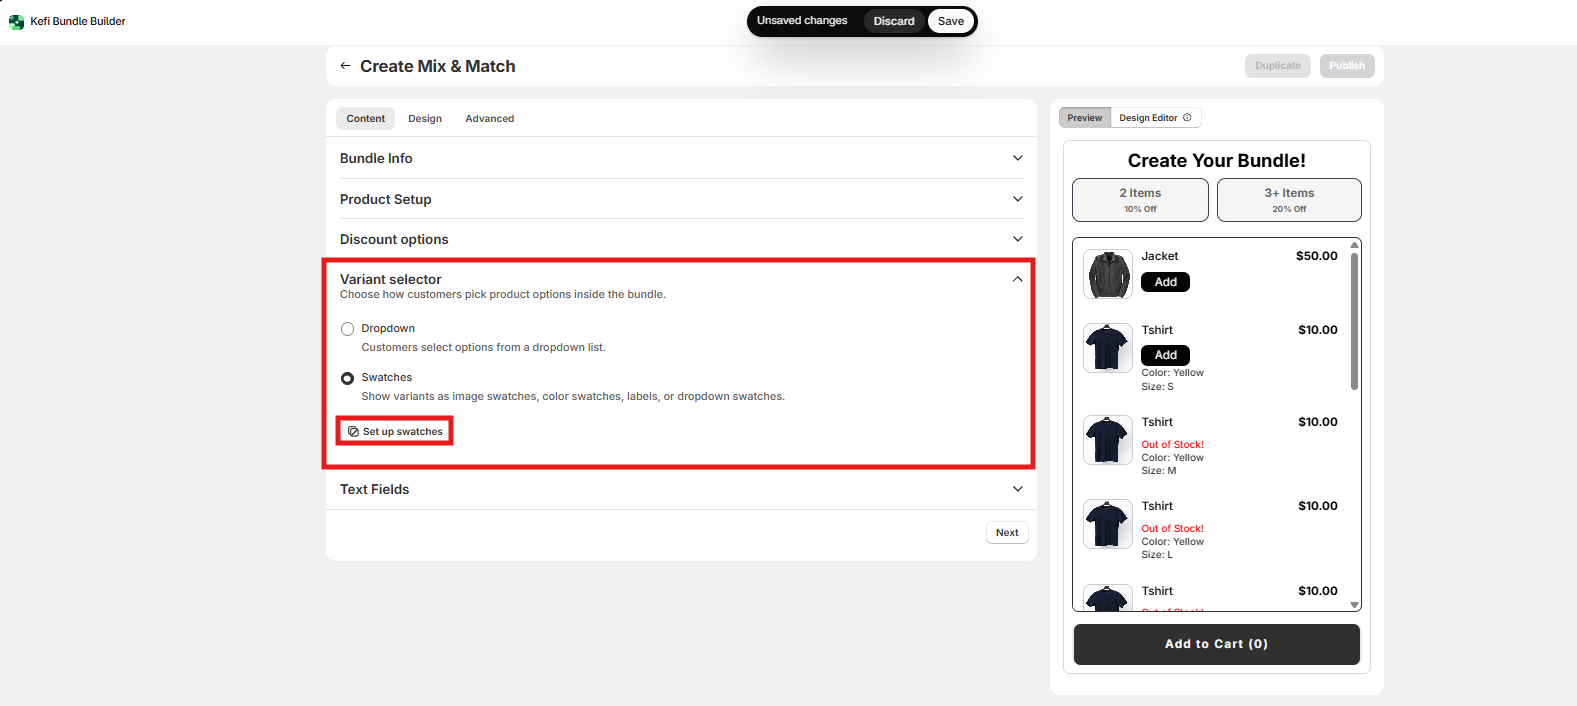
To further personalize how these options appear, click on Set up swatches. Here, you can customize the swatch layout, labels, and appearance—for example:
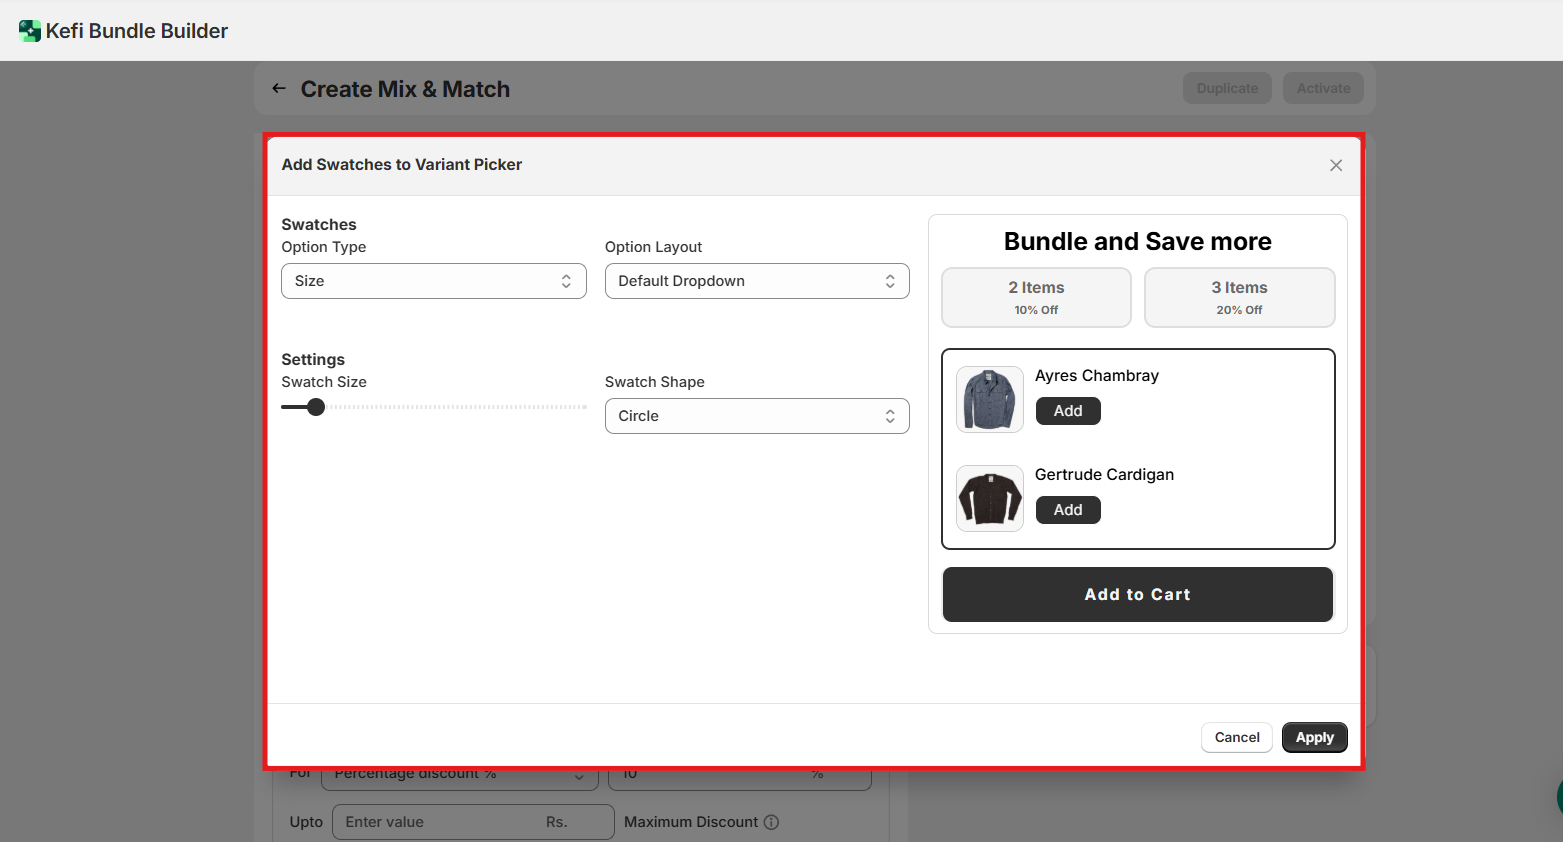
  • Swatches Option Type - Color, size
  • Option Layout
  • Swatch Size
  • Swatch Shape

5. Text Fields

This section allows you to customize all the text shown on the Mix and Match bundle widget. It’s perfect for aligning the language with your brand tone or translating content for different markets.

You can easily update key elements such as:

  • Options Text – Label for product choices
  • Footer Text – Summary or instructional message at the bottom
  • Free Text – Message for free gift offers 
  • Quantity – Labels for item quantities
  • Add Button – Text for adding products to the bundle
  • Add to Cart CTA – Main call-to-action button text

‍

Now , click on the “Next” button to proceed to the next section .

‍

After clicking the next you would be redirected to the next section that is Design

‍

Step 3: 

Design – Customize the Appearance of Your Bundle Widget

The Design section allows you to tailor the appearance of your bundle widget so it seamlessly matches your store’s branding and layout. A well-branded widget not only enhances visual appeal but also builds trust and improves the overall customer experience.

The customization options are grouped into three main categories:

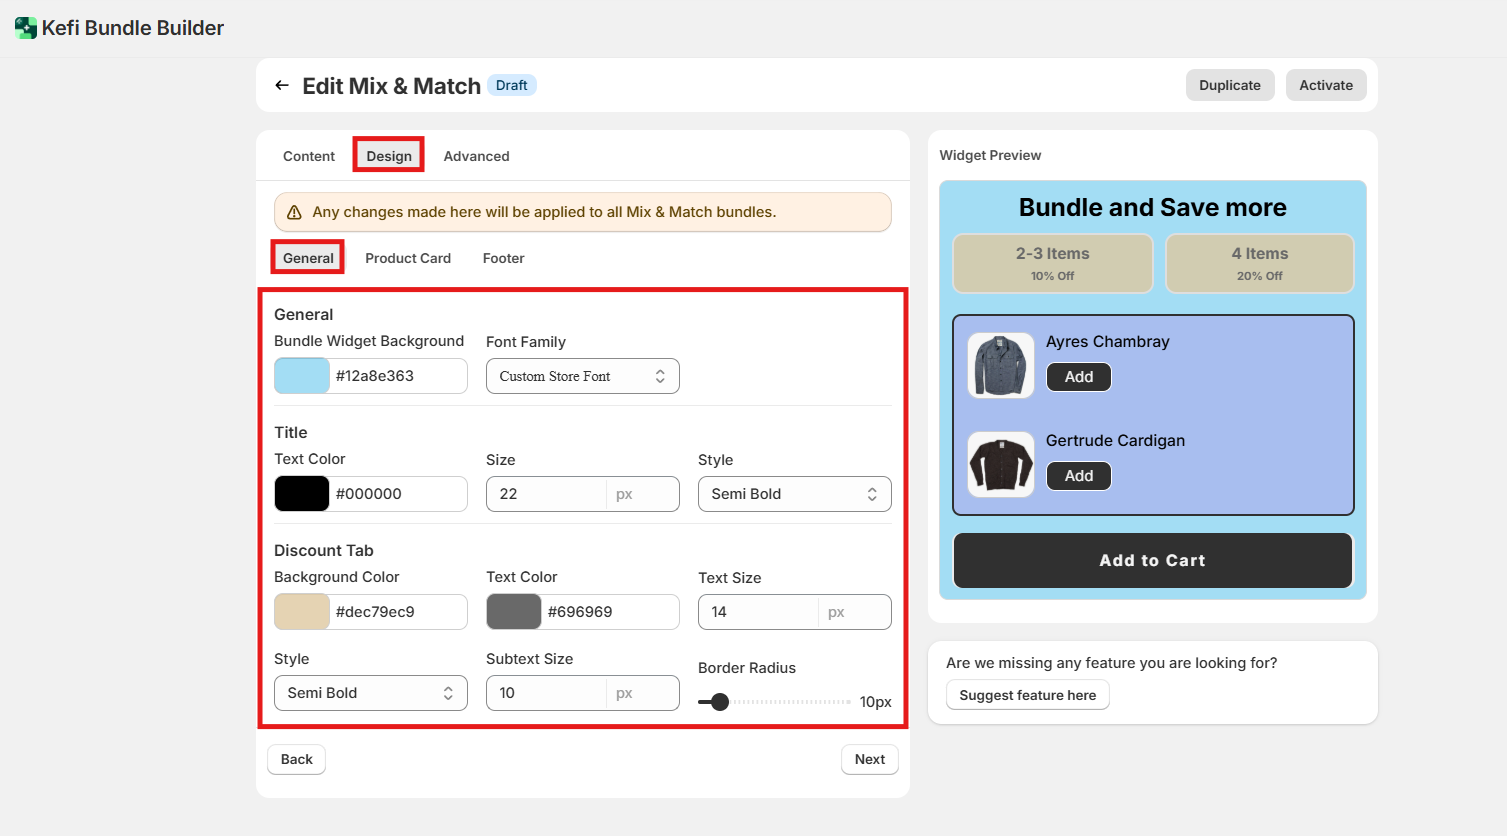
1. General Settings

These options control the overall look and feel of the widget container and key informational areas.

General

  • Bundle Widget Background – Set the background color of the main widget.
  • Font Family – Choose the font family to match your storefront’s typography.

Title

  • Text Color
  • Size
  • Style (e.g., bold, italic)

Discount Tab

  • Background Color
  • Text Color
  • Text Size
  • Style
  • Subtext Size
  • Border Radius

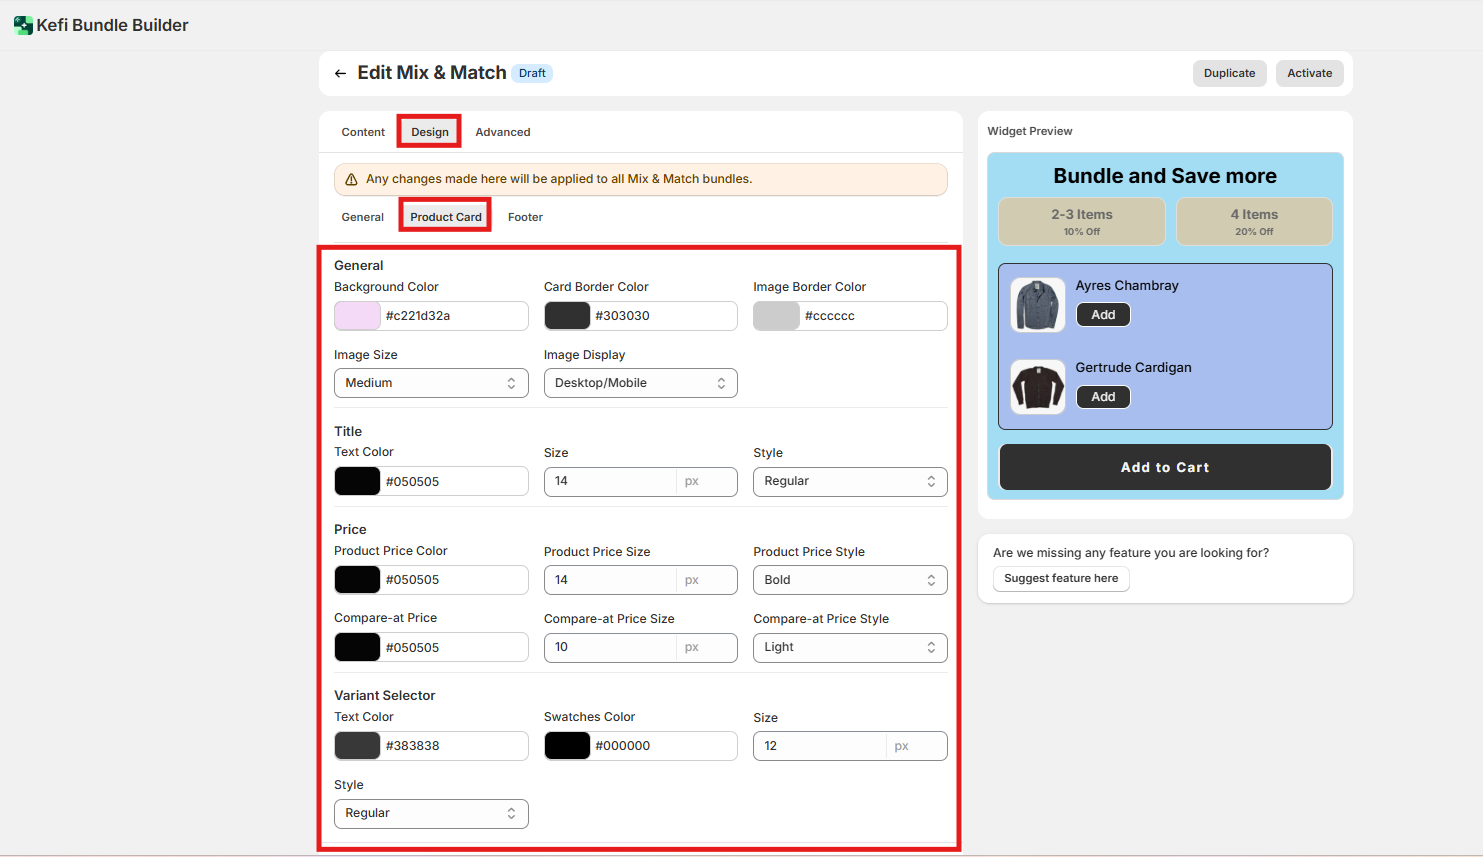
2. Product Card

Customize how individual product blocks appear within the bundle widget.

General

  • Background Color
  • Card Border Color
  • Image Border Color
  • Image Size – Choose the product image size (Small, Medium, Large).
  • Image Display – Set visibility: Desktop & Mobile, Desktop only, or None.

Title

  • Text Color
  • Size
  • Style

Price

  • Product Price Color
  • Product Price Size
  • Product Price Style

Compare-at Price

  • Compare-at Price Size
  • Compare-at Price Style

Variant Selector

  • Text Color
  • Swatches Color
  • Size
  • Style

3. Footer

Style the final section of the bundle widget where pricing details and the Add to Cart button appear.

Total Section

  • Background Color
  • Text Color
  • Total Text Size
  • Total Text Style
  • Price Size
  • Price Style

Add to Cart Button

  • Background Color
  • Text Color
  • Size
  • Style
  • Border Radius

‍

These design settings allow you to fully customize your bundle widget's look—ensuring it feels like a natural part of your storefront, both visually and functionally.

‍

Now , click on the “Next” button to proceed to the next section .

‍

After clicking the next you would be redirected to the next section that is “Advance”

‍

Step 4: 

Advanced Settings - The Advanced section gives you greater control over when, where, and to whom the bundle widget is shown. These settings are useful for precise targeting and scheduling. Let’s dive into each option:

‍

1. Widget Position

By default, the widget will appear below the Add to Cart button.

To change its position, open the Shopify Theme Editor, and simply drag the app block to your preferred location on the product page - no coding required.

‍

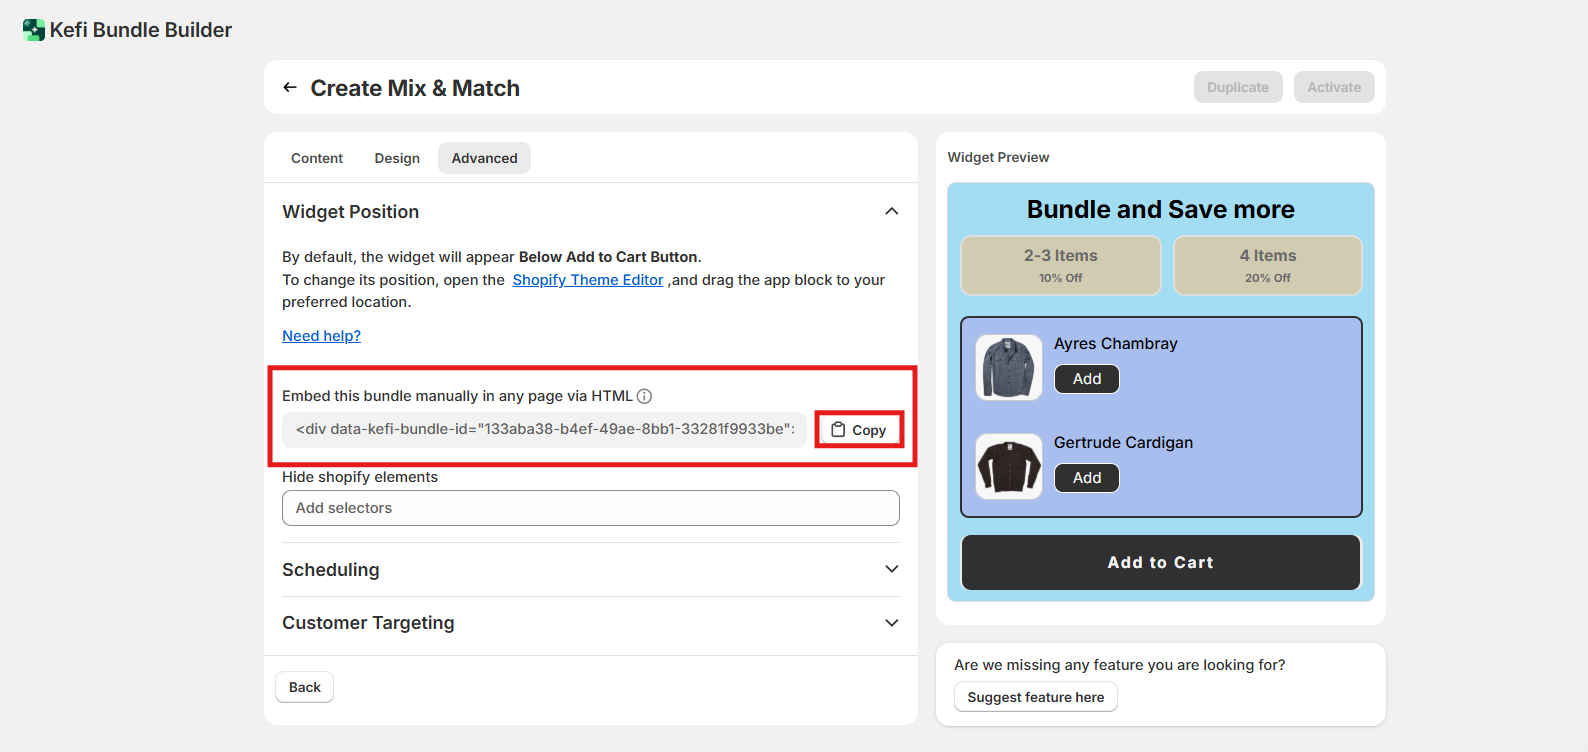
Embed Bundle via HTML

You can also embed this bundle manually on any page using HTML.

Display the bundle wherever you like by placing the provided HTML tag directly into your theme file.
‍

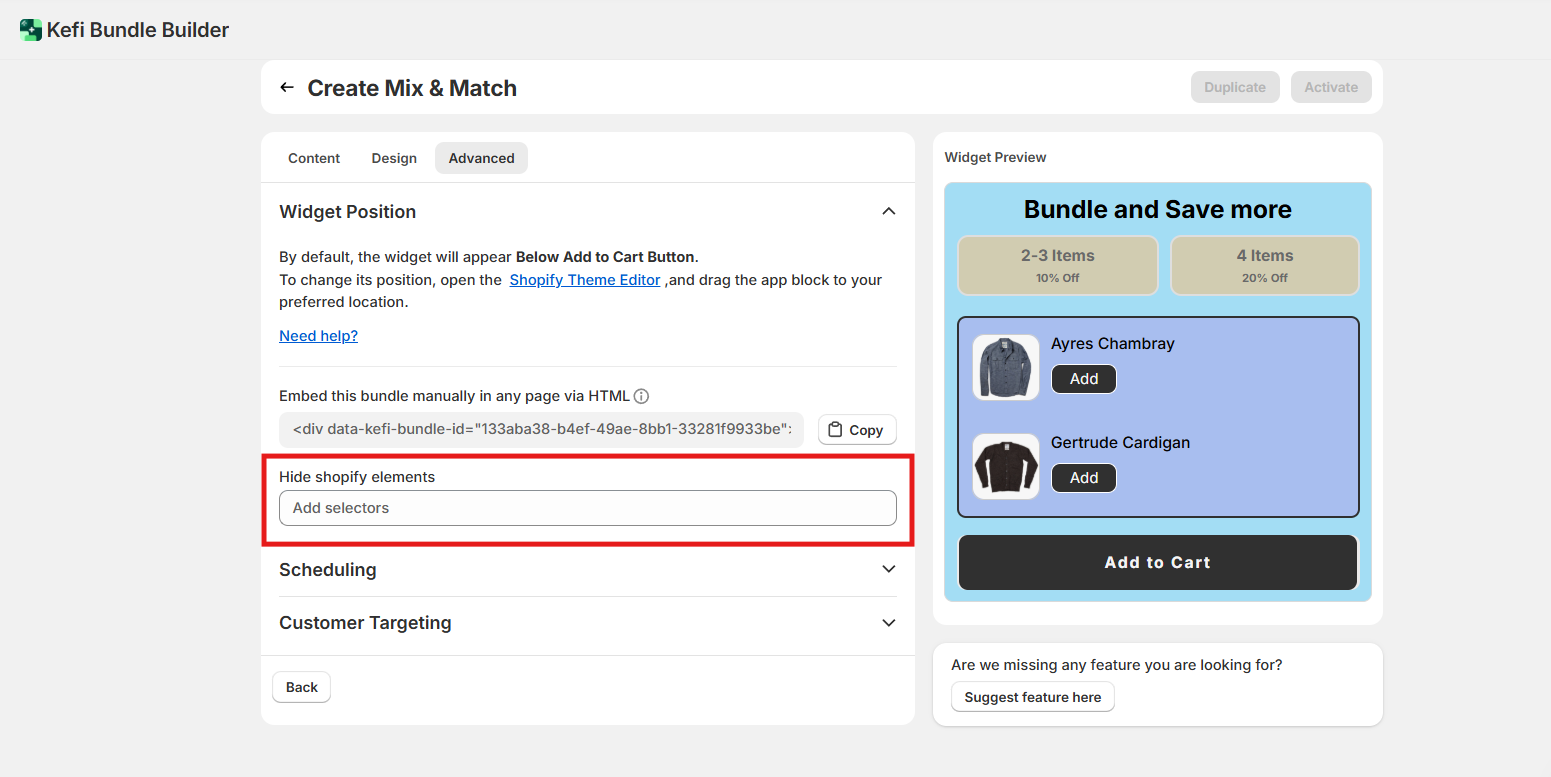
Hide Shopify Elements

You have the option to hide specific Shopify elements (like the default Add to Cart button or product price) to reduce redundancy when showing bundles.

Simply enter the CSS selectors of the elements you'd like to hide.

 For example:

  • .product__price
  • .product-form__buttons

This helps create a cleaner, more focused layout around your bundle widget.
‍

‍

For a detailed step-by-step guide, refer to this help article:

How to Position Bundles on Your Product Page

‍

2. Product Settings

Fine-tune how products display, calculate discounts, and behave inside your bundle widget using the following tabs:

1. Visibility
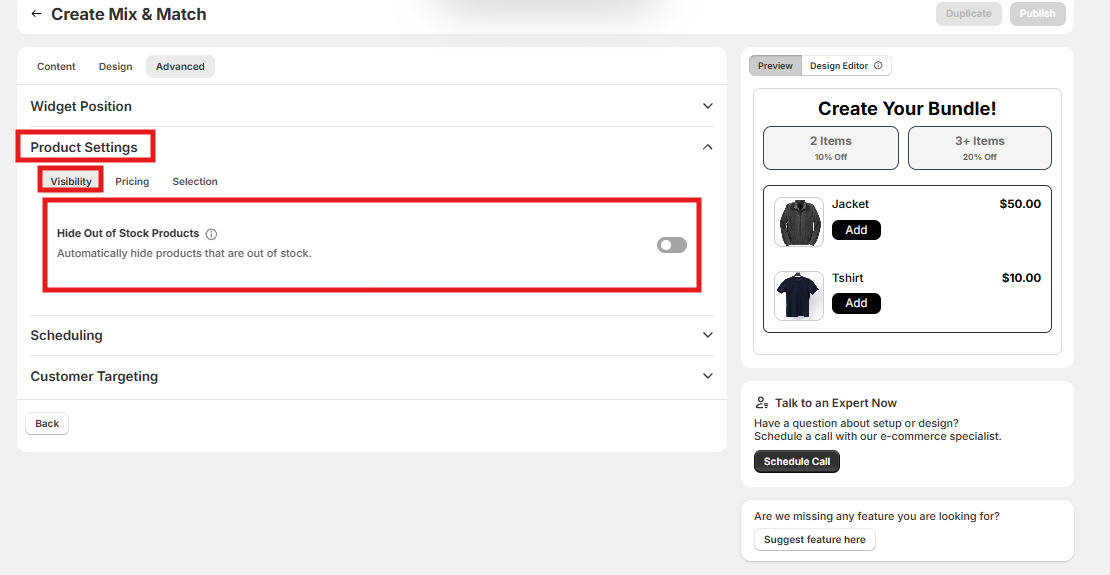
  • Hide Out of Stock Products – Enable this toggle to automatically hide any products that are currently out of stock from appearing in the bundle widget.

‍

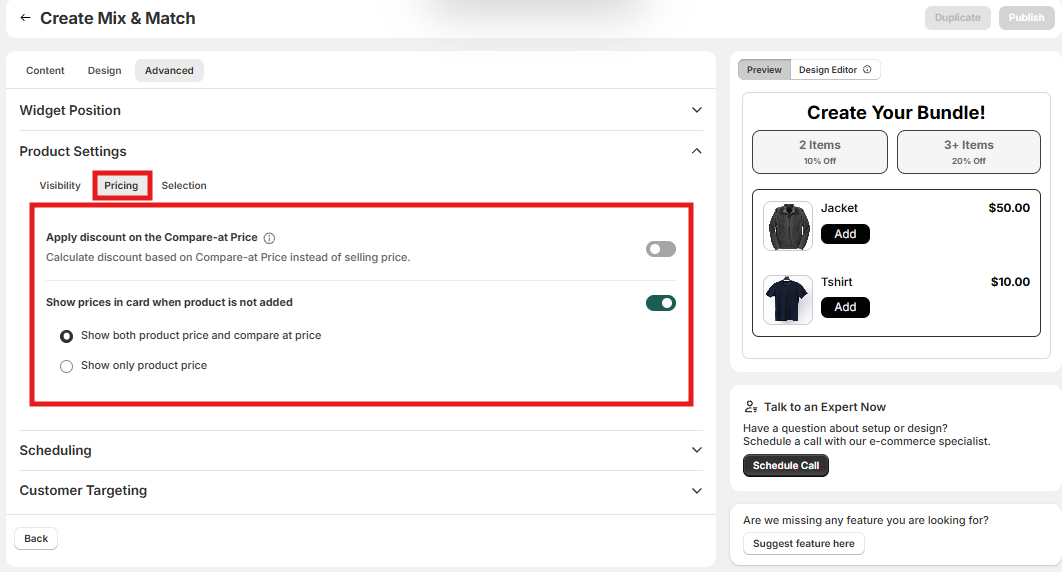
2. Pricing

  • Apply discount on the Compare-at Price – Toggle this on to calculate the bundle discount based on each item's Compare-at Price rather than its regular selling price.
  • Show prices in card when product is not added – Choose how price information displays on product cards before a customer adds them to the bundle:
    • Show both product price and compare at price – Display the discounted price alongside the original strike-through price.
    • Show only product price – Display only the current product price.

‍

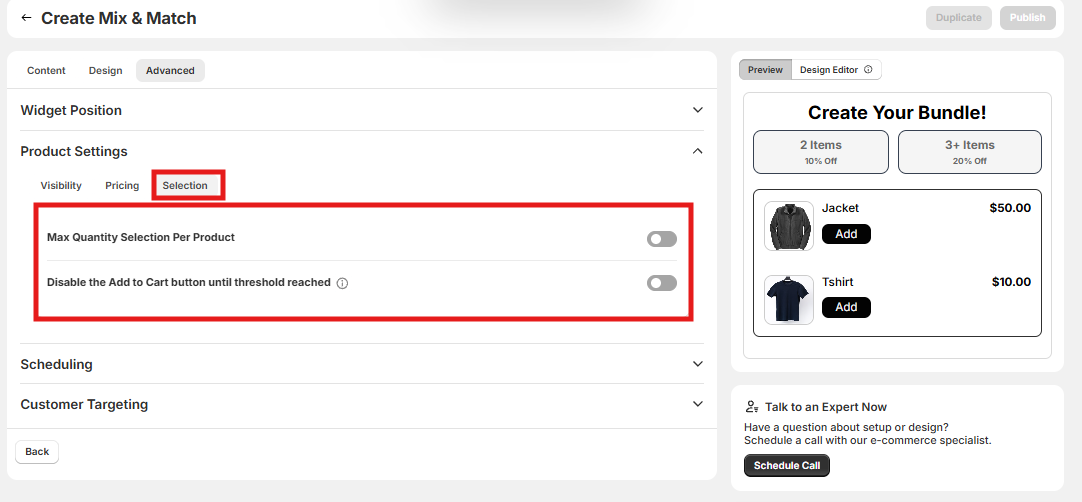
3. Selection

  • Max Quantity Selection Per Product – Set a cap on the maximum quantity of a single product a customer can add to the bundle.
  • Disable the Add to Cart button until threshold reached – Prevent customers from adding the bundle to their cart until they satisfy the required minimum product threshold.

‍

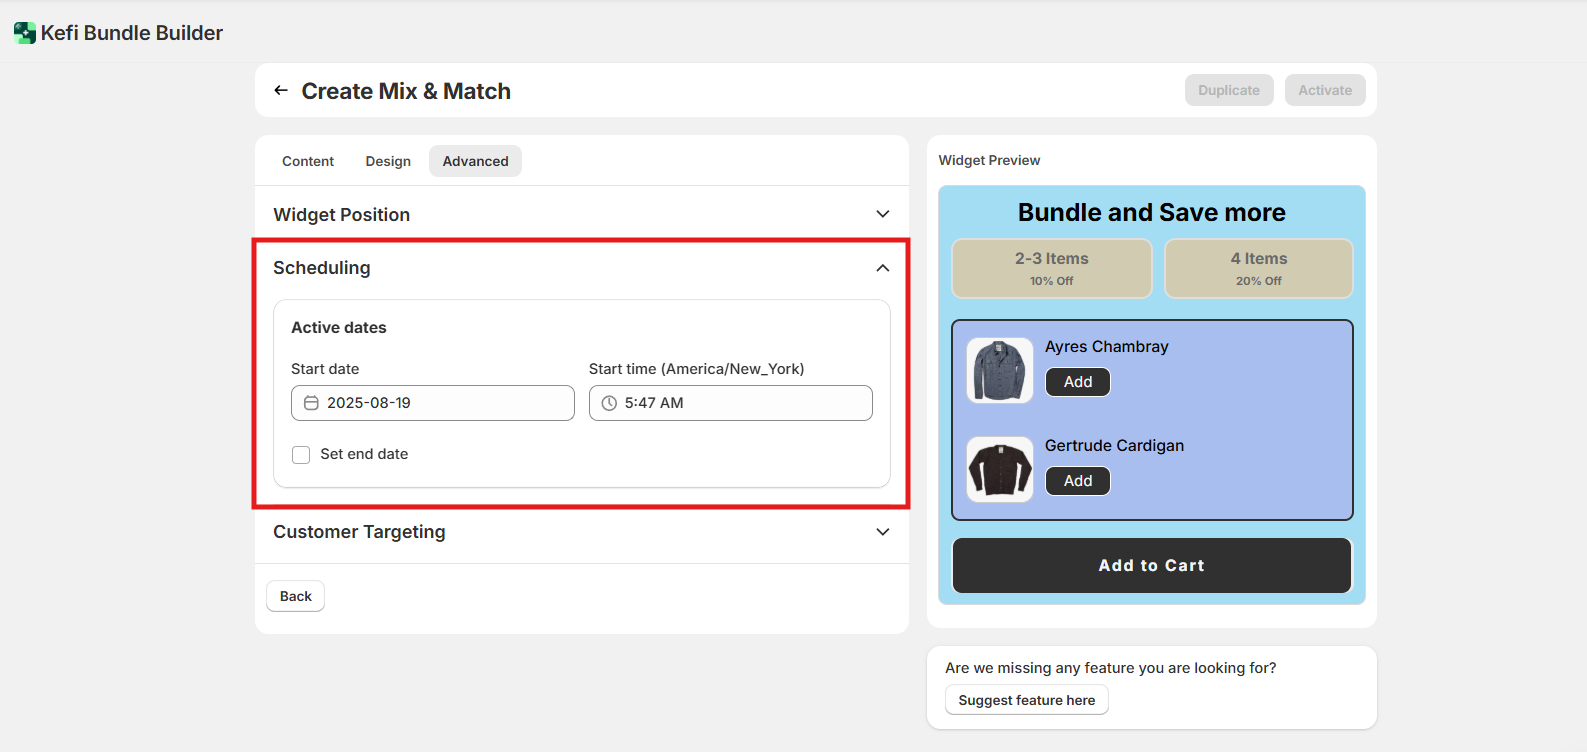
3. Scheduling

Set a start and end date for your bundle campaign. This is perfect for time-sensitive promotions, seasonal offers, or flash sales. The widget will only display during the defined period.
‍

‍

4. Customer Targeting

Control who sees the bundle by targeting:

  • All customers
  • Specific customer segment

‍

‍

In case of Specific Customer Segment -
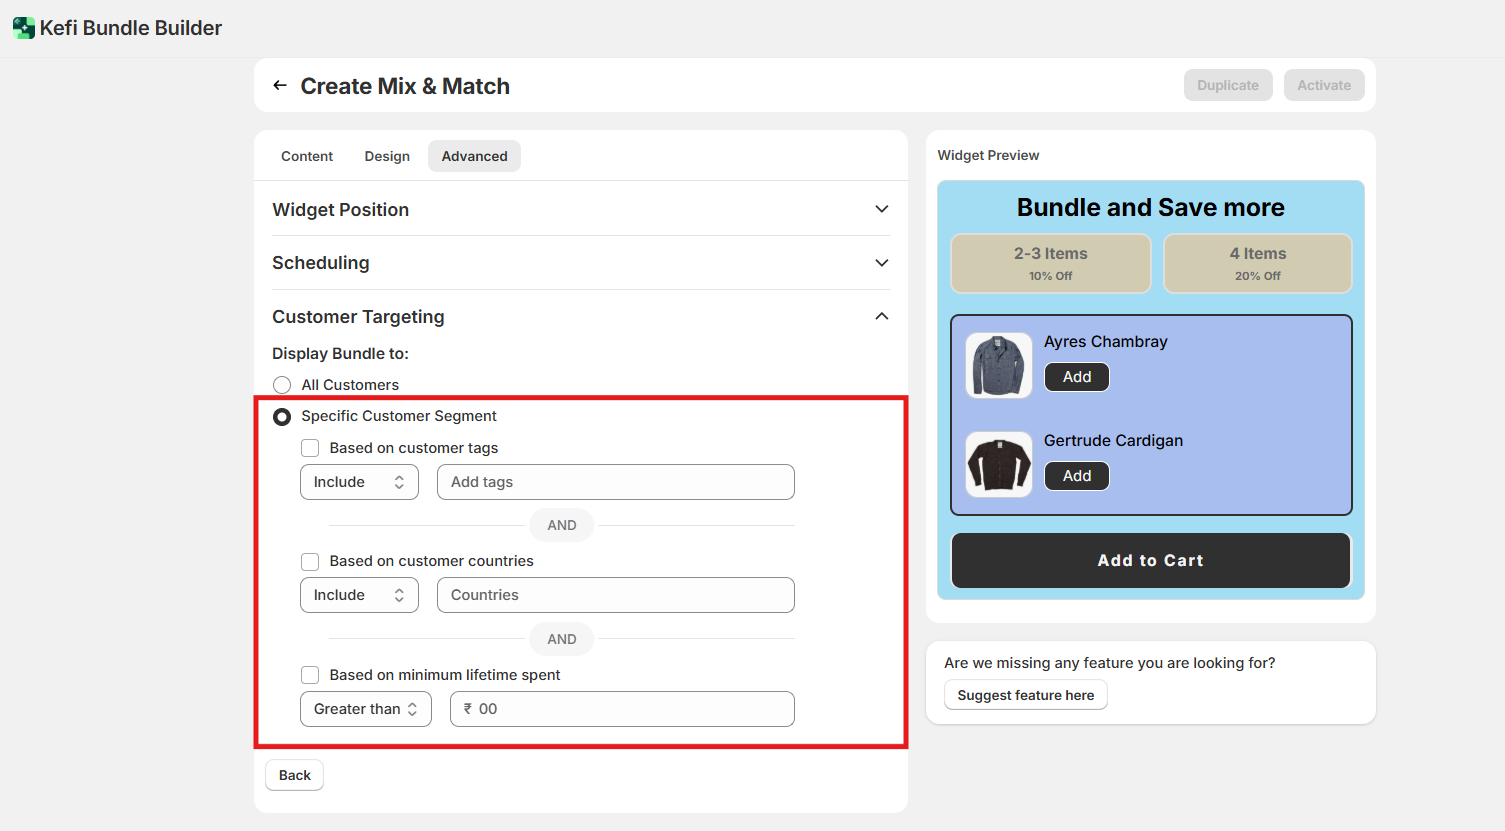
  • Customer Tags - Show bundles only to users with certain Shopify tags (e.g., “VIP”, “Loyal”). You can include/exclude based on tags.
  • Customer Countries - Limit bundle visibility by geographic region — useful for country-specific offers or regulations. You can include/exclude based on countries.
  • Minimum Lifetime Spend - Display bundles only to customers who’ve spent above or less than a set threshold.

‍

STEP 5 

Click on “Save” button to save all the changes

‍

‍

STEP 6:

‍

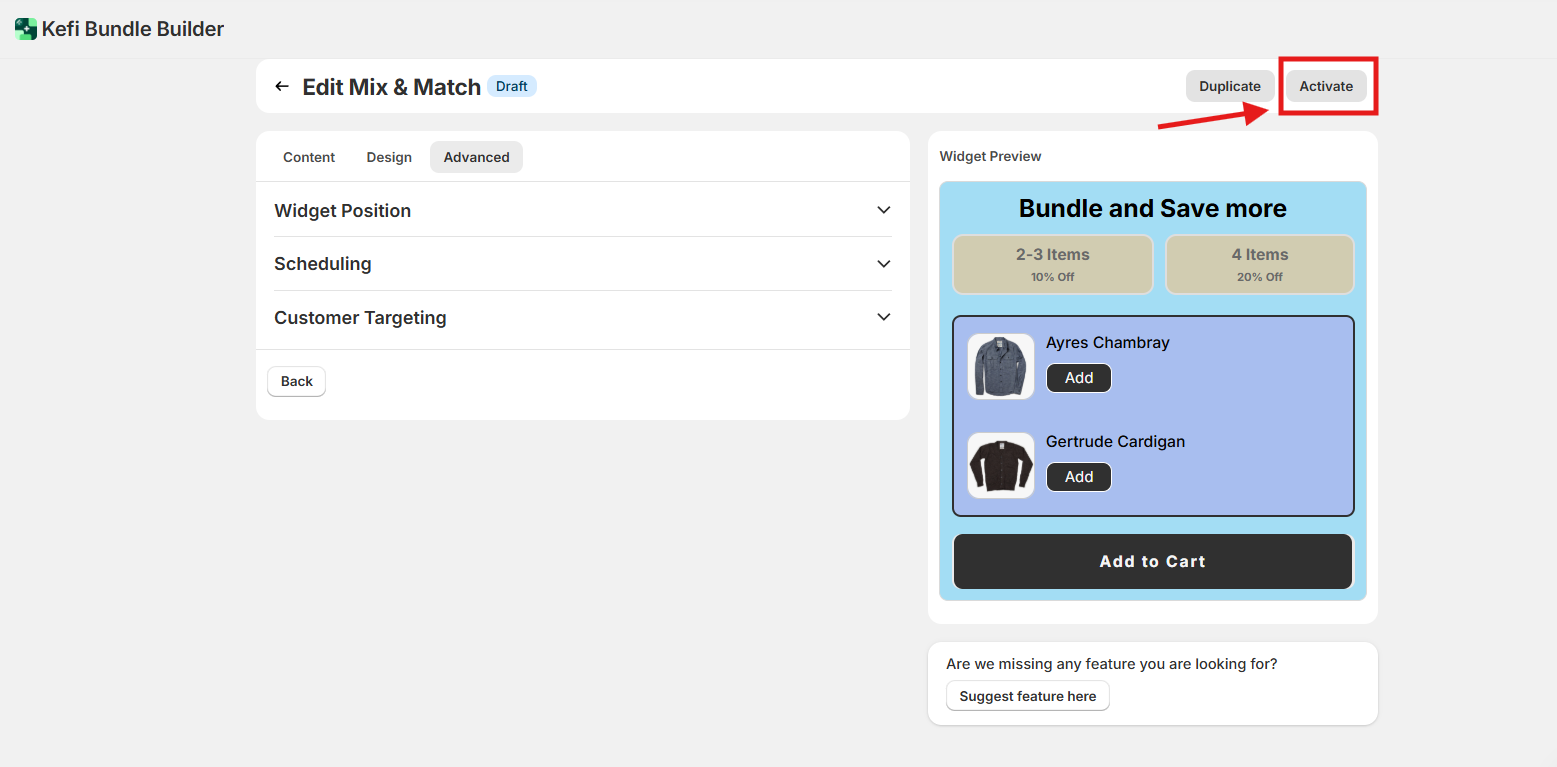
Click on “Activate” to activate the widget on your shopify store(make sure you have enabled the core snippet button in order to see the bundles on your store).
‍

‍

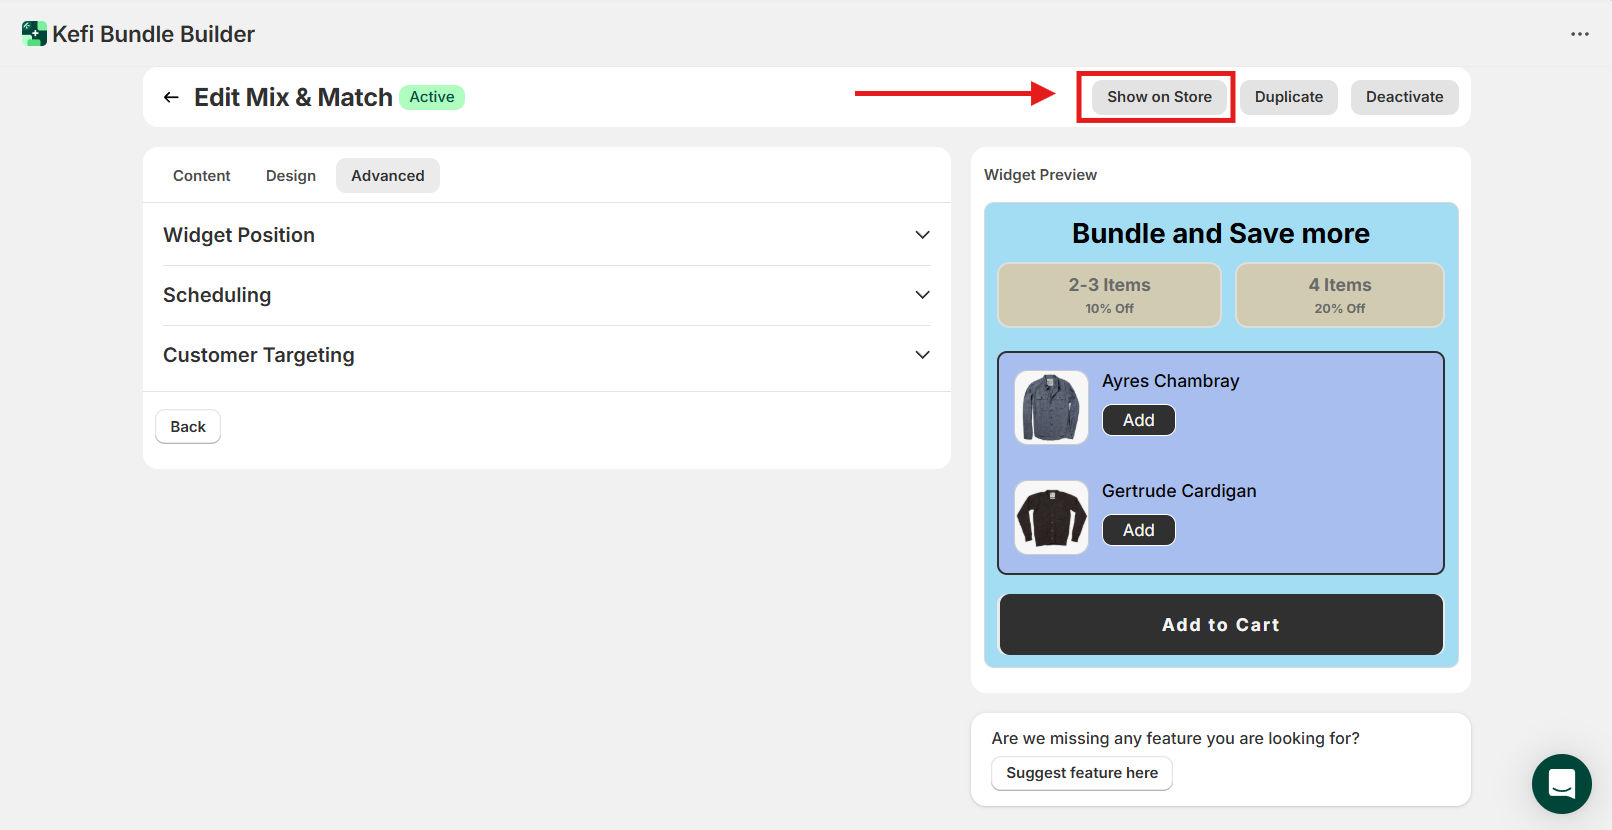
Your Mix and Match Bundle is Now Live! Click the “Show on Store” button to Preview the bundle as it appears to your customers
‍

‍

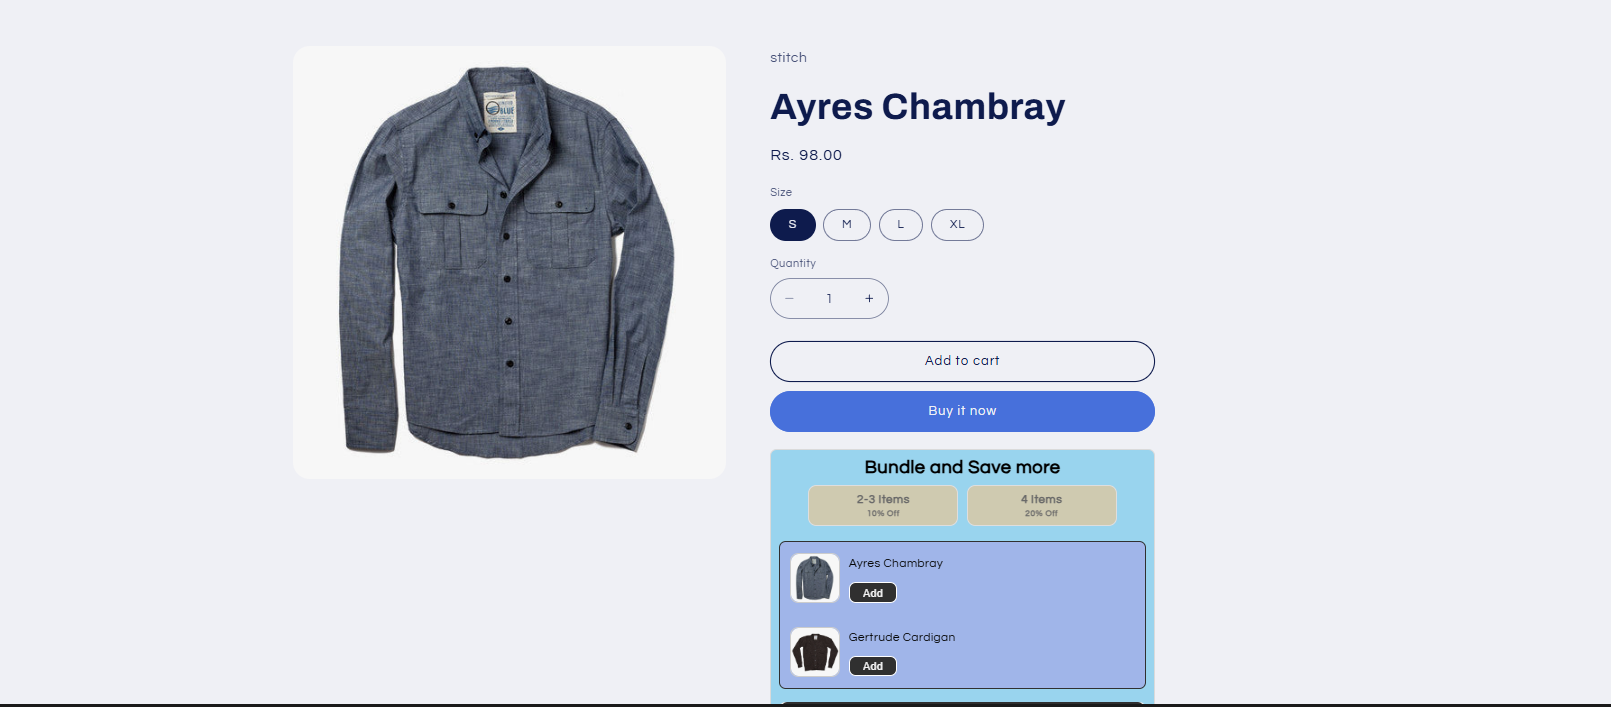
Now, head over to your storefront to see the Mix and Match Bundle live in action.
‍

‍

Need Help?

If you have any questions or need assistance, feel free to contact us:

  • Live Chat: Available via the Kefi Bundles app or website.
  • Email: wecare@keficommerce.com

‍