In a world where personalization drives purchasing decisions, giving customers the ability to curate their own product bundles can be a game-changer. The Build Your Own Box(Bundle Builder) allows shoppers to mix and match items based on their preferences—whether it's choosing favorite flavors, assembling themed gift sets, or crafting the perfect outfit. This interactive shopping experience not only delights customers but also boosts average order value and reduces product returns.
From picking out a custom toy box filled with games, crafts, and surprises to designing a personalized spa gift set with soaps, lotions, and candles—the Build Your Own Box tool transforms a standard shopping journey into a fun, engaging experience tailored to individual needs.
Use Case: Build Your Own Box for Personalized Shopping
Offering a Build Your Own Box option helps merchants stand out in a crowded market by:
Key Features of the Bundle Builder
Here are the standout capabilities that make this feature so effective:
Now that you understand what the Build Your Own Box (Bundle Builder) is and why it’s beneficial, let’s walk through how you can set it up.
How to Setup your Build your own Box (Bundle Builder)
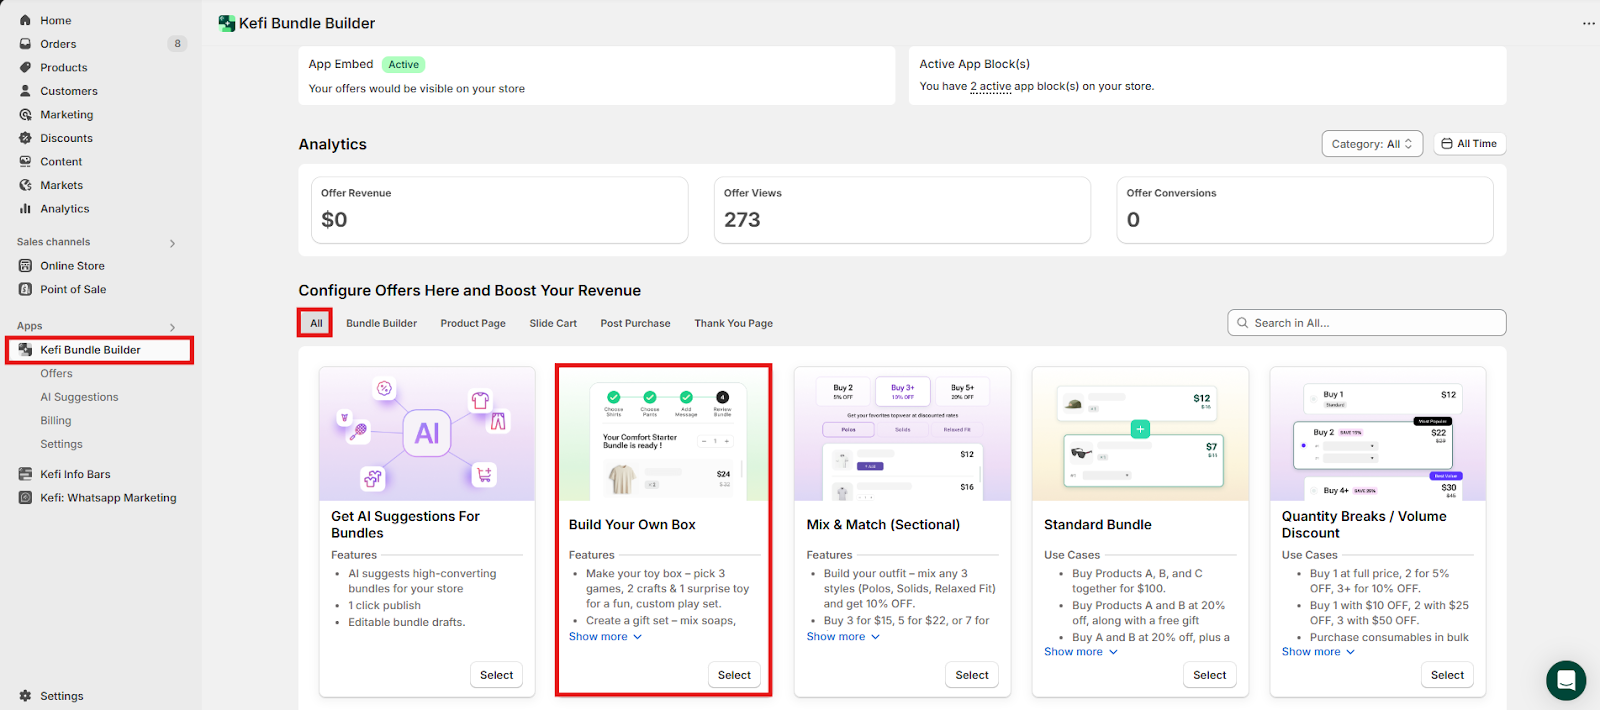
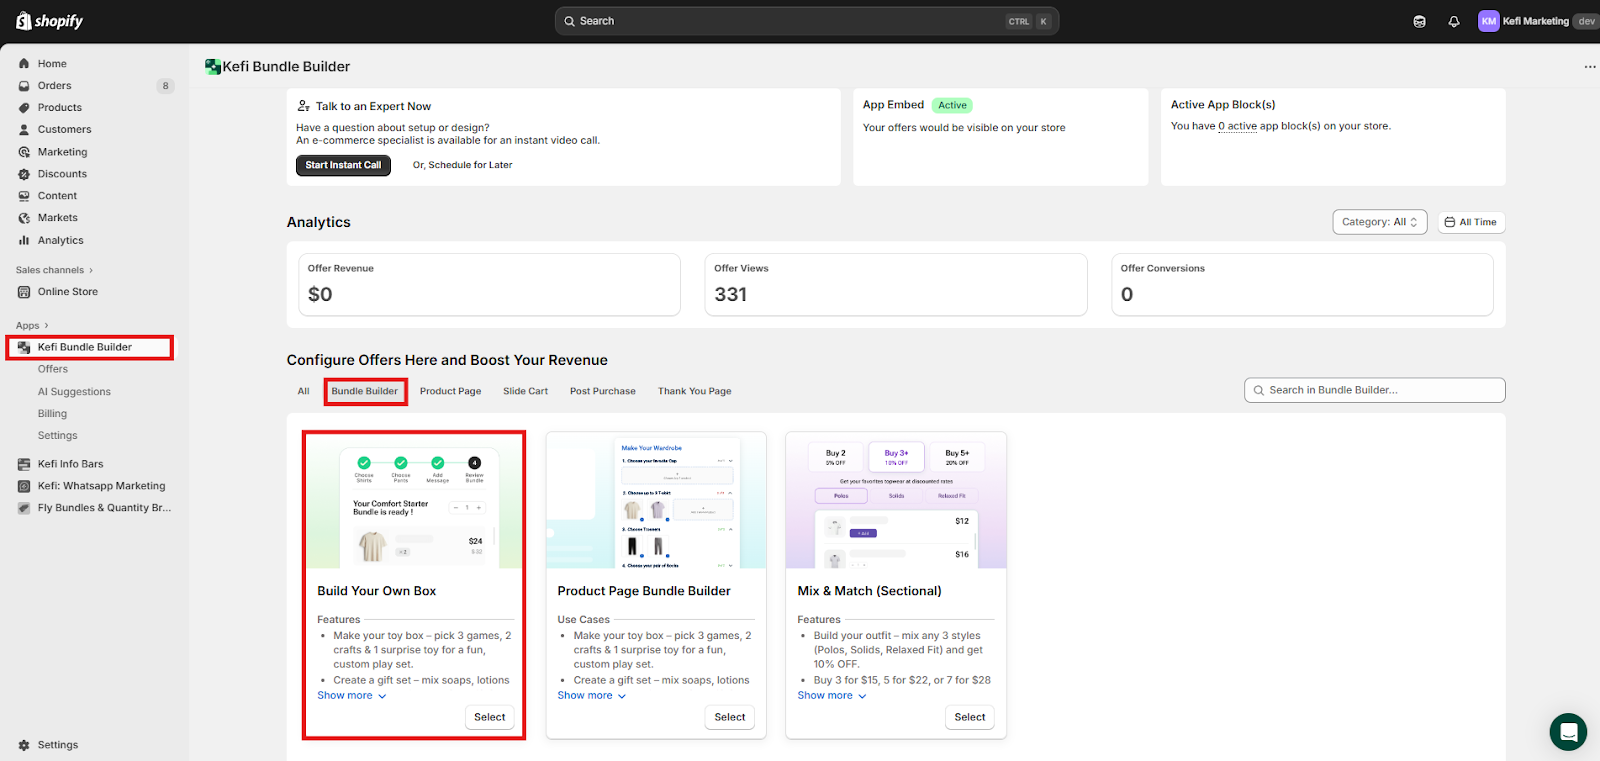
After selecting the Build Your Own Box bundle type, you will land on the Choose a template screen where you will define the bundle's appearance and functionality.
1. Choose Layout
First, decide where the bundle selector will appear on your product page by choosing one of the two main layout options:
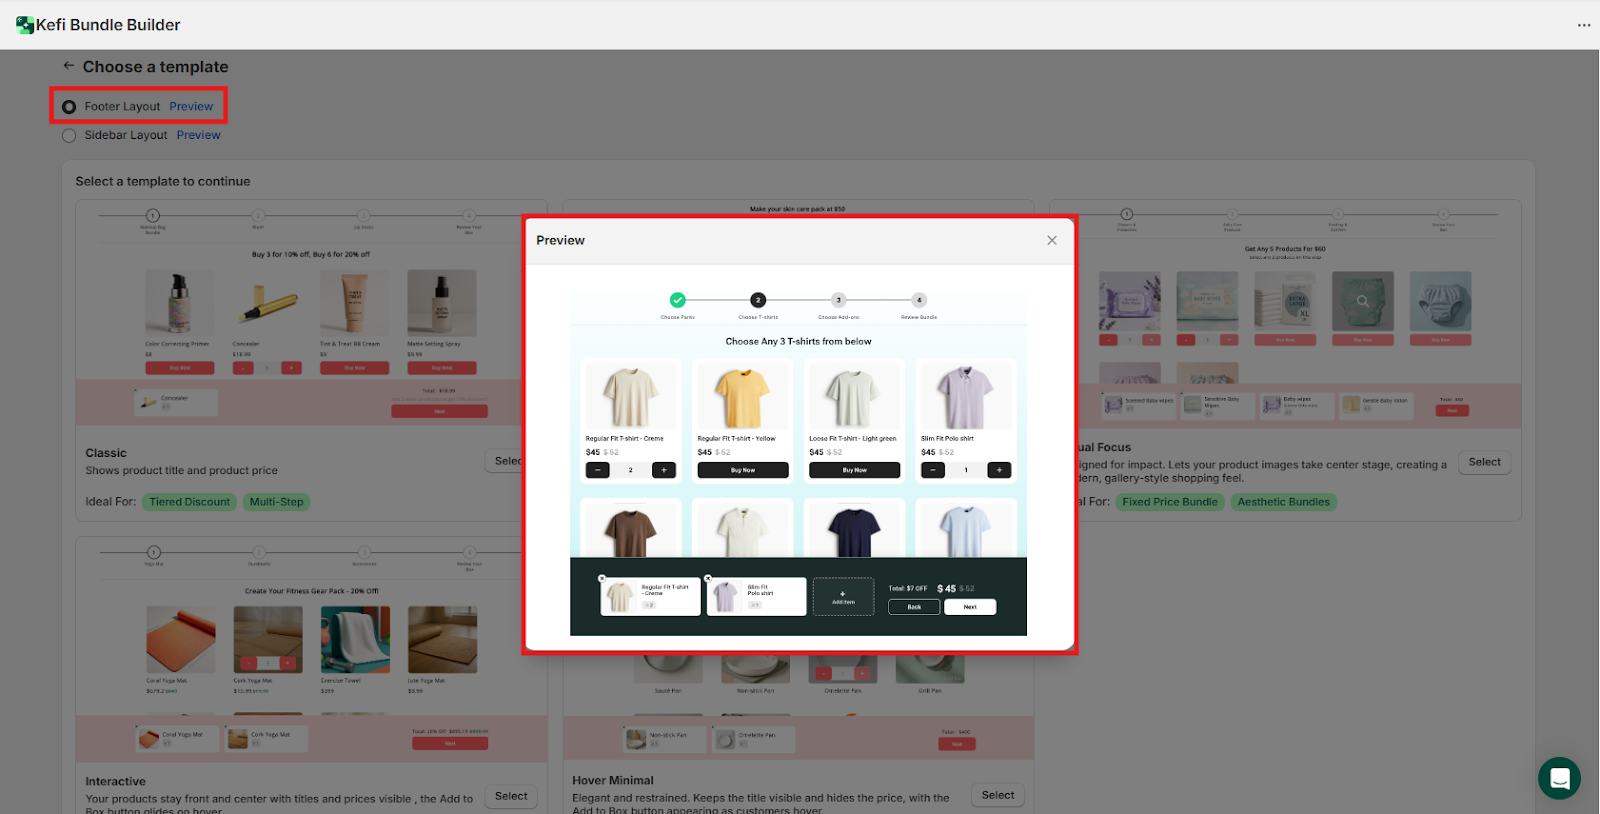
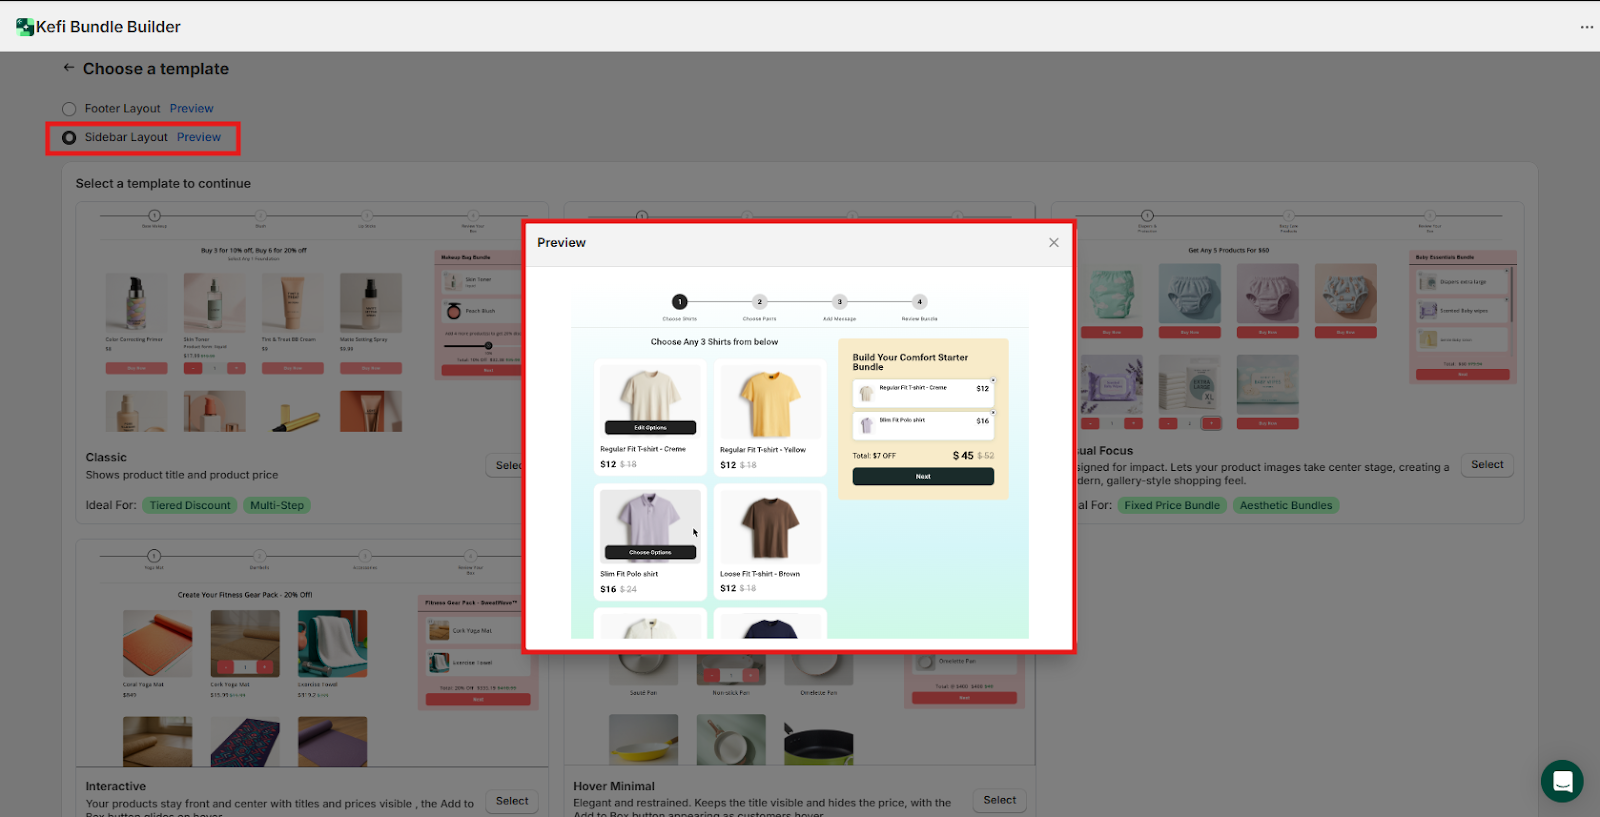
Tip: Click Preview next to either option to see how the layout will integrate with your store's theme.
2. Select a Template
Next, select the template that best matches your branding and the goal of your bundle. You must select a template to continue.
Description: Shows both the product title and the product price clearly.
Ideal For: Tiered Discount, Multi-Step.
Description: Strips out individual product prices for a cleaner look. Perfect for bundles with one flat rate.
Ideal For: Fixed Price Bundle, Products with Multiple Variants.
Description: Designed for impact. Lets your product images take center stage, creating a modern feel
Ideal For: Fixed Price Bundle, Aesthetic Bundles.
Description: Your products stay front and center with titles and prices visible.
The Add to Box button glides on hover for a dynamic feel.
Ideal For: % or Fixed Discounts, Products with Multiple Variants.
Description: Elegant and restrained. Keeps the product title visible and hides the price.
Ideal For: Fixed Price Bundle, Multi-Step.
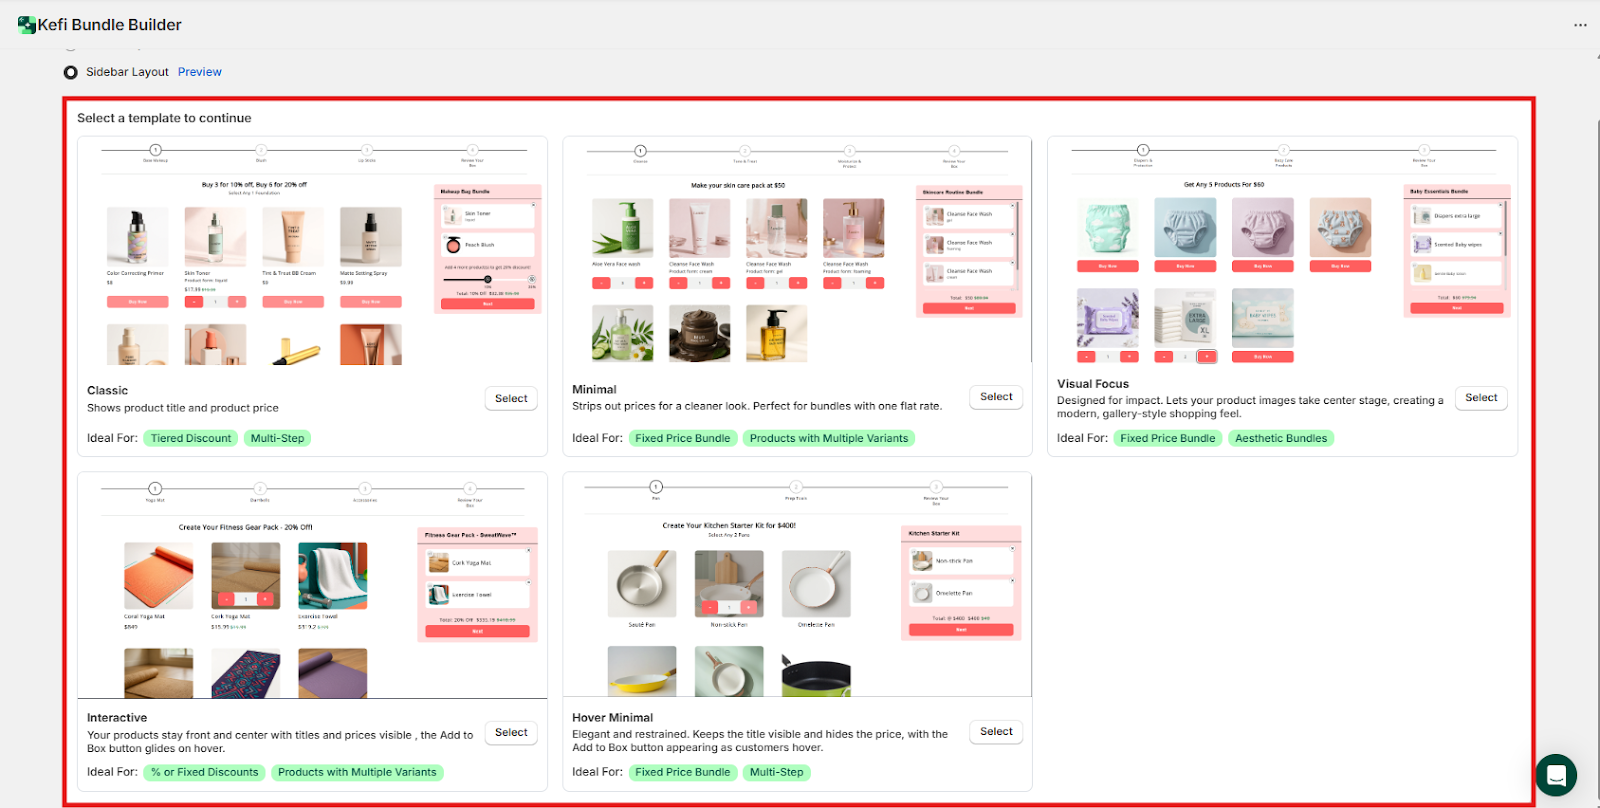
Click Select under your chosen template to proceed to the next step of setting up the bundle rules.
After selecting Build Your Own Box, you’ll be taken to the setup screen, which includes three main sections:
A live widget preview appears on the right side of the screen, so you can instantly see how your changes will appear to customers.
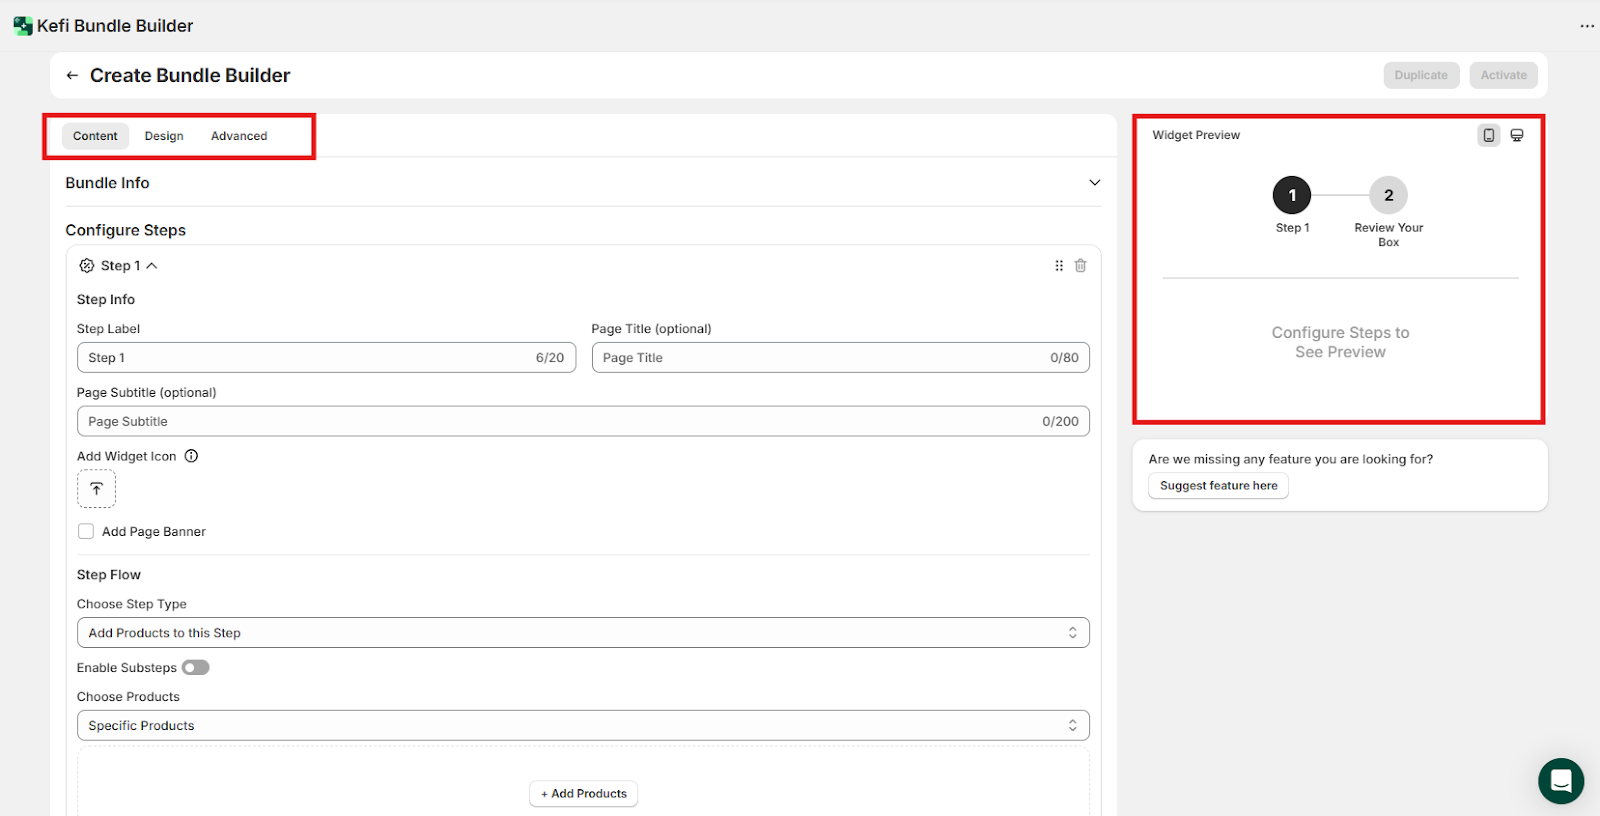
Content Tab:
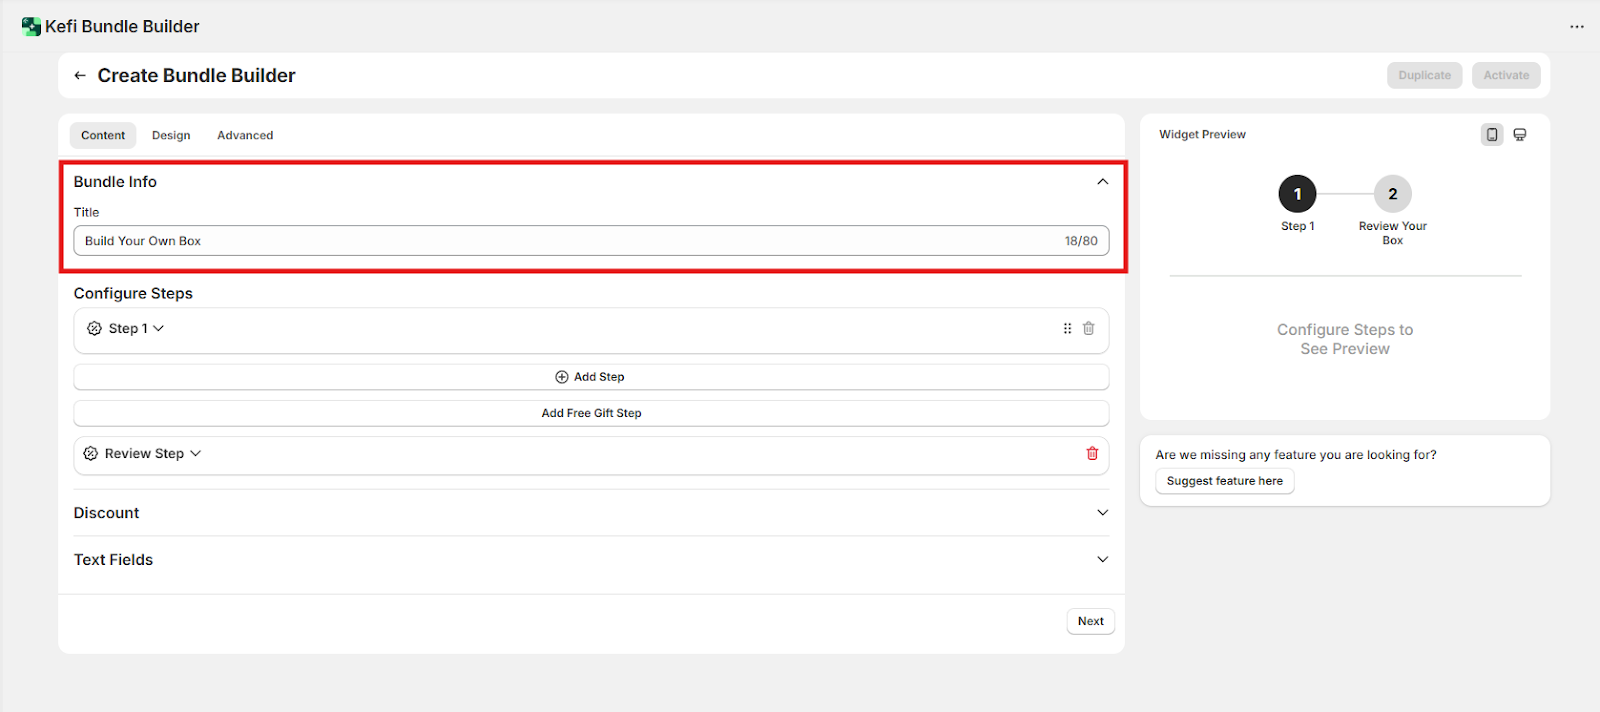
1. Bundle Info
Add a clear and engaging title for your box. This title will appear on the review step of your bundle builder screen, so make it both descriptive and enticing to encourage completion..
Example: “Make Your Own Toy Box” or “Build Your Custom Gift Set
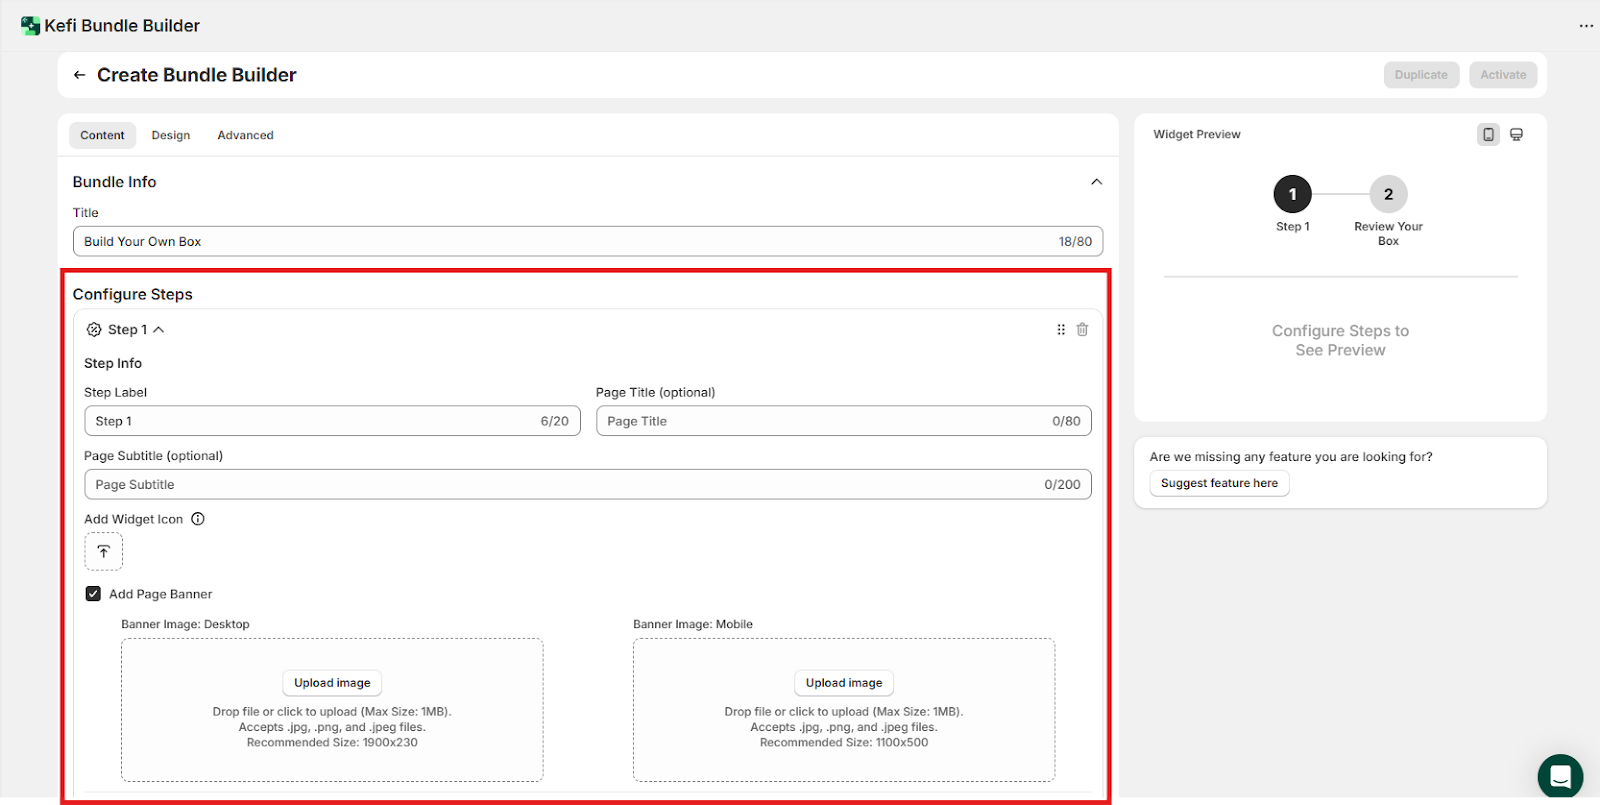
2. Configure Step
Now it’s time to define the structure of your bundle by creating steps for customers to follow.
Step 1: Add Step Info
Start by setting up the first step in your bundle flow. This typically represents a product category or choice group (e.g., "Choose Your Games").
You'll need to fill in the following fields:
Step Flow
After configuring your step info, it’s time to define the contents and behavior of each step in the bundle. This is done through the Step Flow configuration.
1. Choose Step Type
You’ll begin by choosing the type of step you want to add. There are two primary options:
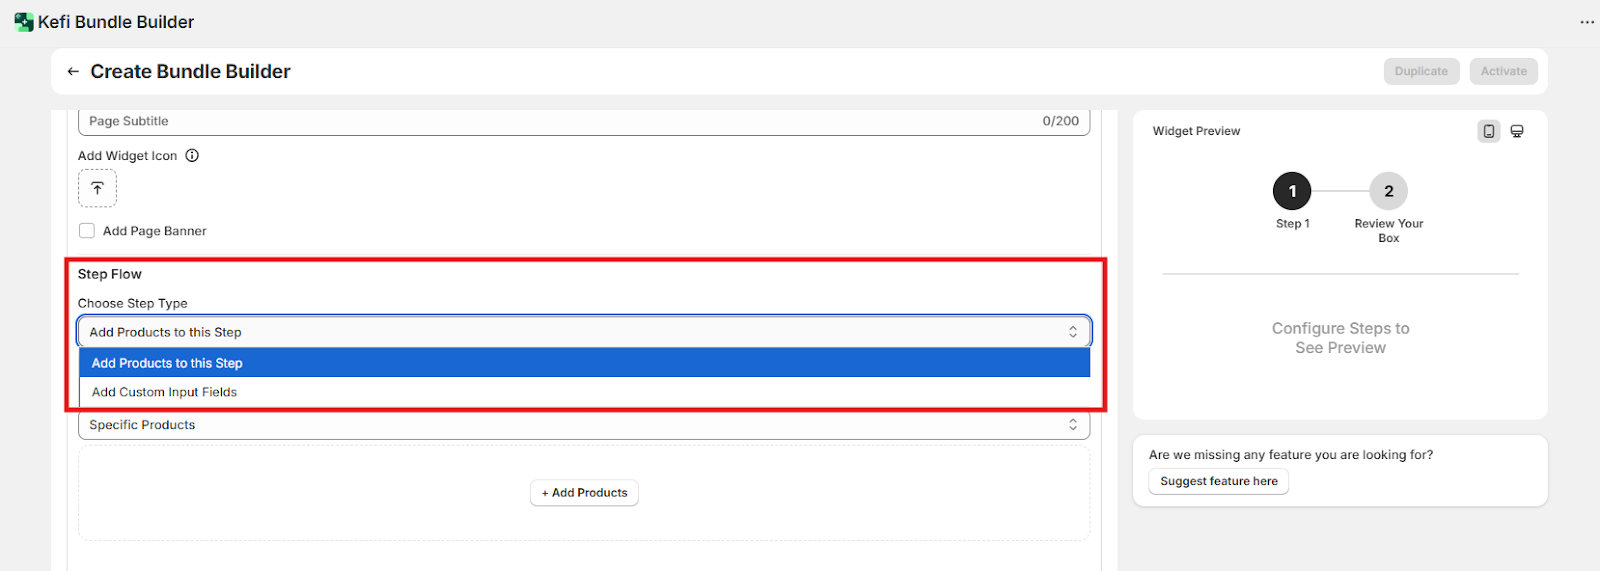
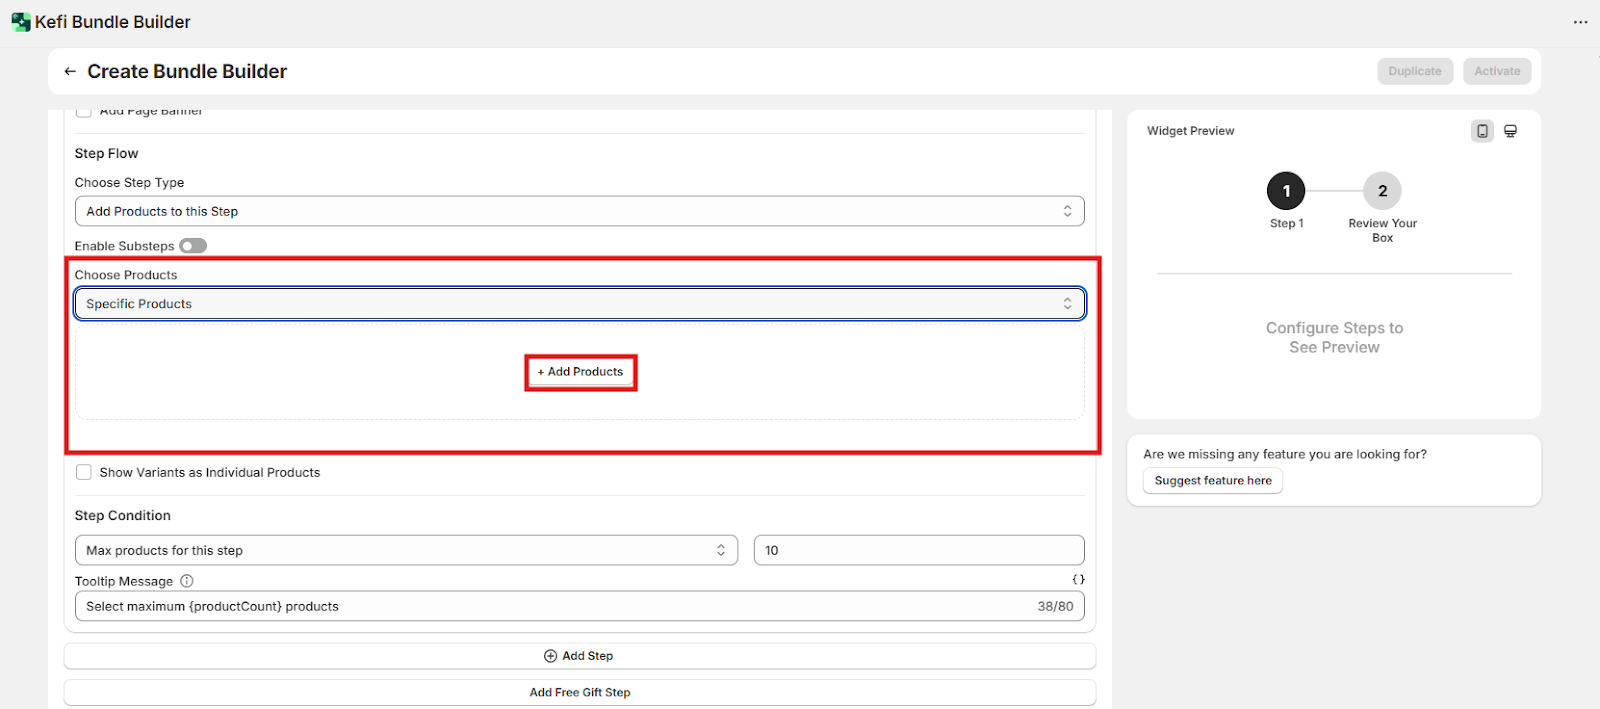
A. Add Product to This Step
Select this option to allow customers to choose products during this step.
Product Source Options:
Once you’ve selected the product source, click Add Products to include them in the step.
B. Add Custom Field Input
Select this option if you want to collect custom information from the customer (e.g., names, gift messages, notes).
Steps to configure:
If you need to collect multiple pieces of information, click Add Field to insert additional custom fields.

2. Step Conditions
Set rules that determine how many products a customer can or must select:

3. Tooltip Message
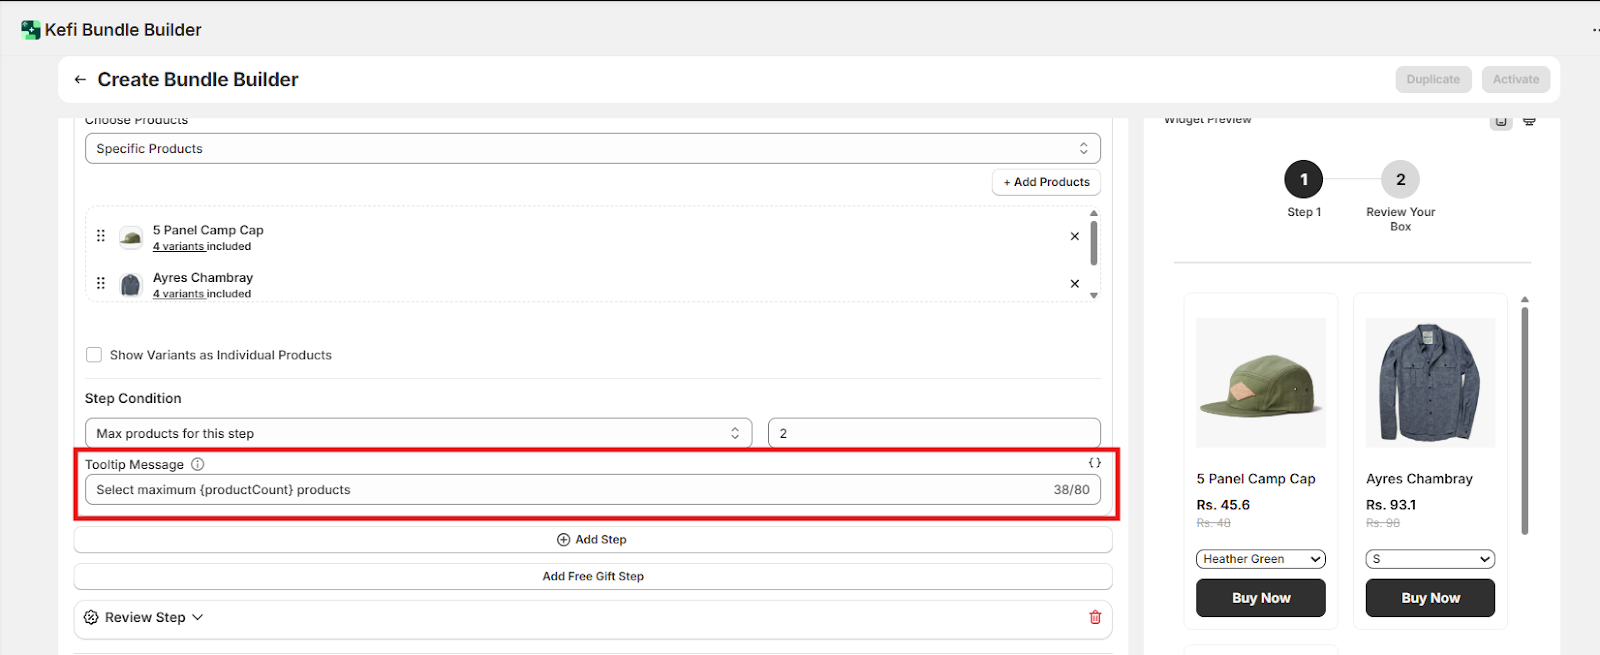
4. Show Variants as Individual Products
5. Add More Steps

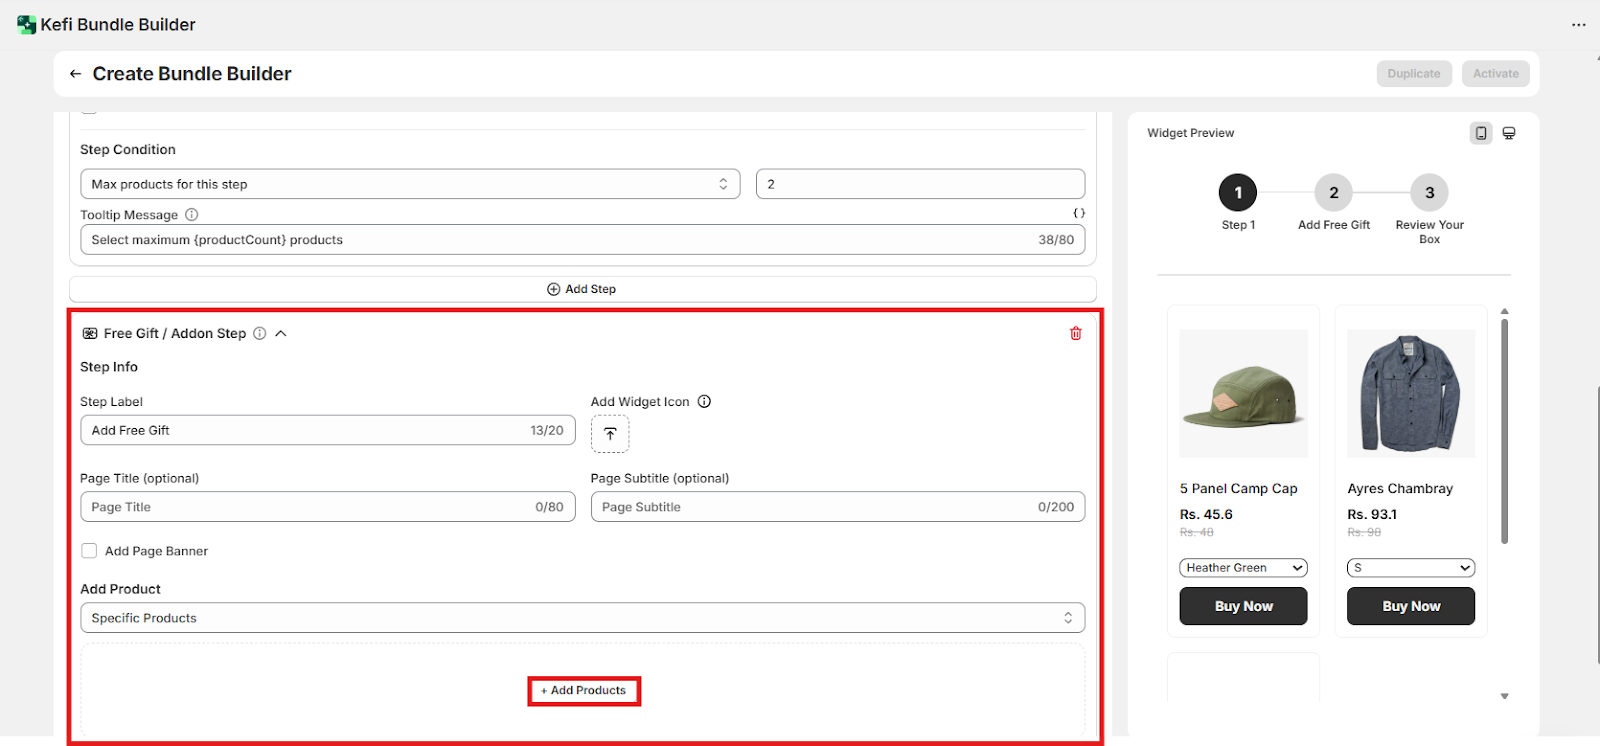
6. Add Free Gift Step (Optional)
You can include a free gift option as part of the bundle experience:

7. Enable Substeps (Optional)
To create substeps within a main step, tick the Enable Substep option.
Once enabled, configure each substep with the following:
Substep Conditions:
Tooltip Message:
Note: You can create multiple substeps by selecting Add More Substep.
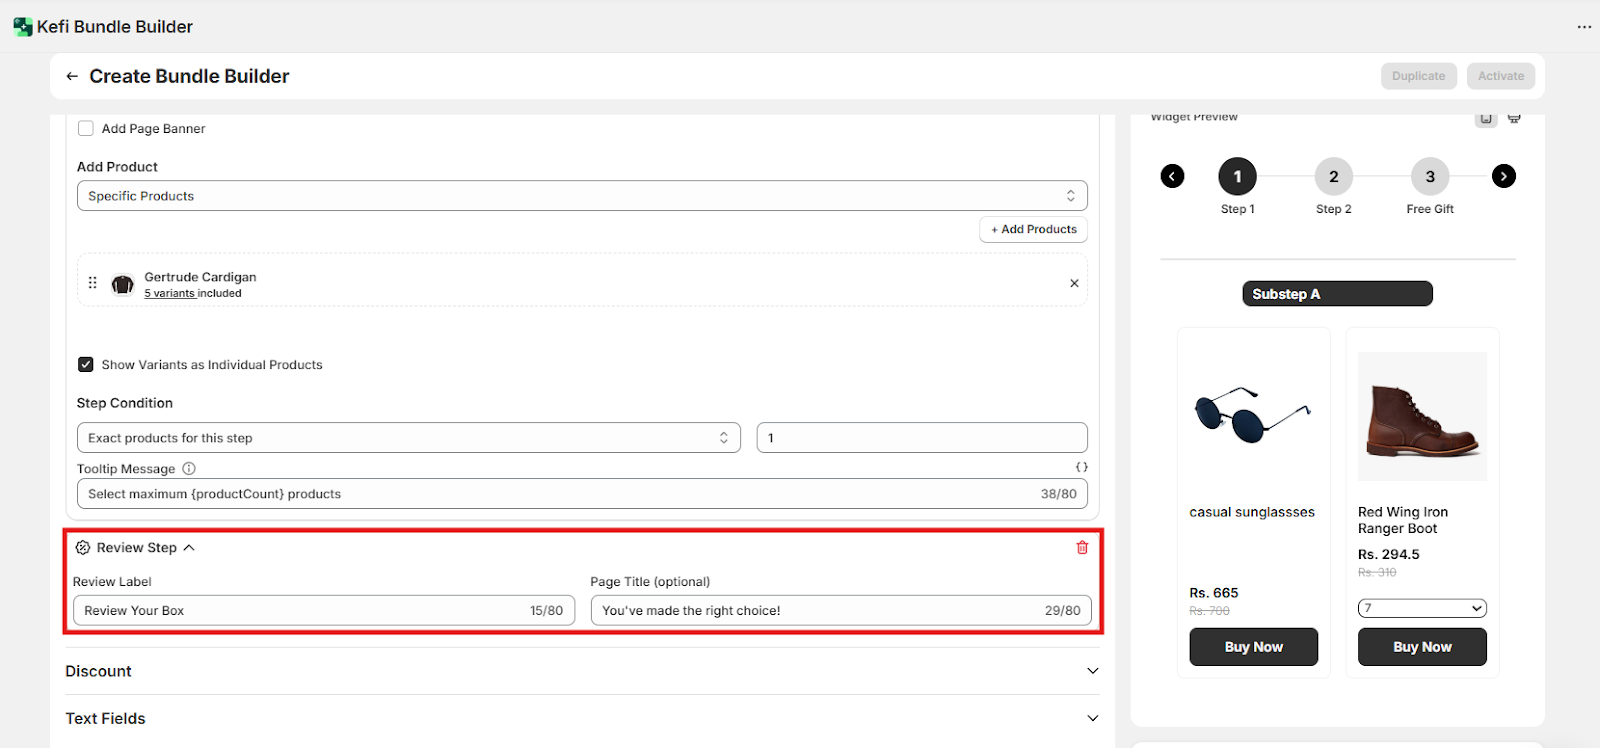
Review Step
To give customers a final chance to review their selections before checkout, you can enable the Review Step.
Here’s how to set it up:
Show Swatches - You can also display product variants-such as different colors, sizes, or styles-by enabling the Show swatches option.
This allows customers to view and select from the available variants directly within the bundle widget, improving the shopping experience.
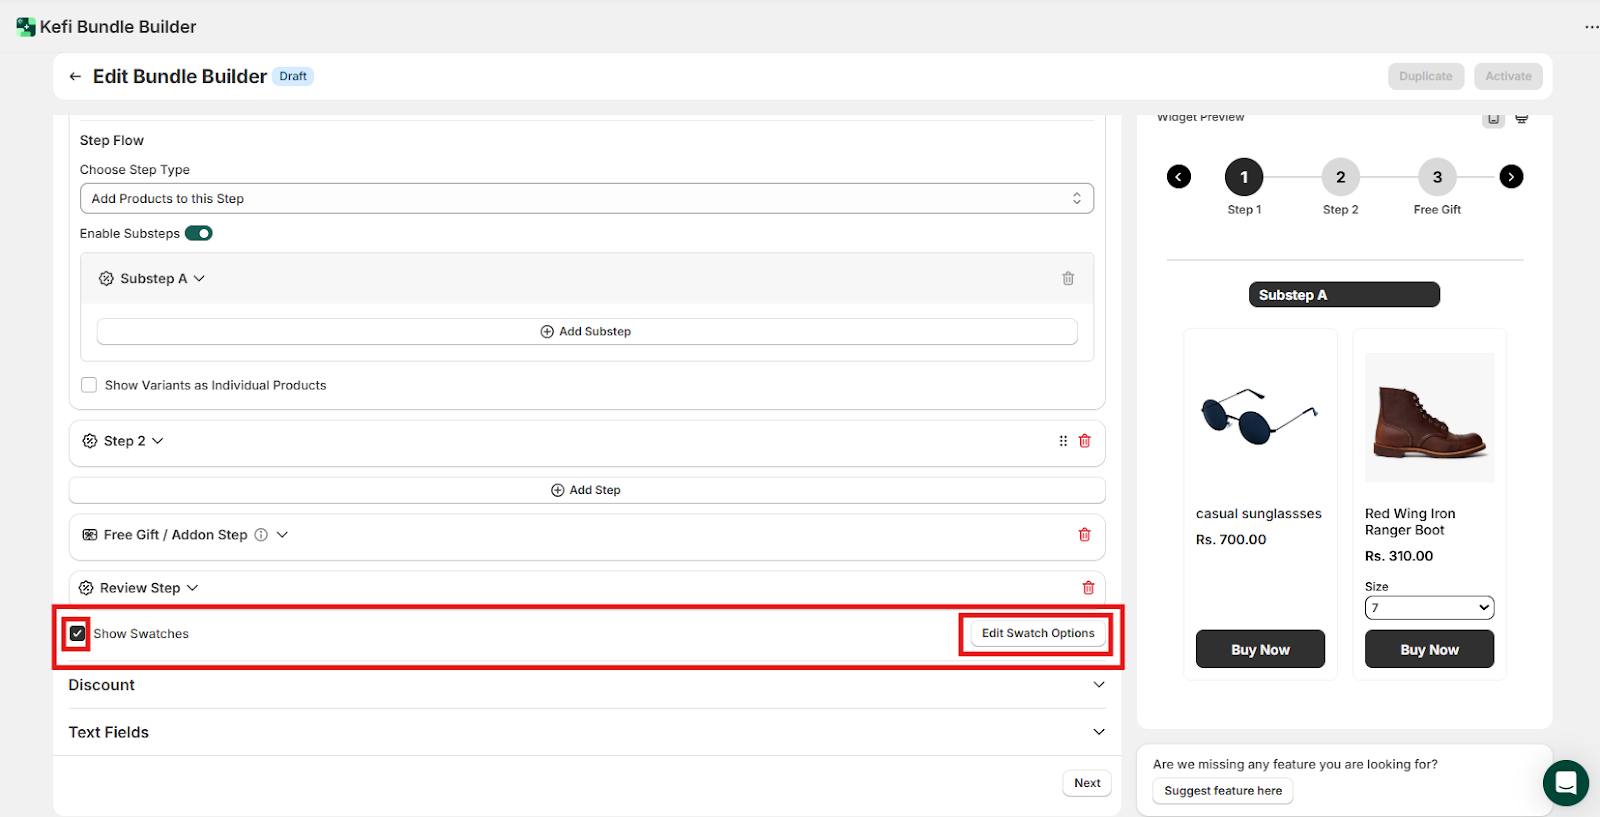
To further personalize how these options appear, click on Edit swatches. Here, you can customize the swatch layout, labels, and appearance-for example:

3. Discount
The next part of the content setup is configuring how discounts will be applied to the bundle. You can choose from multiple discount types depending on how you want to incentivize customers.
Select Discount Type
Choose one of the following options:
Combine this discount with other:
You can choose to combine your add-on discount with other types of discounts active in your store, including:
This allows you to create more compelling promotions by layering multiple incentives for your customers.
Configure Tier Discount
Once Tier Discount is selected, you can define discount tiers based on the number of items a customer adds to the bundle. Each tier allows you to control the discount type, value, and messaging.
Step-by-Step Configuration
1. Add Number of Items
Specify the minimum number of items a customer must add to the bundle for the tier discount to apply.
For example:
2. Select Discount Type
For each tier, choose one of the following discount types:
3. Add Range - Define the range of items for each tier to control how discounts scale. This helps create clear boundaries for each discount level.
4. Enable/Disable Tier Messages
5. Add More Tiers
Click Add Discount options to define additional discount levels.
Example Configuration:

4. Customize Text Fields
This section allows you to personalize all the text that appears on your bundle widget. Whether you're aligning the language with your brand voice or translating content for different regions, this gives you full control over the messaging.
You can customize text for key elements like:
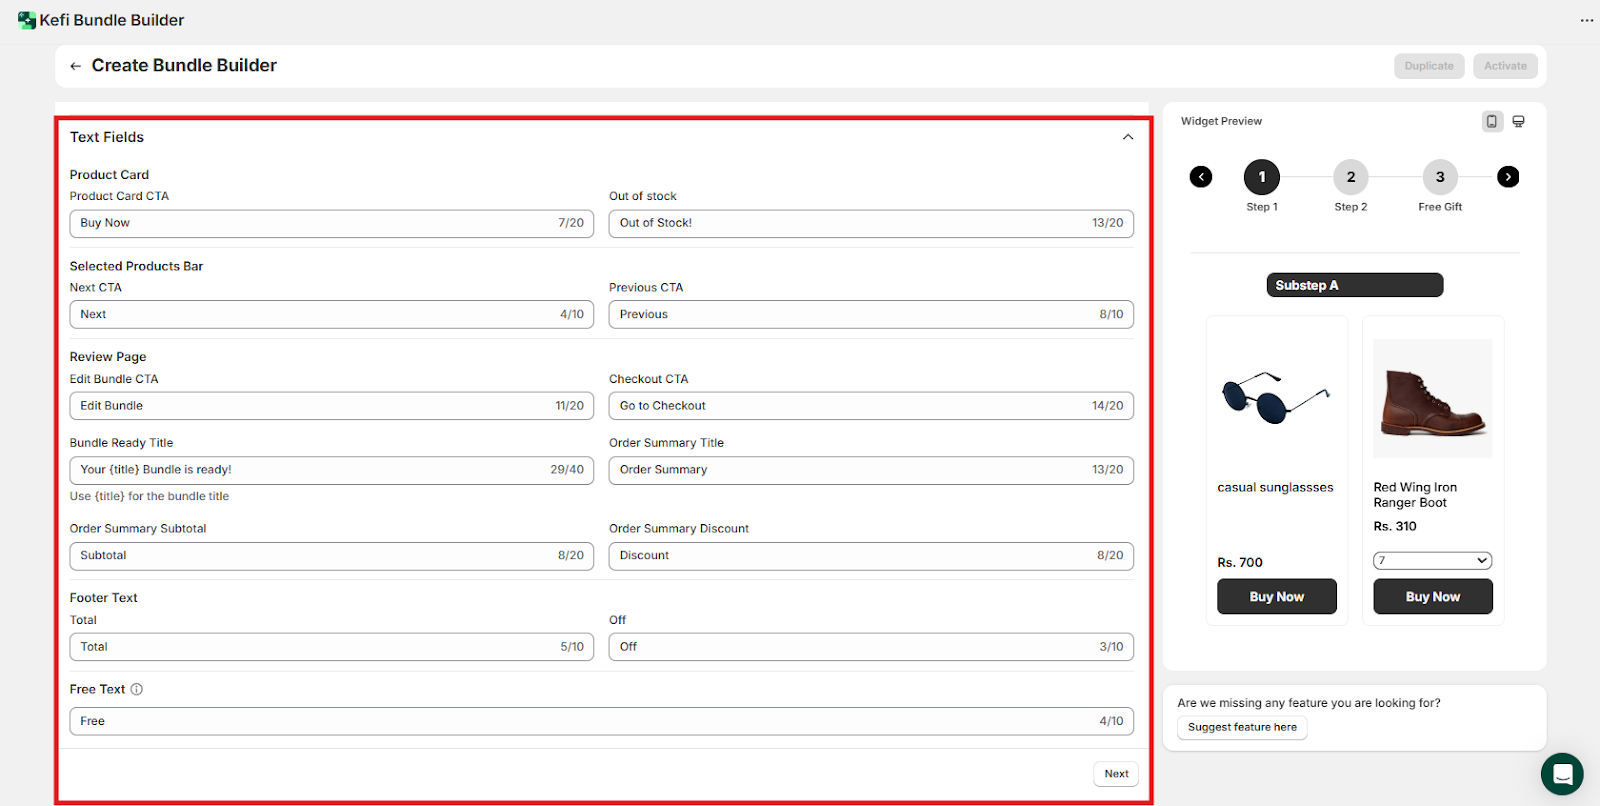
Once you've completed all the steps in the Content tab— click the Next button at the bottom of the page to move on to the Design tab.
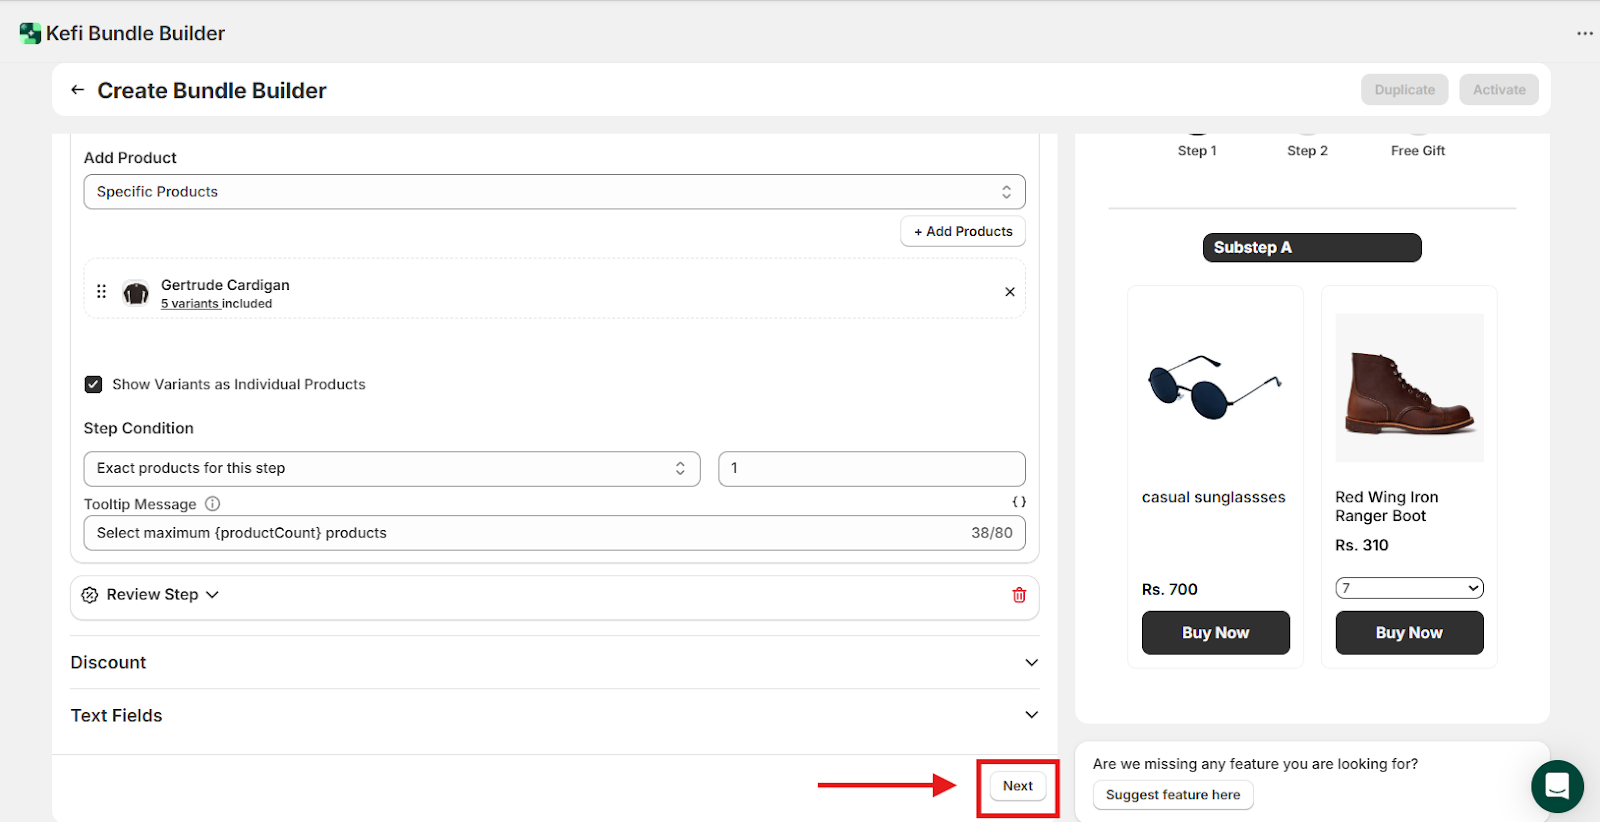
The Design tab allows you to tailor the visual appearance of your bundle widget so it aligns seamlessly with your store’s branding. A cohesive, branded design not only builds trust but also enhances the overall shopping experience.
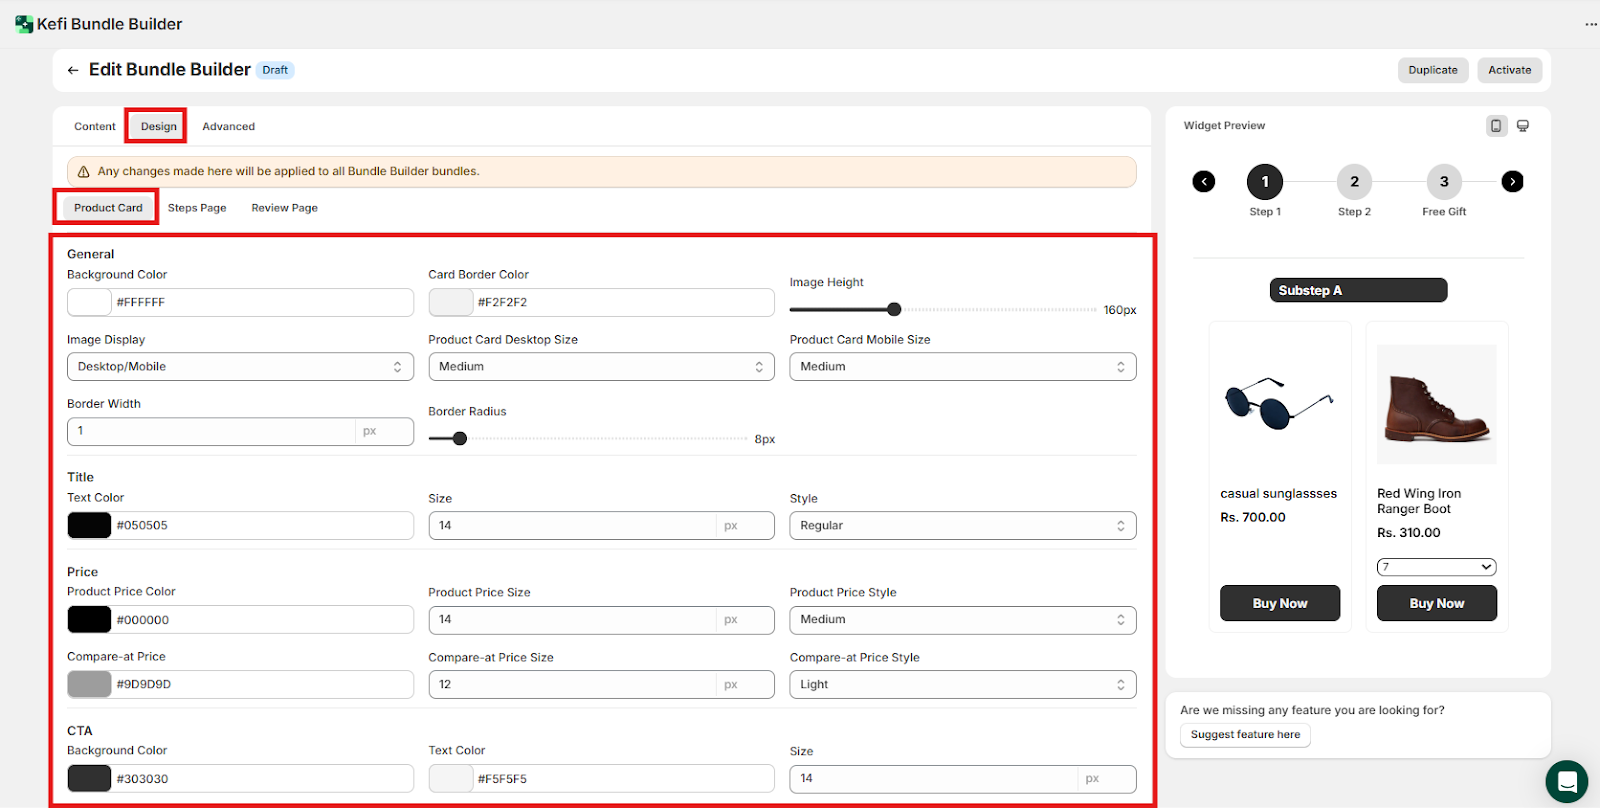
1. Product Card
Fine-tune every visual aspect of your product cards to ensure they match your store’s look and feel.
General Settings
Title
Price
Compare-at Price
CTA (Call to Action)
Variant Selector
Image Popup
Customize the styling of the image preview popup:
2. Steps Page
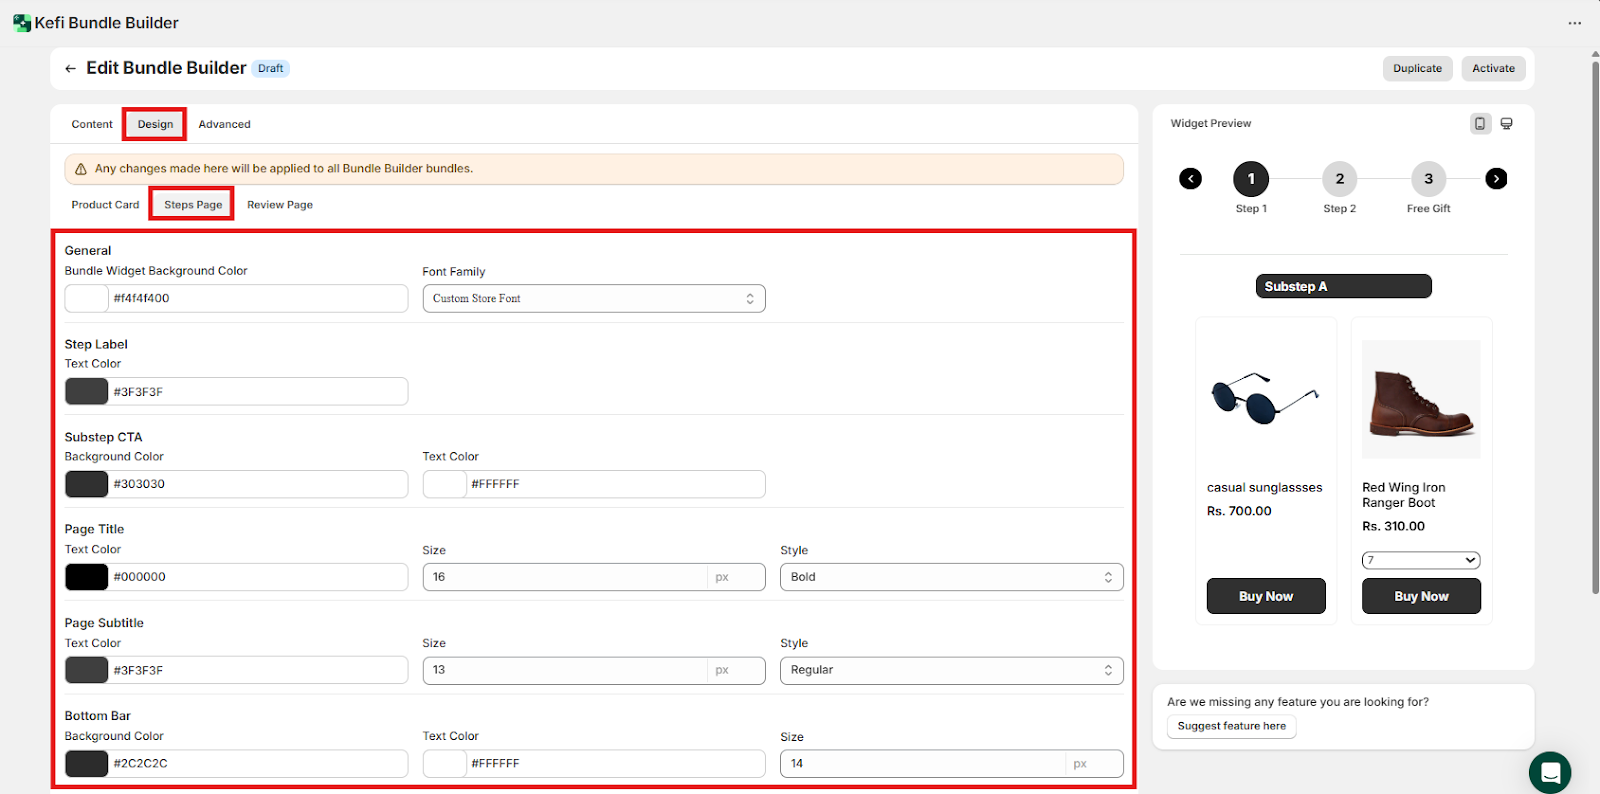
This section lets you style the main navigation and layout for the bundle creation steps.
General
Step Label
Substep CTA
Page Title
Page Subtitle
Bottom Bar (Footer)
Navigation Buttons
3. Review Page
Customize the final review experience before customers add the bundle to their cart.
Bundle Title
Order Summary Card
Order Summary Header & Total
Order Summary Rows
Edit Bundle CTA
Review Product Card
These comprehensive styling options ensure that your bundle widget blends perfectly with your storefront — offering a polished, branded, and intuitive shopping experience.
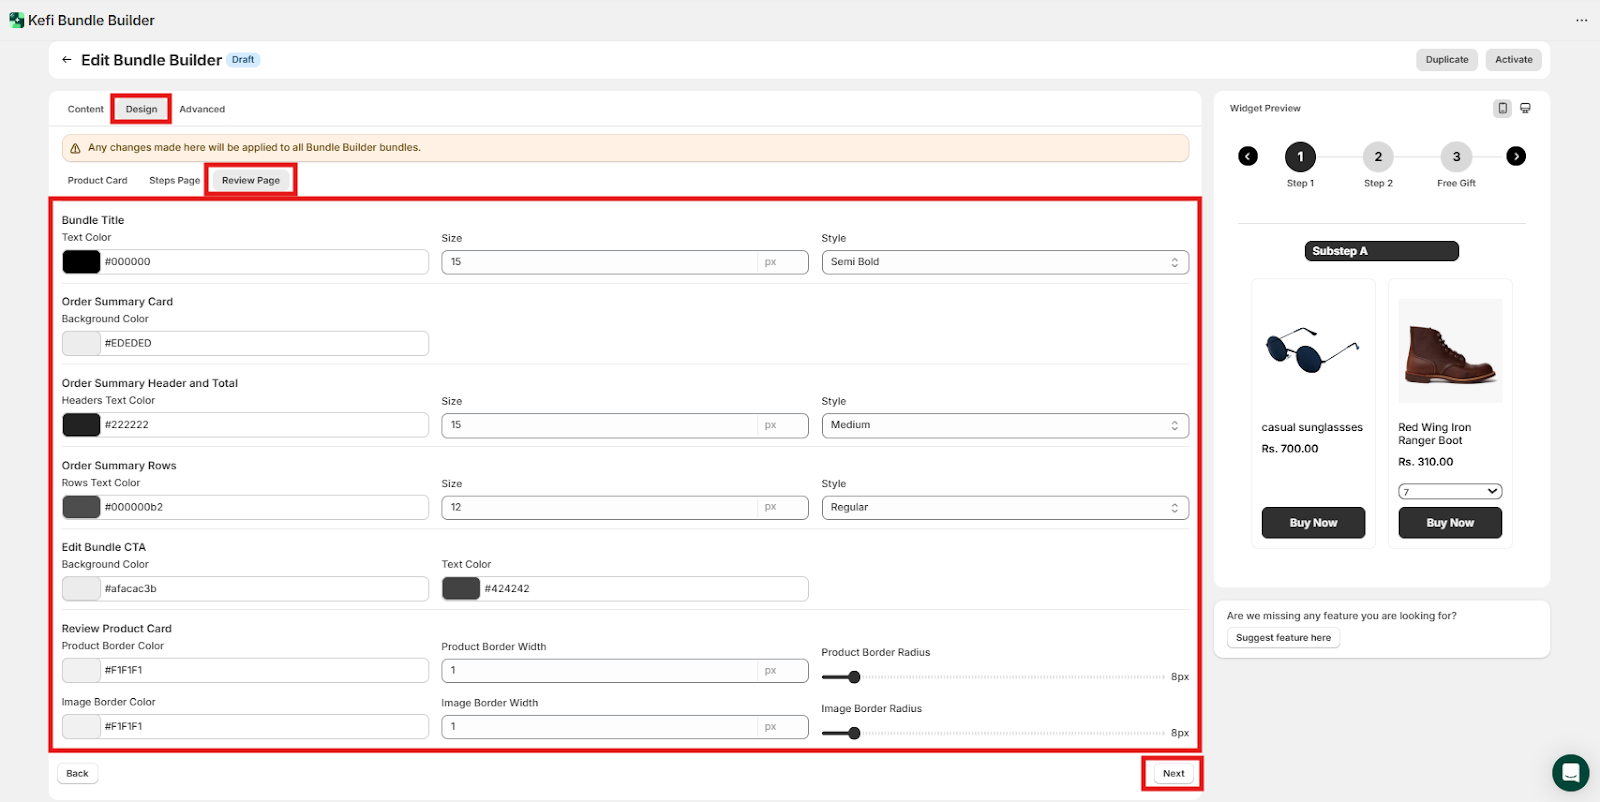
Now , click on the “Next” button to proceed to the next section .
After clicking the next you would be redirected to the next section that is “Advance”
The Advanced tab gives you powerful tools to manage how, when, and to whom your bundle is shown. This includes settings for bundle visibility, scheduling promotions, and targeting specific customer groups.
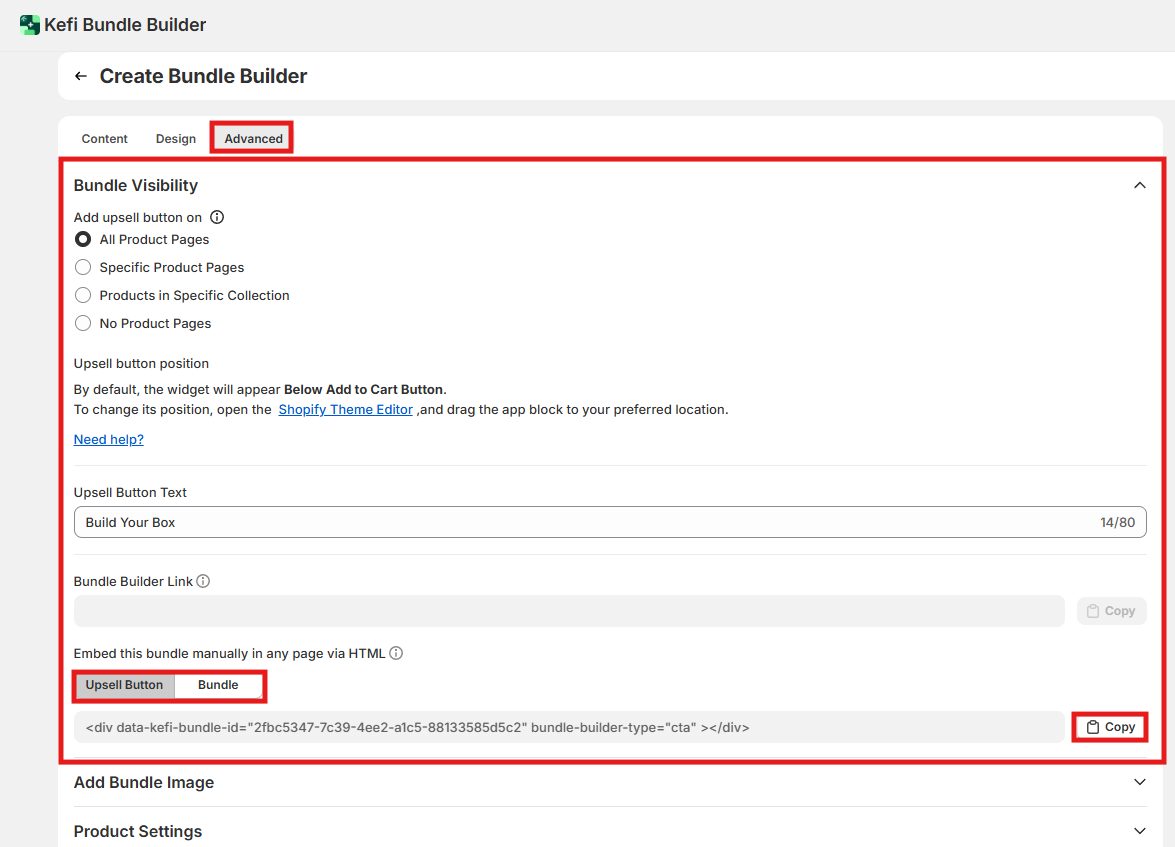
1. Bundle Visibility
Maximize engagement by making your bundle easy to find with a customizable Upsell Button that links directly to the bundle builder.
Add Upsell Button
You can place a Call-to-Action (CTA) button on various product pages to drive traffic to your bundle builder. Choose where the button appears:
Offer Button Text
Enter custom text for the button (e.g., "Create Your Gift Box", "Build Your Bundle & Save").
Upsell Button Position
By default, the widget will appear below the Add to Cart button.
To change its position:
You’ll get a dedicated Bundle Page link once the bundle is created - this is a standalone page generated by the Bundle Builder.
You can also embed this bundle manually on any page of your store via HTML. This allows you to display the bundle anywhere by placing the provided HTML tag directly in your theme file.
The system provides HTML code for both the Upsell Button and the Bundle Widget, and you can toggle between these options to choose which one you'd like to use.
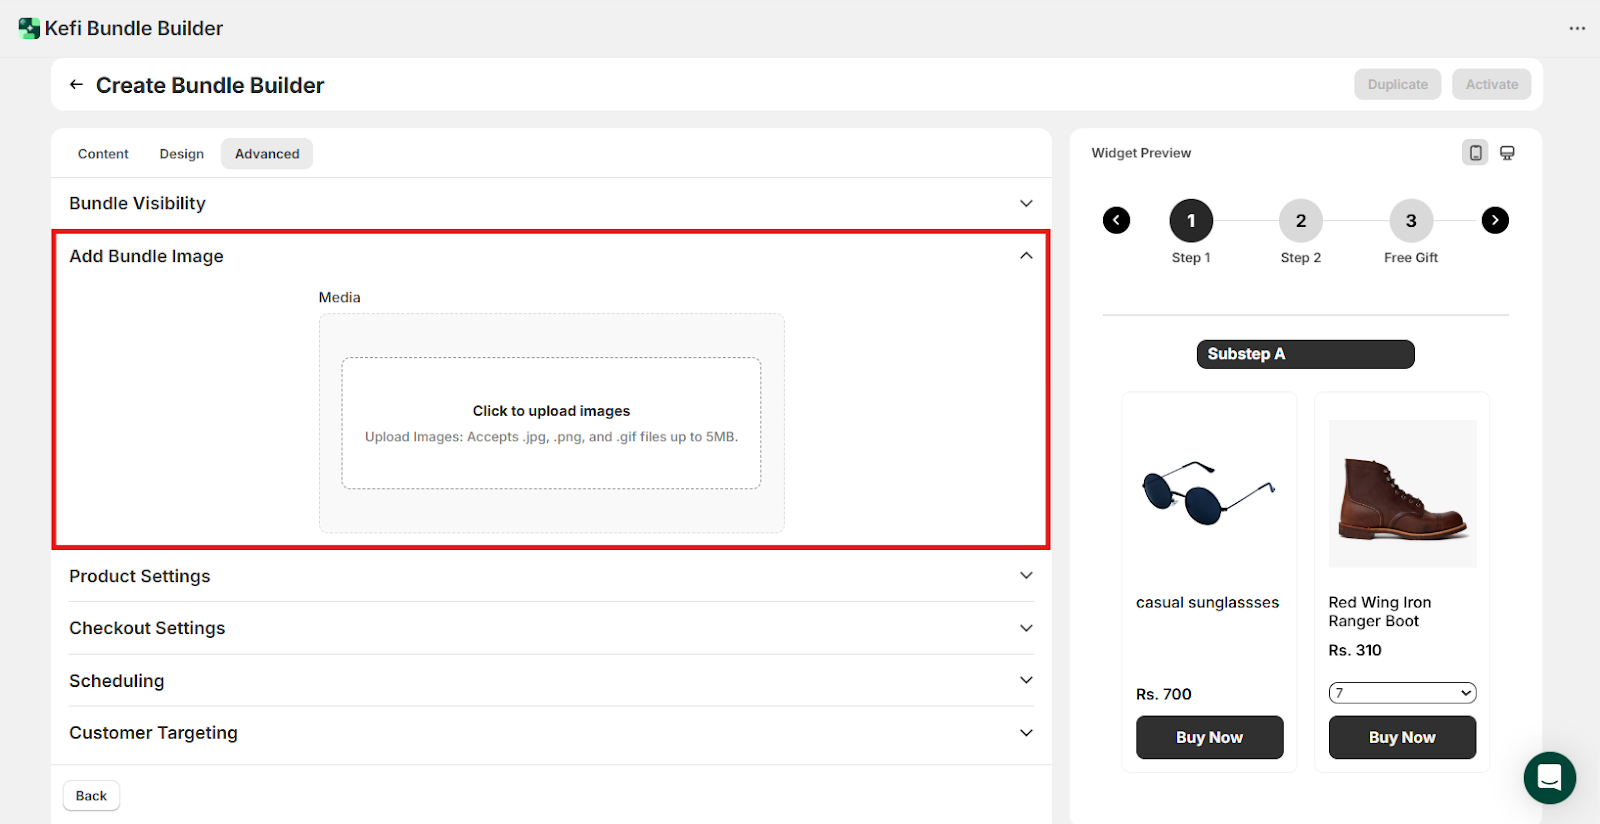
2. Add Bundle Image
This image will appear on the product page created for your bundle. Upload a custom image that visually represents the overall theme or purpose of the bundle to make it more appealing to customers.
3. Product Settings
Customize how products are displayed and selected in the bundle builder.
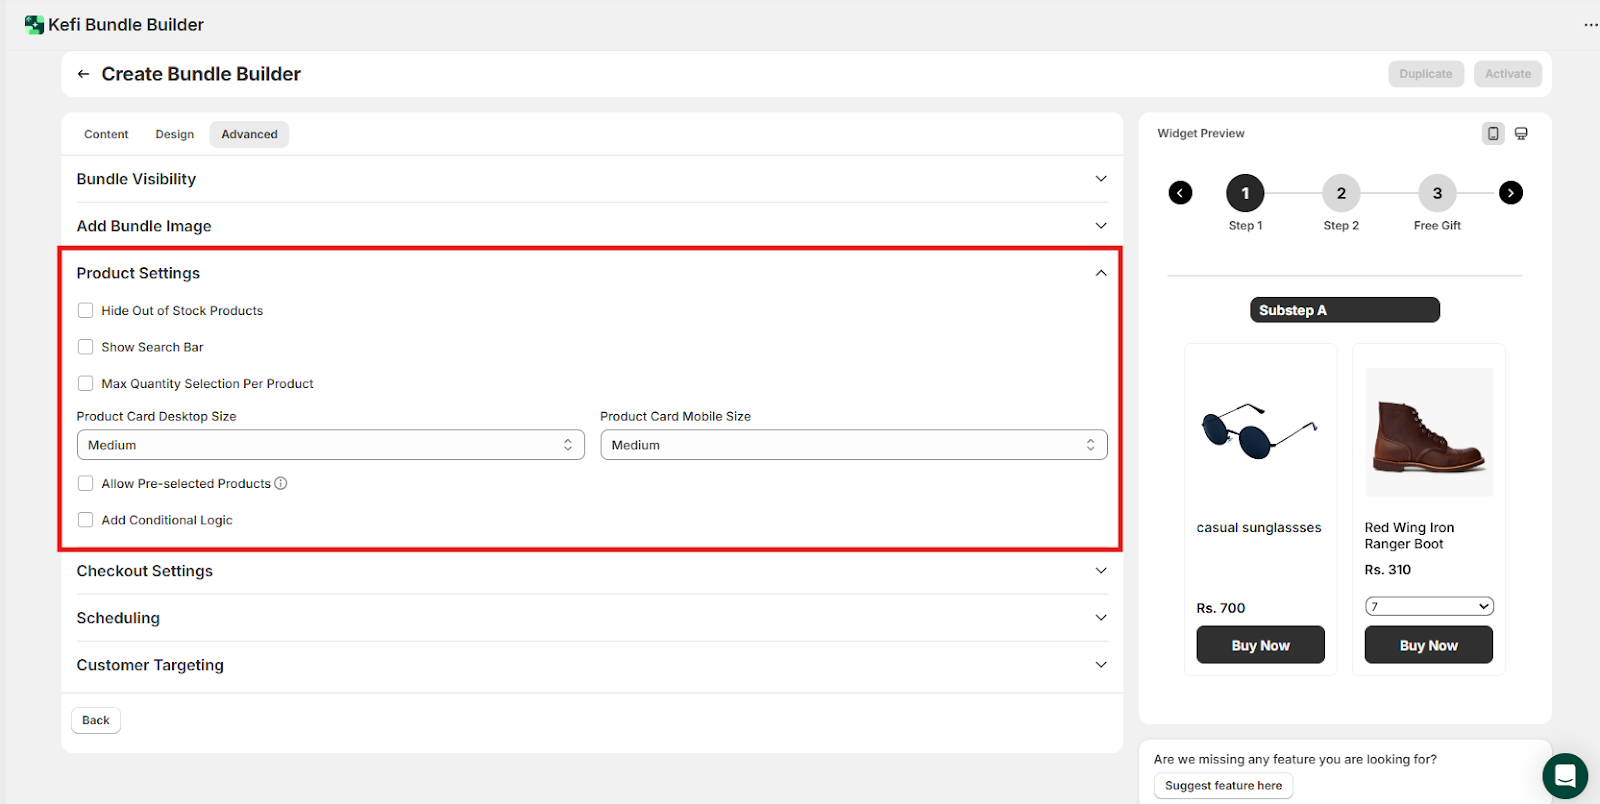
Product Card Display Settings
Allow Pre-selected Products
Enable this option to pre-select specific products in the bundle.
Note:
Add Conditional Logic – Conditional Products
Use conditional logic to dynamically show or hide products based on customer selections.
To create more conditions, click Add Conditional Logic.
4. Checkout Settings
Control where customers are sent after completing their bundle:
5. Scheduling
Set active timeframes to control when the bundle is available.
This is ideal for limited-time bundles, seasonal promotions, or flash sales.
6. Customer Targeting
Choose who can view and access the bundle:
Once you’ve completed all sections—Content, Design, and Advanced—and reviewed your bundle setup, click the Save button at the top of the page.
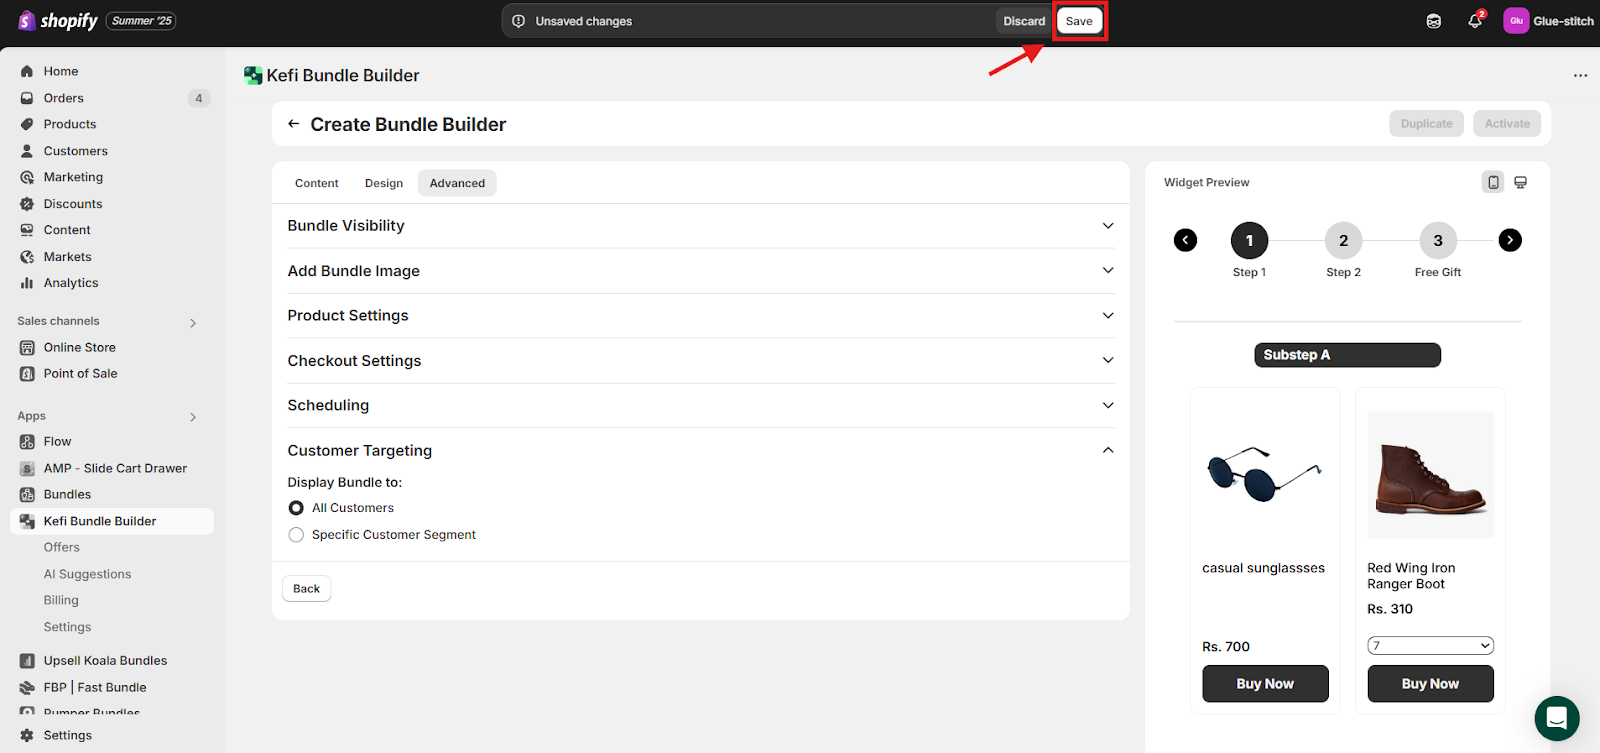
After saving your bundle, the final step is to activate it so it becomes visible to your customers.
Click the Activate button at the top right of the screen to:
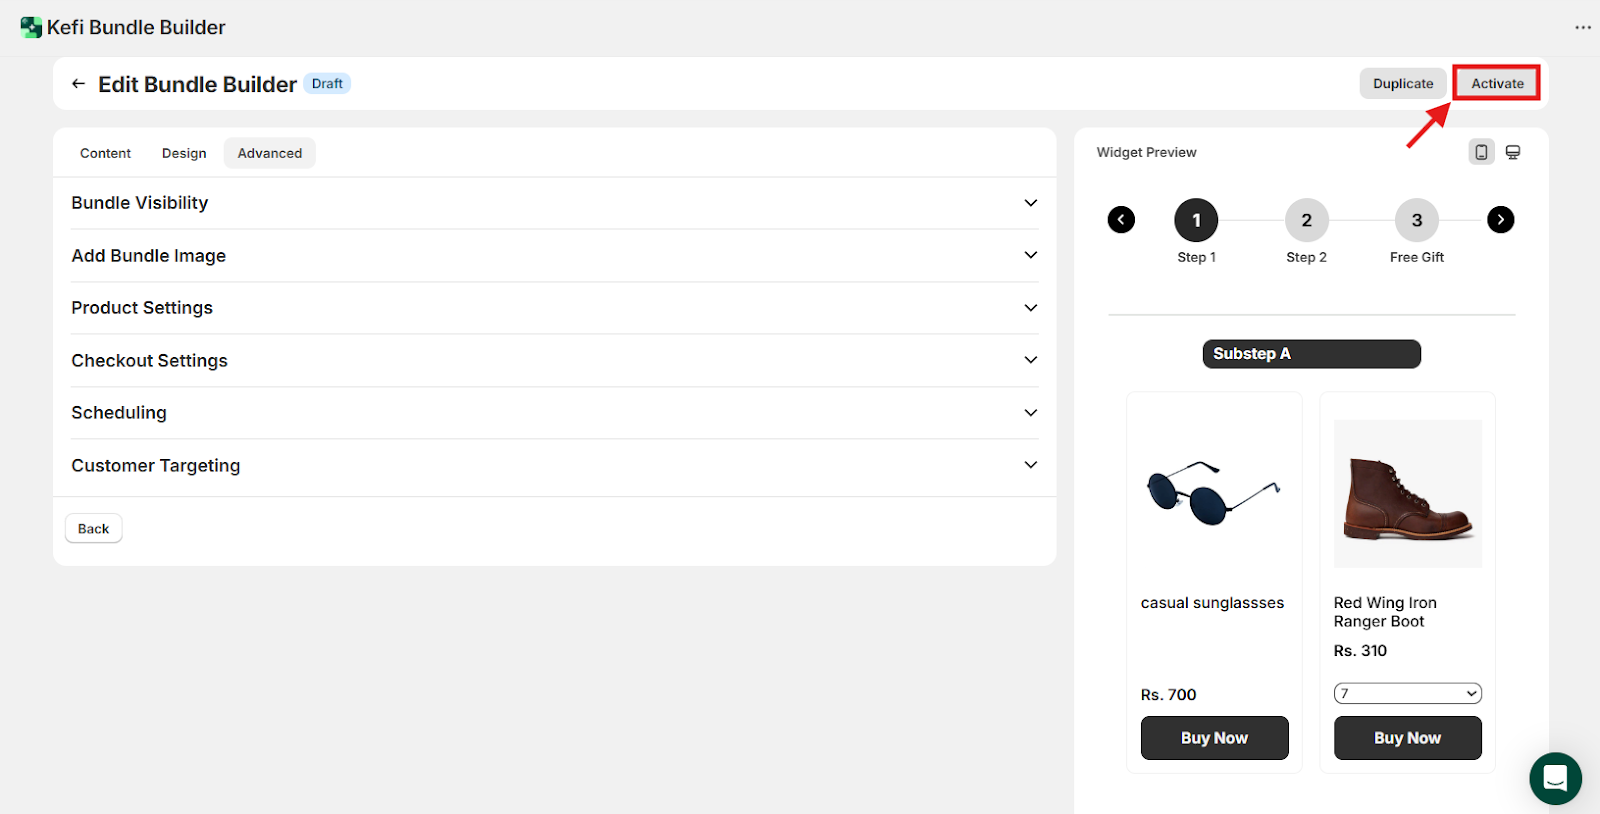
After activating your bundle, you can click Show on Store to preview how the bundle appears live on your storefront.

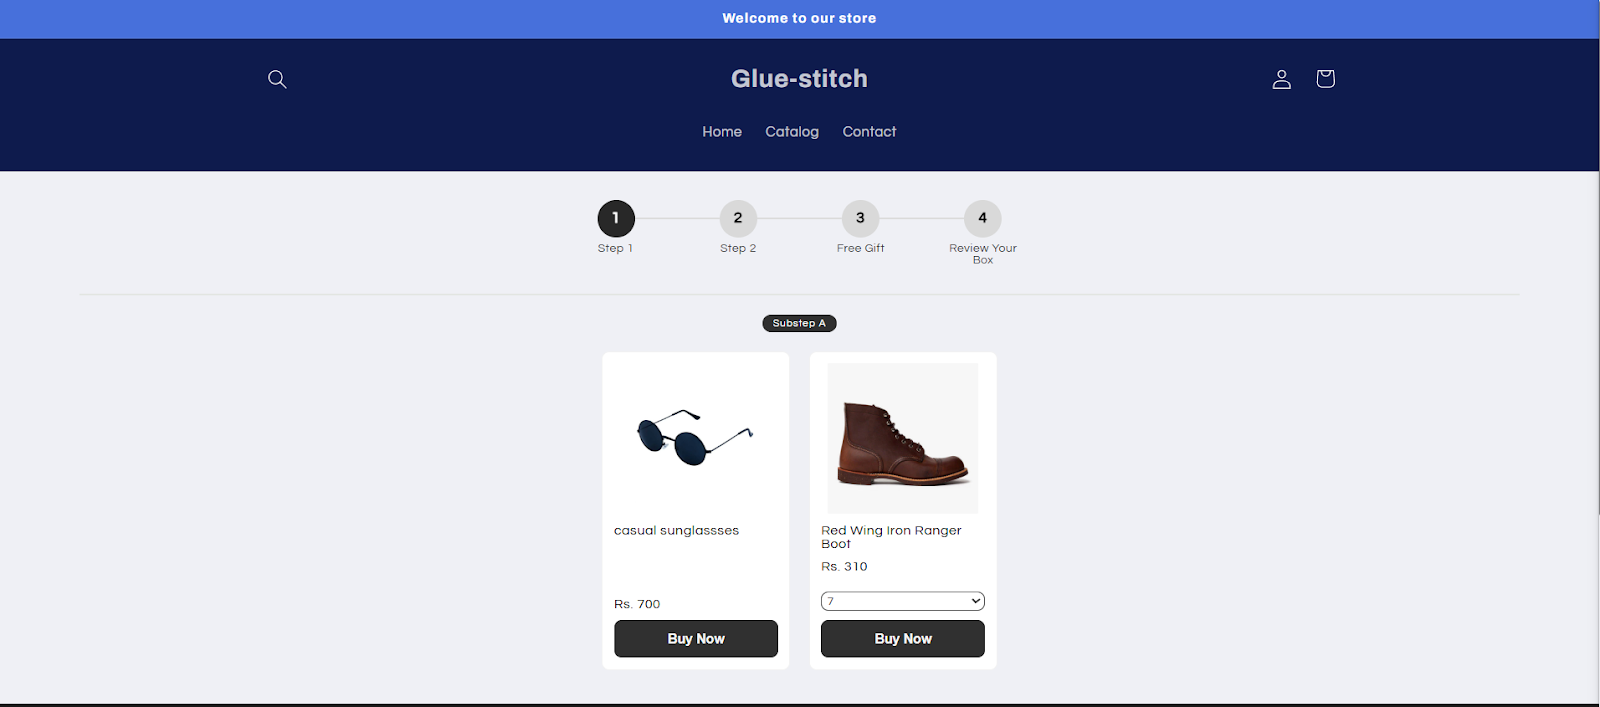
Everything’s set! Now that your bundle is saved, activated, and previewed, you can see it live in action on your store. Watch how your customers interact with the bundle, personalize their selections, and enjoy a seamless shopping experience.
If you have any questions or need assistance, feel free to contact us:
.svg)
