The Quantity Breaks Bundle is a proven sales strategy that rewards customers with tiered discounts as they buy more units of a product. Instead of offering a flat deal, it provides progressive savings that grow with each additional item purchased.
This clear, upfront incentive motivates shoppers to increase their cart size, helping you sell more in a single
Whether you’re selling consumables like supplements, apparel in multiple sizes, or accessories often bought in pairs or sets, the Quantity Breaks Bundle makes bulk buying feel like the smart, obvious choice—delivering value for your customers and growth for your business.
STEP 1
Create a Quantity Breaks/Volume Discount Bundle
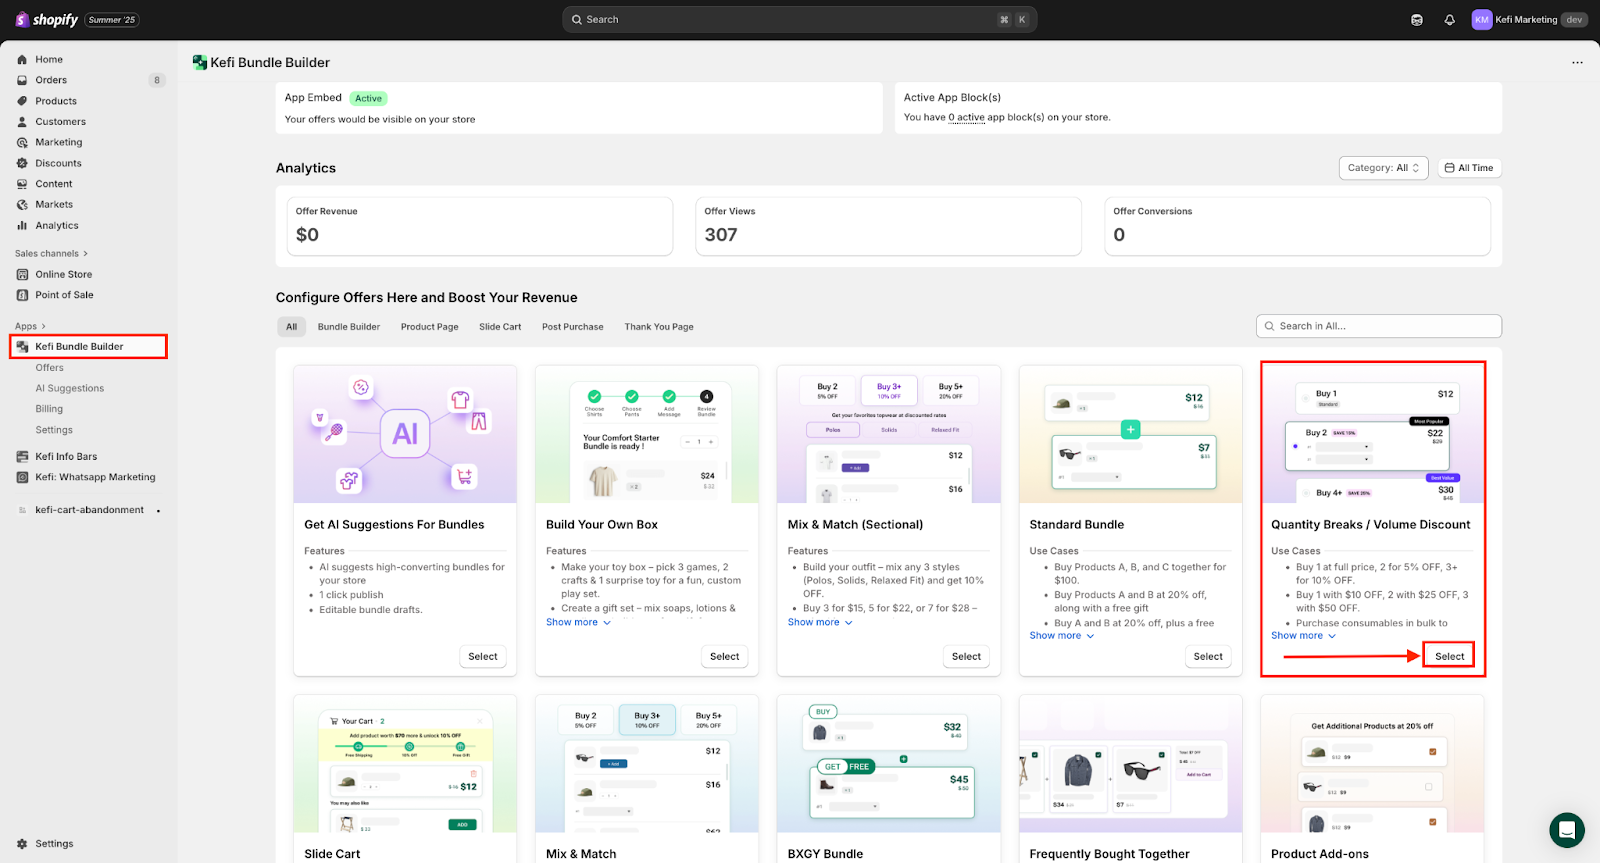
Go to the Kefi Bundle Builder homepage and select the Quantity Breaks/Volume Discount Bundle option to create the bundle. Click ‘Select’.
STEP 2
Choose the Template Design
Select one of the available template options for your bundle:

Once you’ve chosen your preferred template, proceed to the next step.
STEP 2
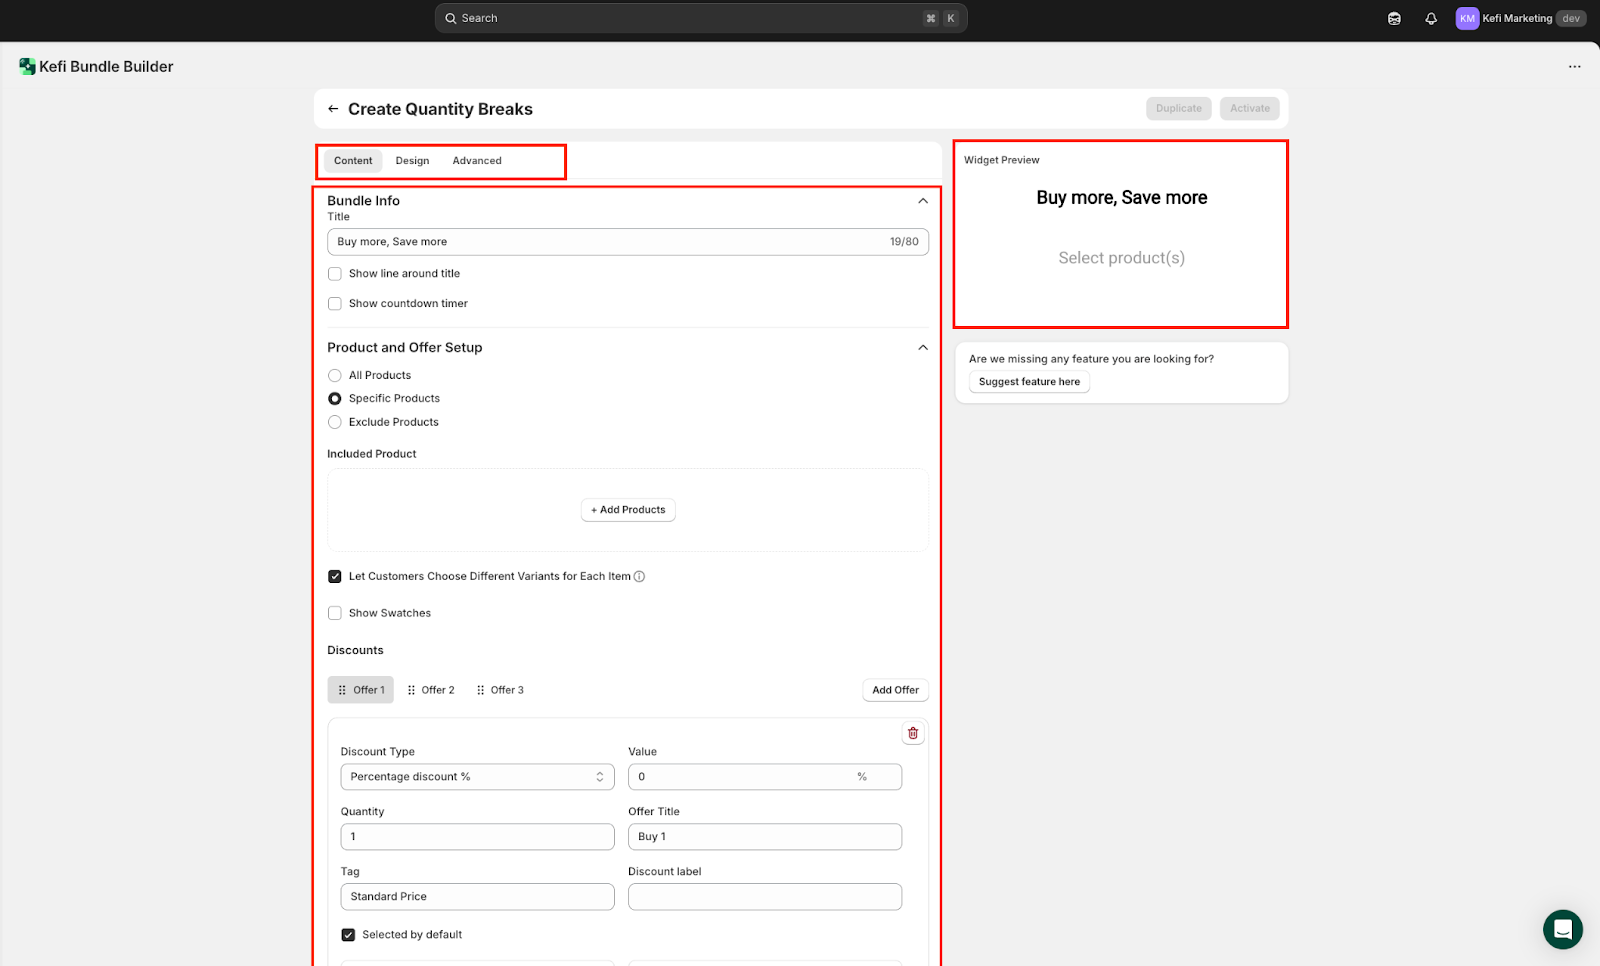
There are 3 sections available: Content, Design and Advanced.
The Widget Preview is available on the right side.
STEP 3
The Content tab is where you define the structure, logic, and messaging of your Quantity Breaks offer. This section allows you to set bundle titles, eligible products, discount tiers, and how offers are displayed to customers.
1. Bundle Info

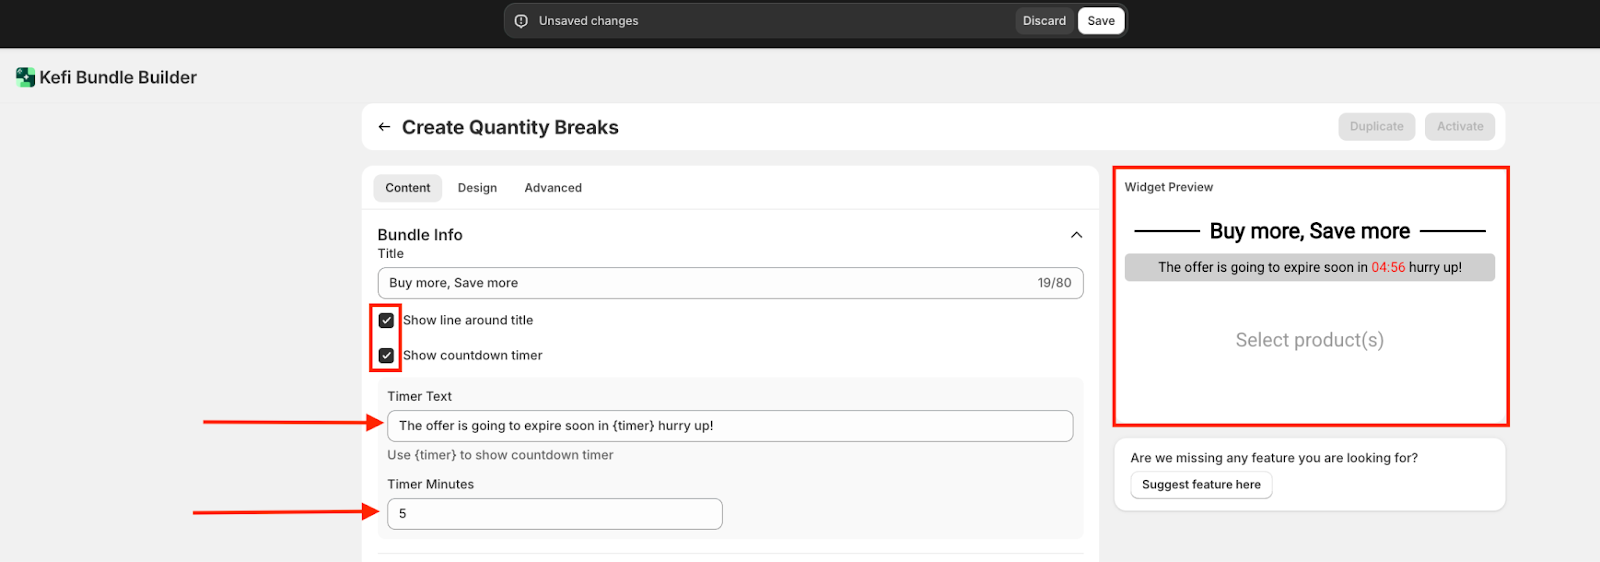
A. Show Line Around Title – Check this box to display a divider line around the title for better emphasis. Uncheck it if you prefer a cleaner look without borders.
B. Show Countdown Timer – Check this box to add a timer beneath your title, creating urgency and motivating quicker purchases. You can edit the timer text and change the timer minutes as well. Uncheck if you don’t want to display a timer.
Changes are instantly visible in the Widget Preview panel, so you can see exactly how the bundle will appear before publishing.
STEP 4
2. Product and Offer Setup
This section lets you decide which products your Quantity Breaks Bundle will apply to. You have three options:
Let Customers Choose Different Variants for Each Item - Shoppers can mix and match product variants (like sizes or colors) claiming the bundle. When unchecked, All items in the bundle must be the same variant.
Show Swatches - Displays variant options (like color swatches or size buttons) directly in the bundle, making it easy for customers to select. When unchecked, variants won’t appear as swatches.
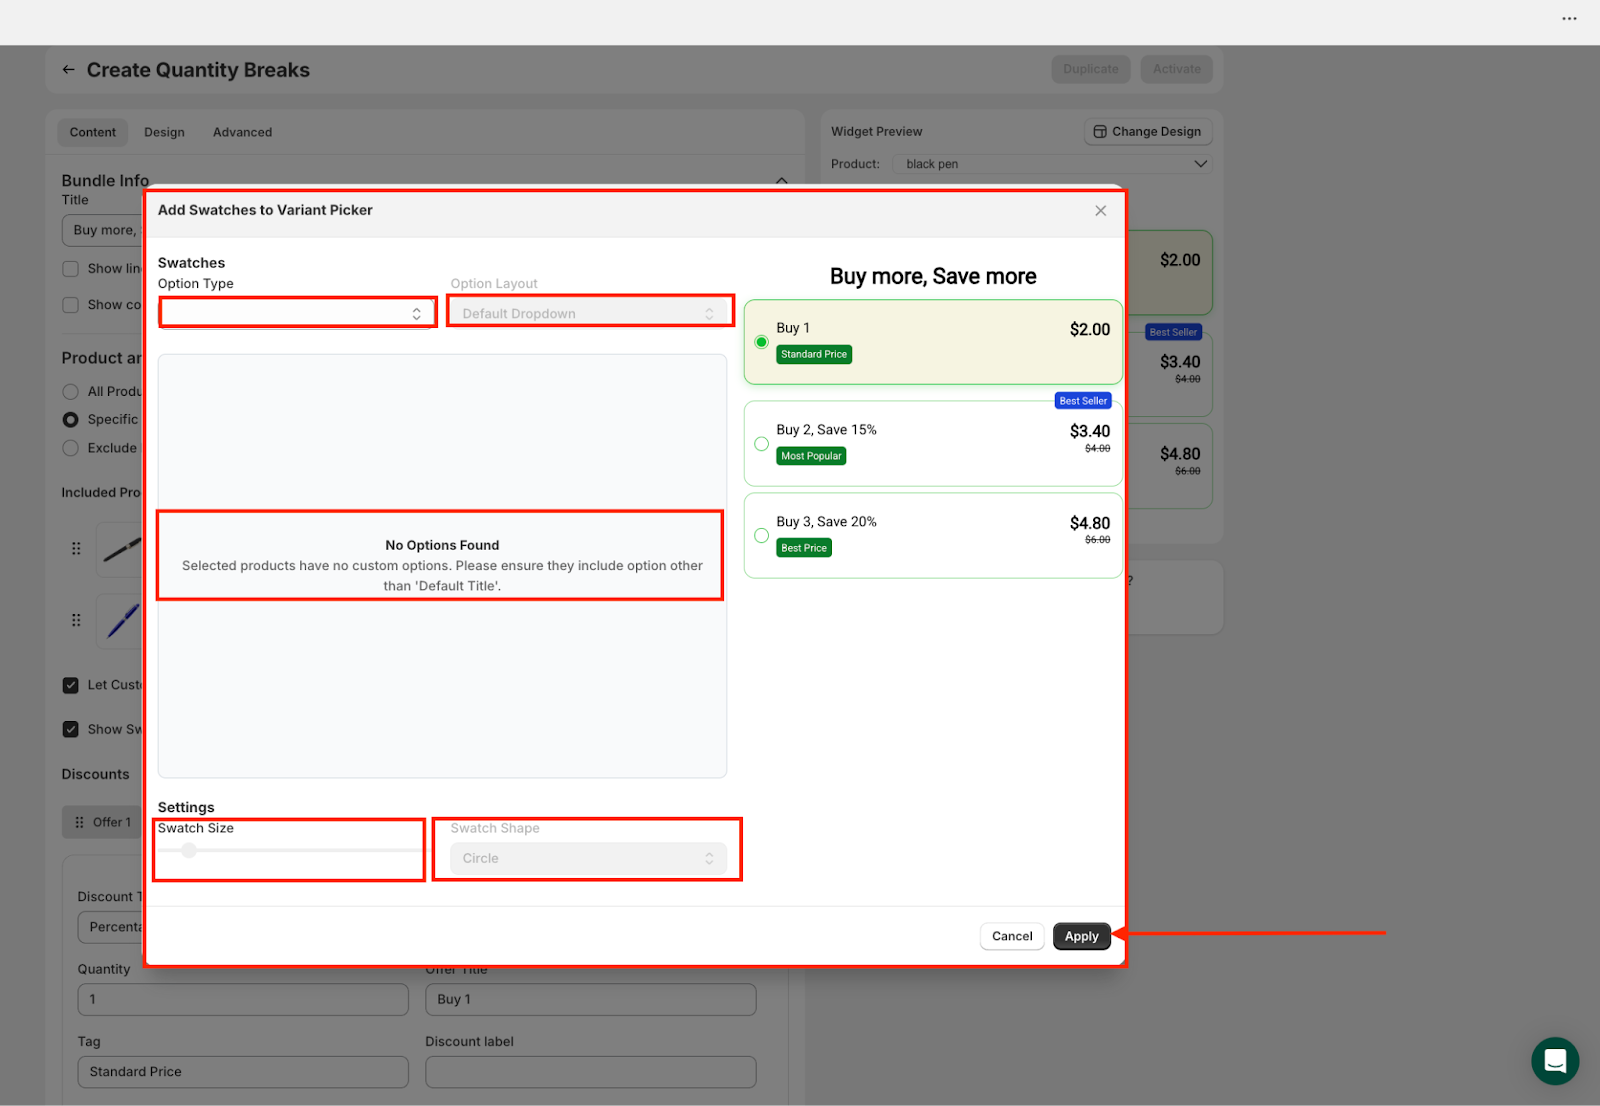
Here’s what happens when you check on Show Swatches and click on ‘Edit Swatch Options’. The panel lets you customize how product variants (like colors or sizes) are displayed in your Quantity Breaks bundle.
In this case, you’ll see a message saying “No Options Found” because the selected product has no custom options. However, if the product had variant options (like different colors or sizes), this is where you would control how they appear to customers in the bundle.
Once your settings are adjusted, click Apply to save changes.

All selections update in the Widget Preview so you can see how the bundle will look before publishing.

On clicking ‘Add Products’, your entire product list will be visible. Select the boxes beside the product you wish to add. Once done, click ‘Select’.

For example, this is the widget preview when both of these boxes are checked. You also have the option to ‘Edit Swatch Options’ here.

Here’s what happens when you check on Show Swatches and click on ‘Edit Swatch Options’. The panel lets you customize how product variants (like colors or sizes) are displayed in your Quantity Breaks bundle.
In this case, you’ll see a message saying “No Options Found” because the selected product has no custom options. However, if the product had variant options (like different colors or sizes), this is where you would control how they appear to customers in the bundle.
Once your settings are adjusted, click Apply to save changes.
STEP 6
3. Discounts - The Discounts section is where you set up different pricing tiers for your Quantity Breaks bundle. Each Offer represents a tier and you can create multiple offers using the Add Offer button.
OFFER 1
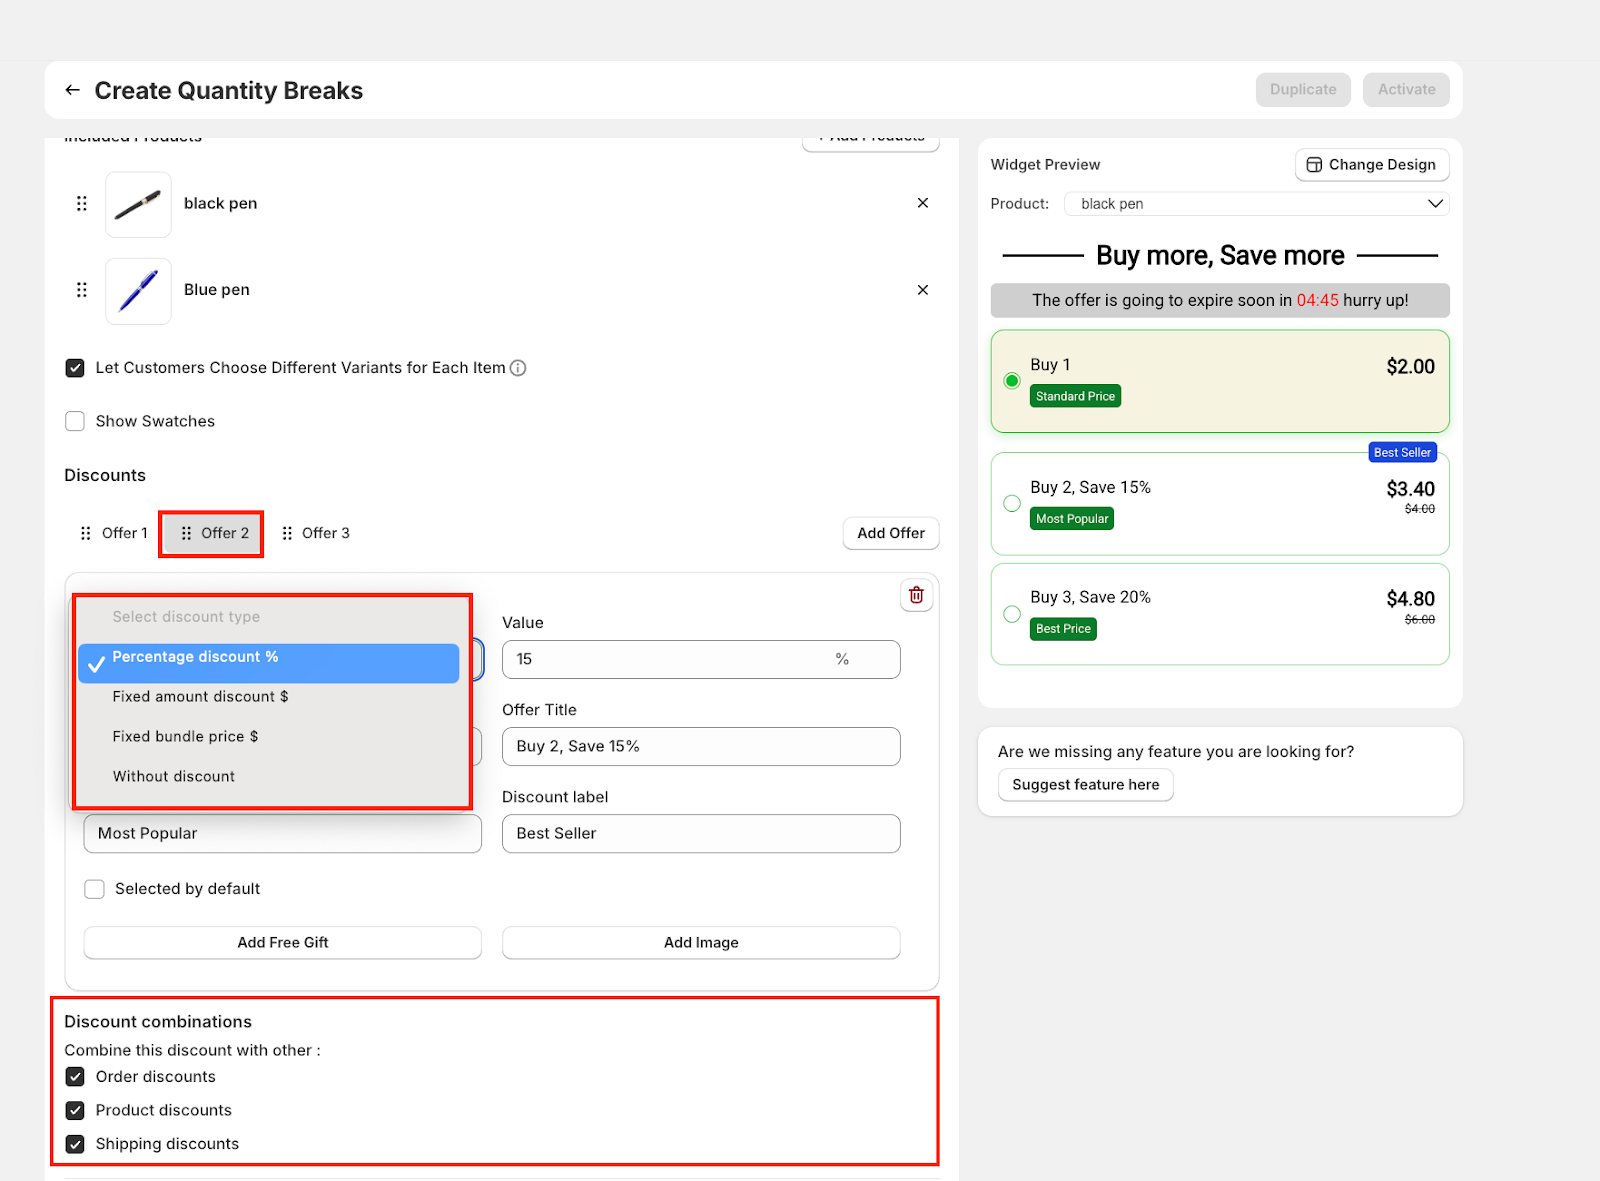
Discount Type: Choose from: Percentage Discount (%), Fixed Amount Discount ($), Fixed Bundle Price, Without Discount
Value: The actual discount value in percentage
Quantity: Minimum number of items required to unlock this offer tier.
Offer Title: The label shown to customers (e.g., “Buy 3, Save 15%”).
Tag: An optional internal label to organize or filter offers.
Discount Label – Add a custom label to highlight the offer further.
Selected by Default – Check this box if you want a specific offer automatically highlighted when the bundle loads.
Add Free Gift – Attach a free gift to the offer, making it even more appealing.
Add Image – Include a product image or promotional graphic alongside the offer for better visibility.
The Widget Preview on the right updates in real time, so you can instantly see how your offers will look to shoppers.

At the bottom of this section, you can control whether your bundle discounts stack with other promotions:

Checking these boxes means the bundle discount can stack with other active promotions. Unchecking them ensures it works as a standalone offer.
STEP 7
Similarly like Offer 1, you can also switch and add Offer 2. You can either keep the same discount type or choose from the options in the list. You can also modify the discount combinations as per your preference.
Please note- Each offer tab (Offer 1, 2, and 3) includes the same fields:
You can use "Add Offer" to create more discount tiers or click "Delete" to remove any.
This setup helps you create flexible, tiered discounts that encourage larger purchases.
STEP 8
When you switch to Offer 3, you have an extra toggle option. Simply enable it to utilise the feature - “Allow users to buy extra items with the discount offer’’. The rest of the features are the same as Offer 1 and Offer 2.
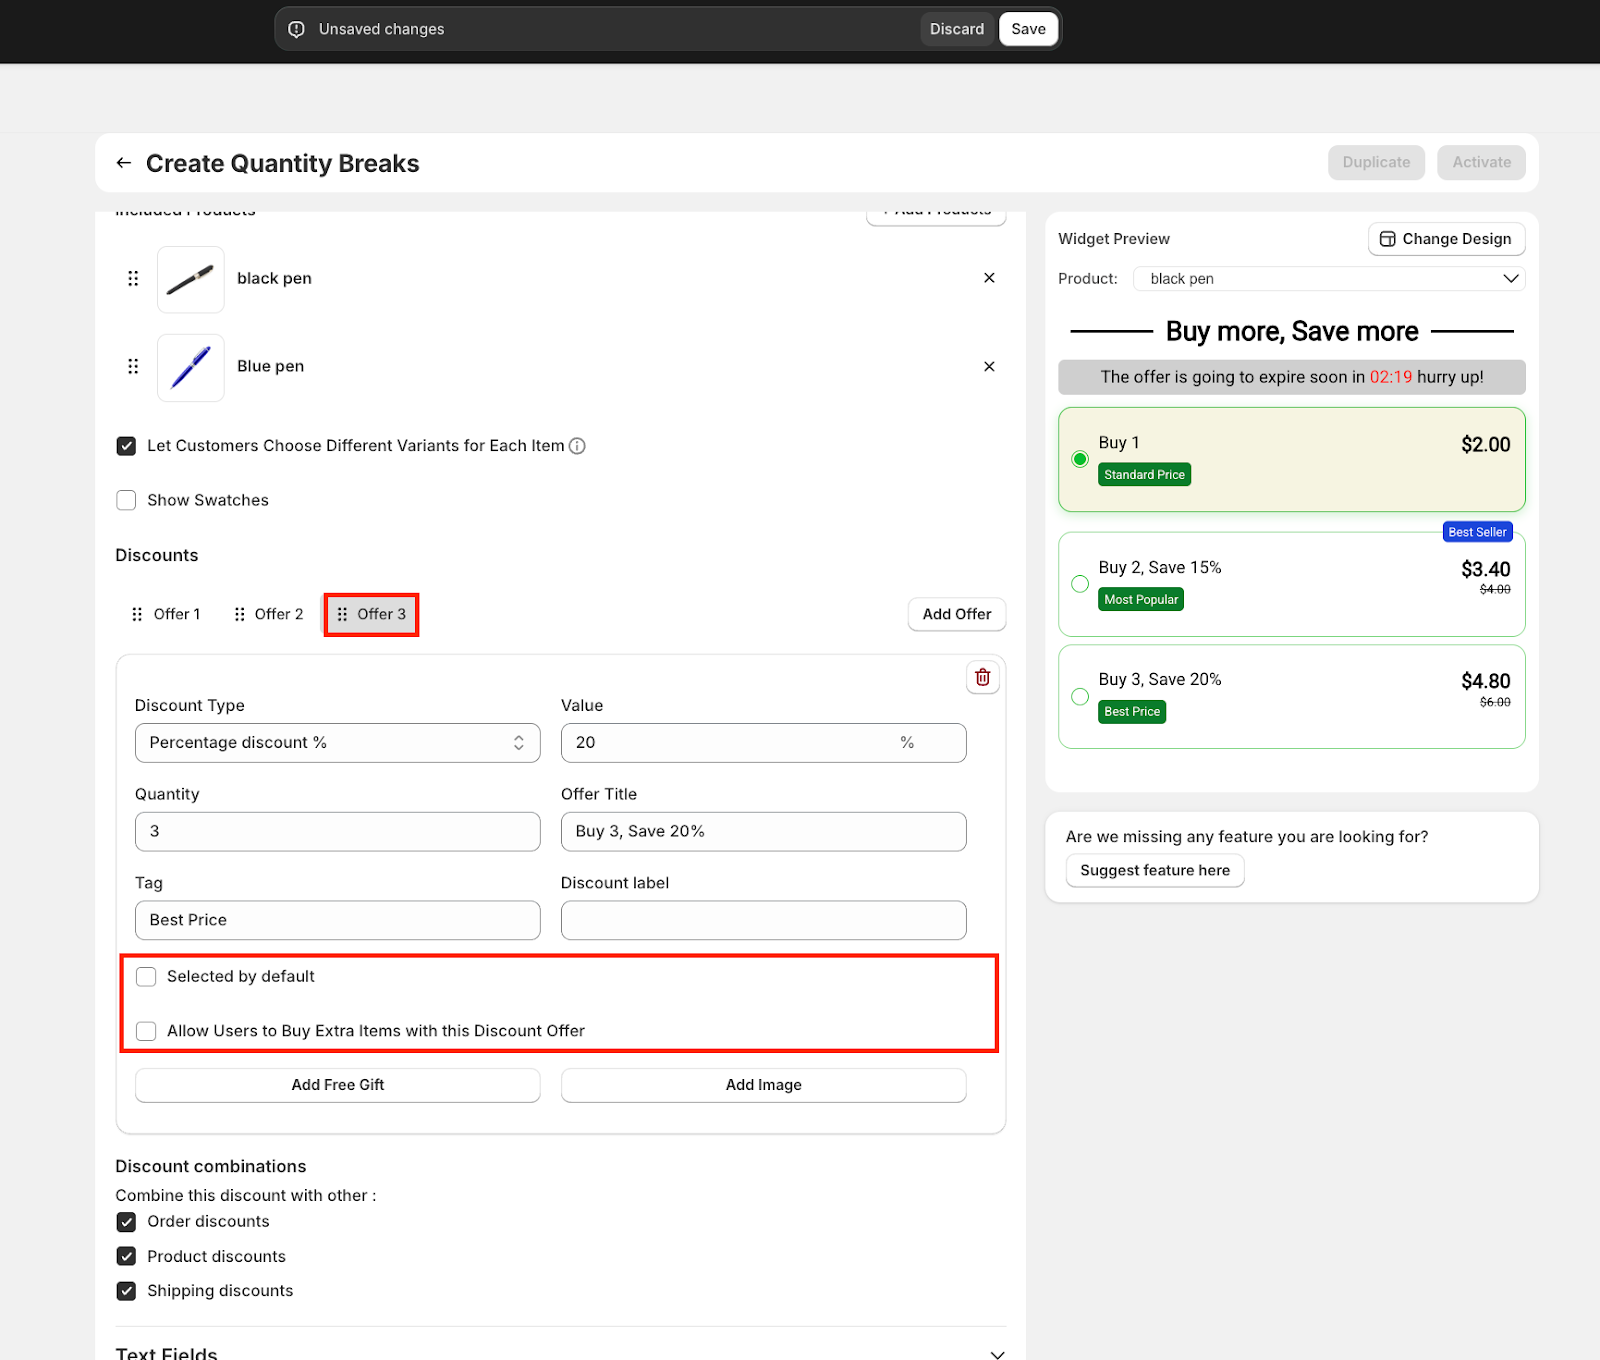
Here’s what happens when you enable both the options - ‘Selected by Default’ and ‘Allow users to buy extra items with the discount offer’
For example, if the offer is “Buy 3, Save 20%,” customers could purchase 4, 5, or more items, and each one would still qualify for the 20% discount. If unchecked, the discount applies strictly to the set quantity (in this case, exactly 3 items).
This flexibility can encourage larger orders since customers aren’t limited to the minimum tier.
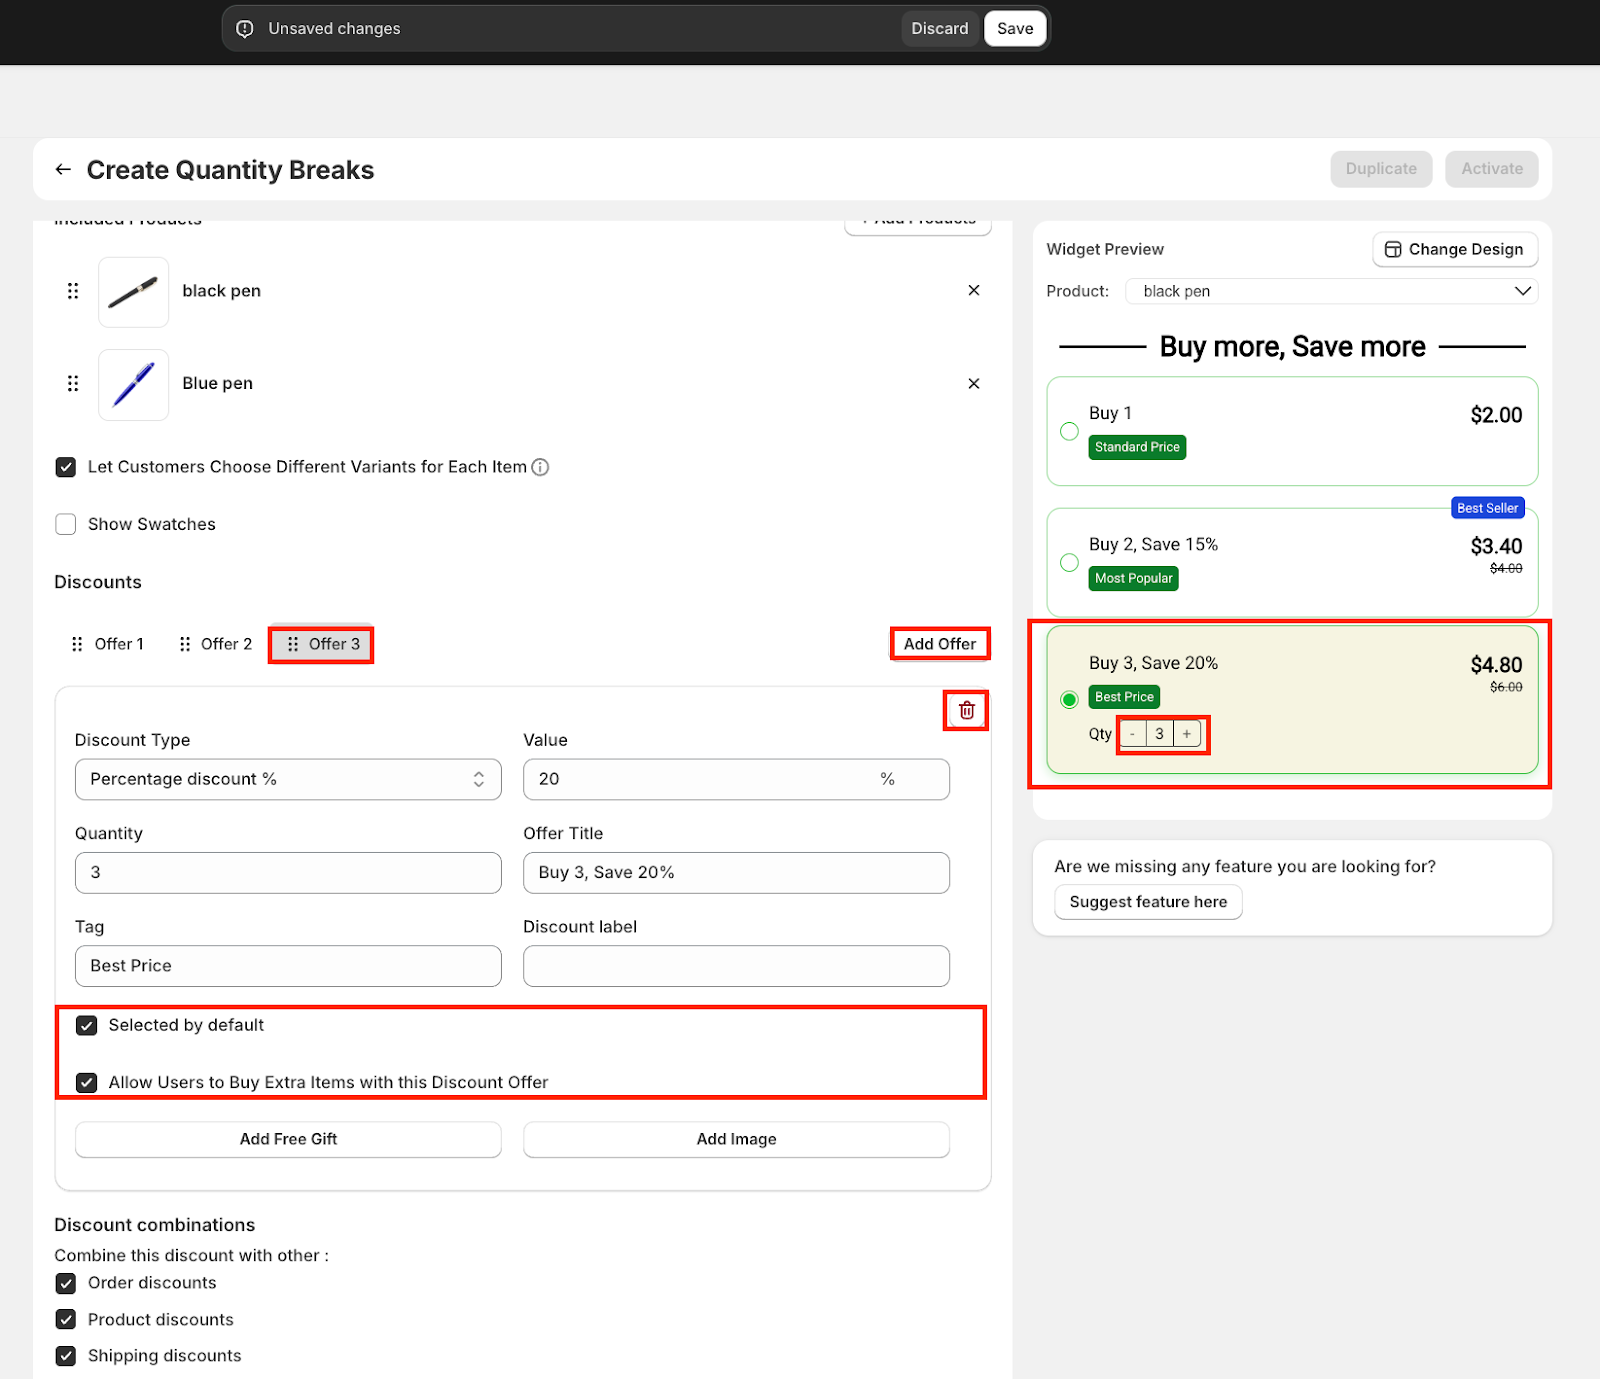
If you want to add more offers, simply click on ‘Add Offer’, and if you wish to delete any offer tier, just click on the bin icon.
STEP 9
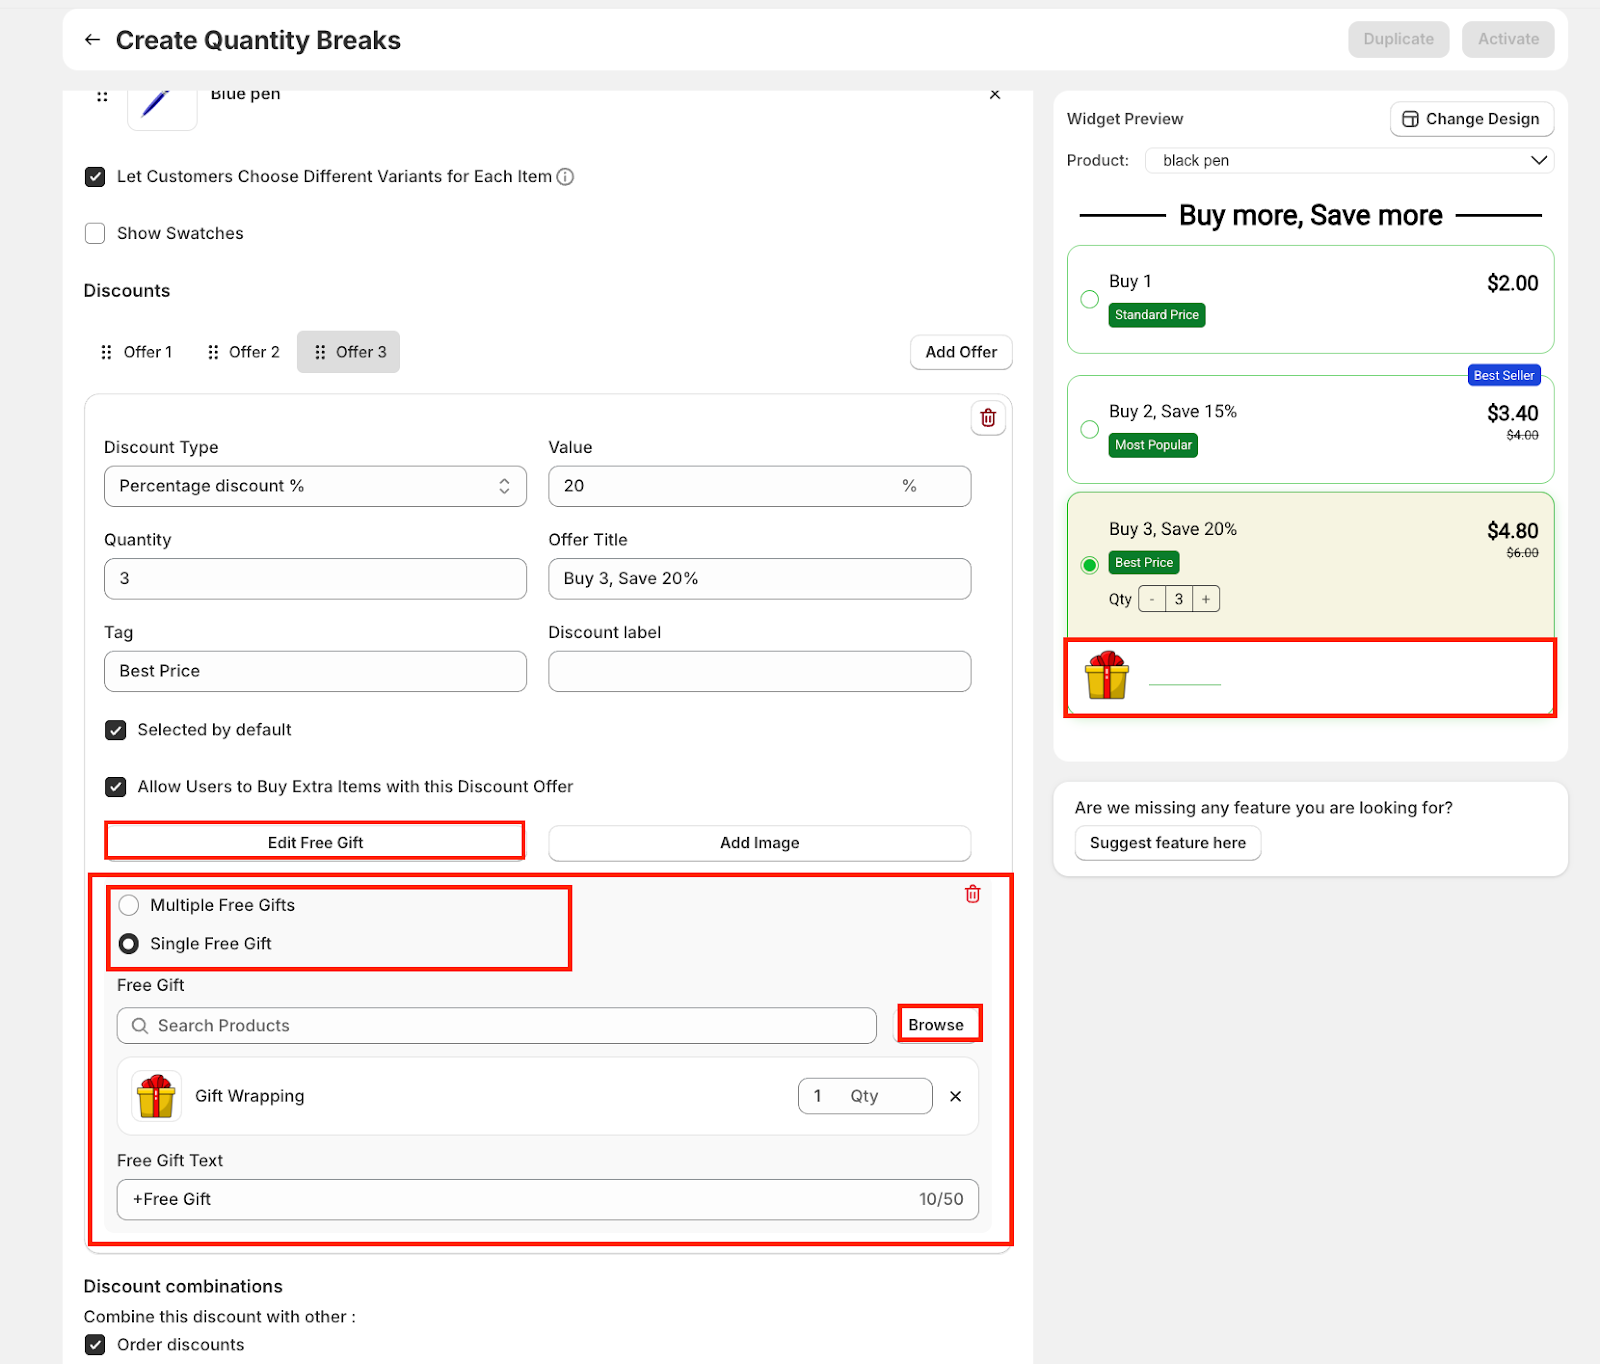
To ‘Add Free Gift’ click on it. This makes the bundle more appealing by giving customers an extra incentive to buy. The free gift will appear directly in the Widget Preview so shoppers can clearly see what they’re getting.
Single vs. Multiple Free Gifts
Free Gift Selection - You can use the Search Products field or the Browse button to select which product will be given as the free gift. Once chosen, the gift appears in the list (e.g., Gift Wrapping) along with the quantity.
Free Gift Text - Here you can customize the label that appears alongside the gift in the widget (e.g., + Free Gift). This text helps highlight the reward and draws customer attention to the added value.
With these settings, you can make your offer stand out by combining discounts with attractive free gifts—helping to increase conversions and customer satisfaction.
.
STEP 10
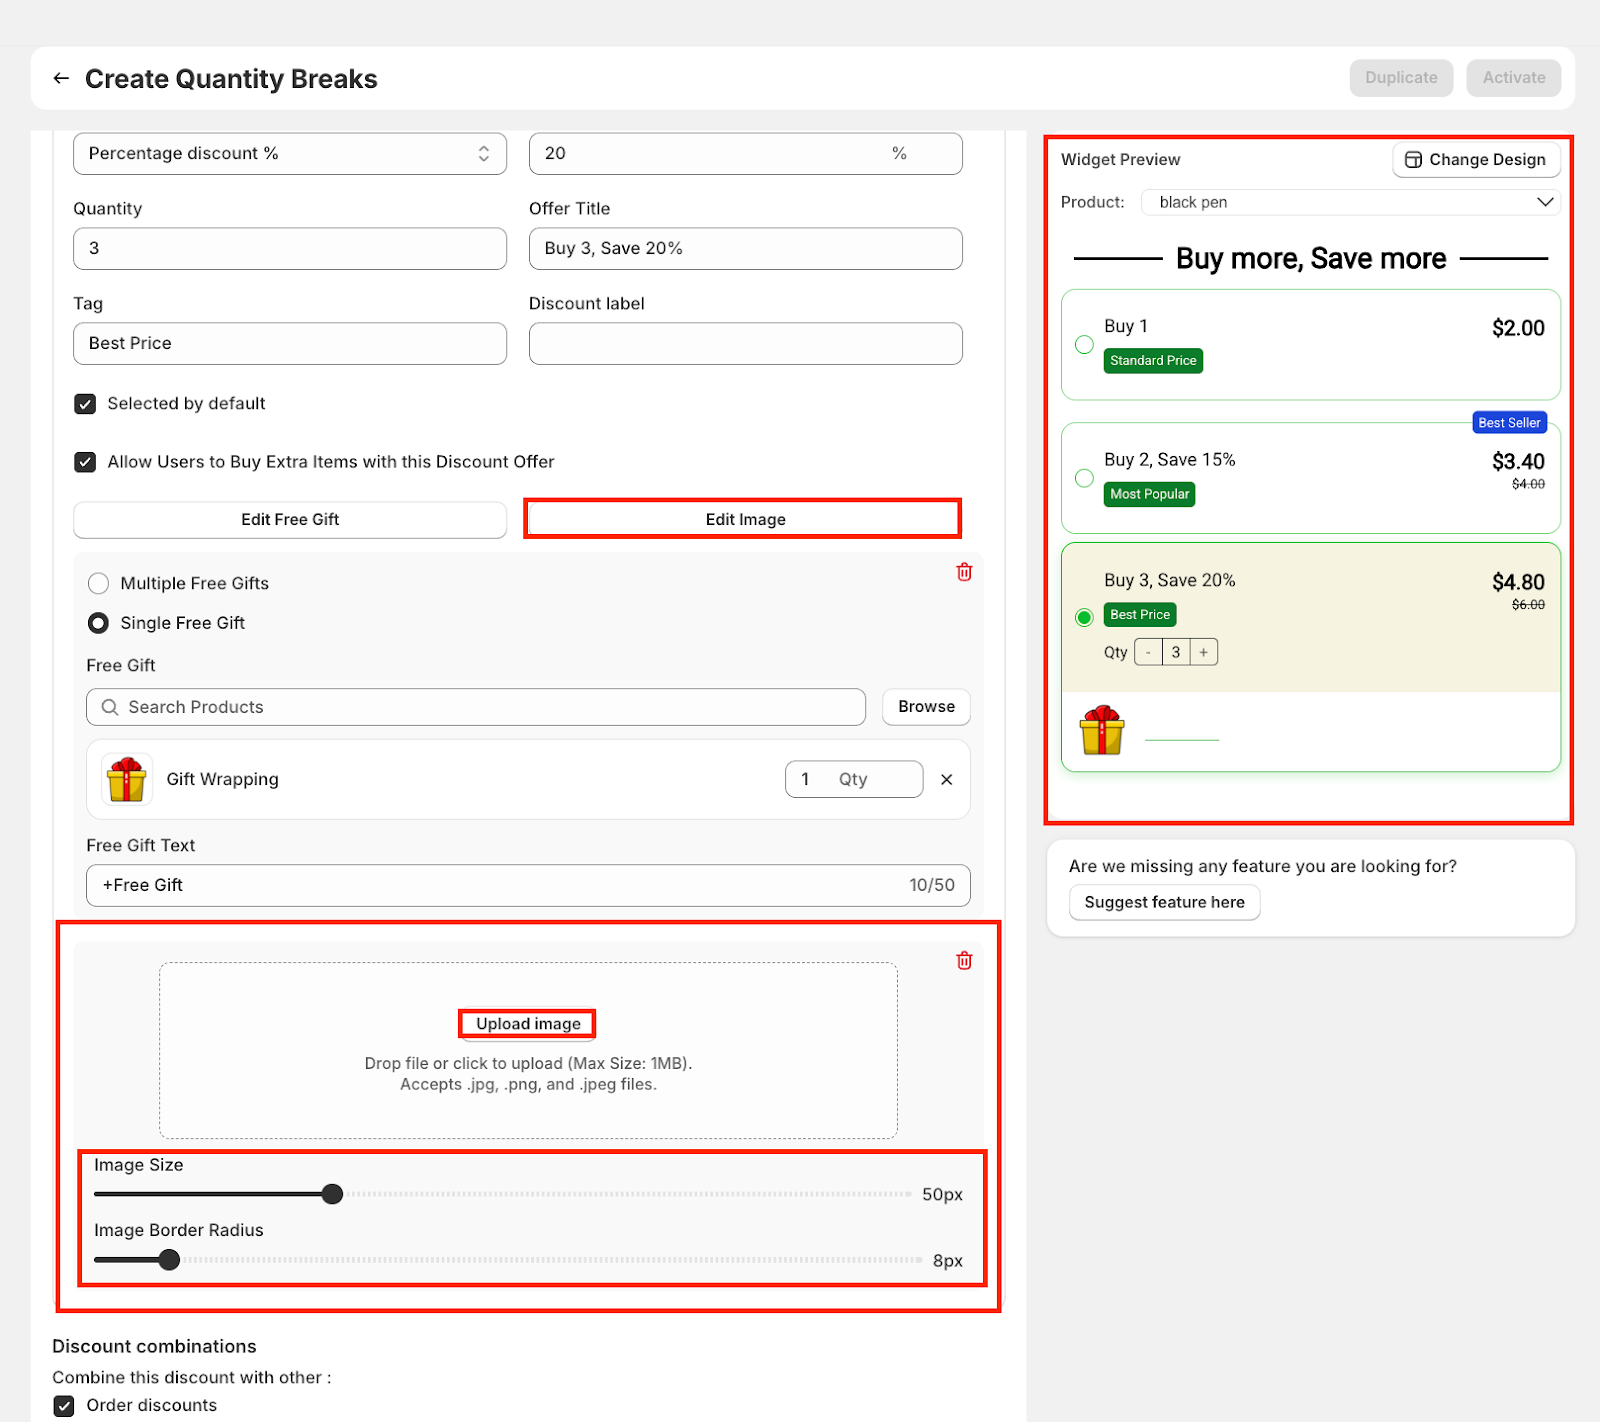
You can also enhance your discount offer by uploading a custom image to make it more eye-catching and engaging for shoppers. Simply click ‘Add Image’.
Upload Image -You can upload an image file directly here. Supported formats include .jpg, .png, and .jpeg with a maximum file size of 1MB. Once uploaded, the image will appear in the Widget Preview panel so you can instantly see how it looks alongside your offer.
Image Size & Border Radius -
All changes update live in the Widget Preview, allowing you to fine-tune the image placement, size, and styling before publishing.
STEP 11
4. Text Field - This section allows you to customize the text displayed in the bundle widget in your preferred language. You can modify labels and messages to better align with your store’s tone and customer base.
The following options are available for customization:
Once you're done customizing the text fields, click Next to proceed to the Design section of the bundle setup.

STEP 12
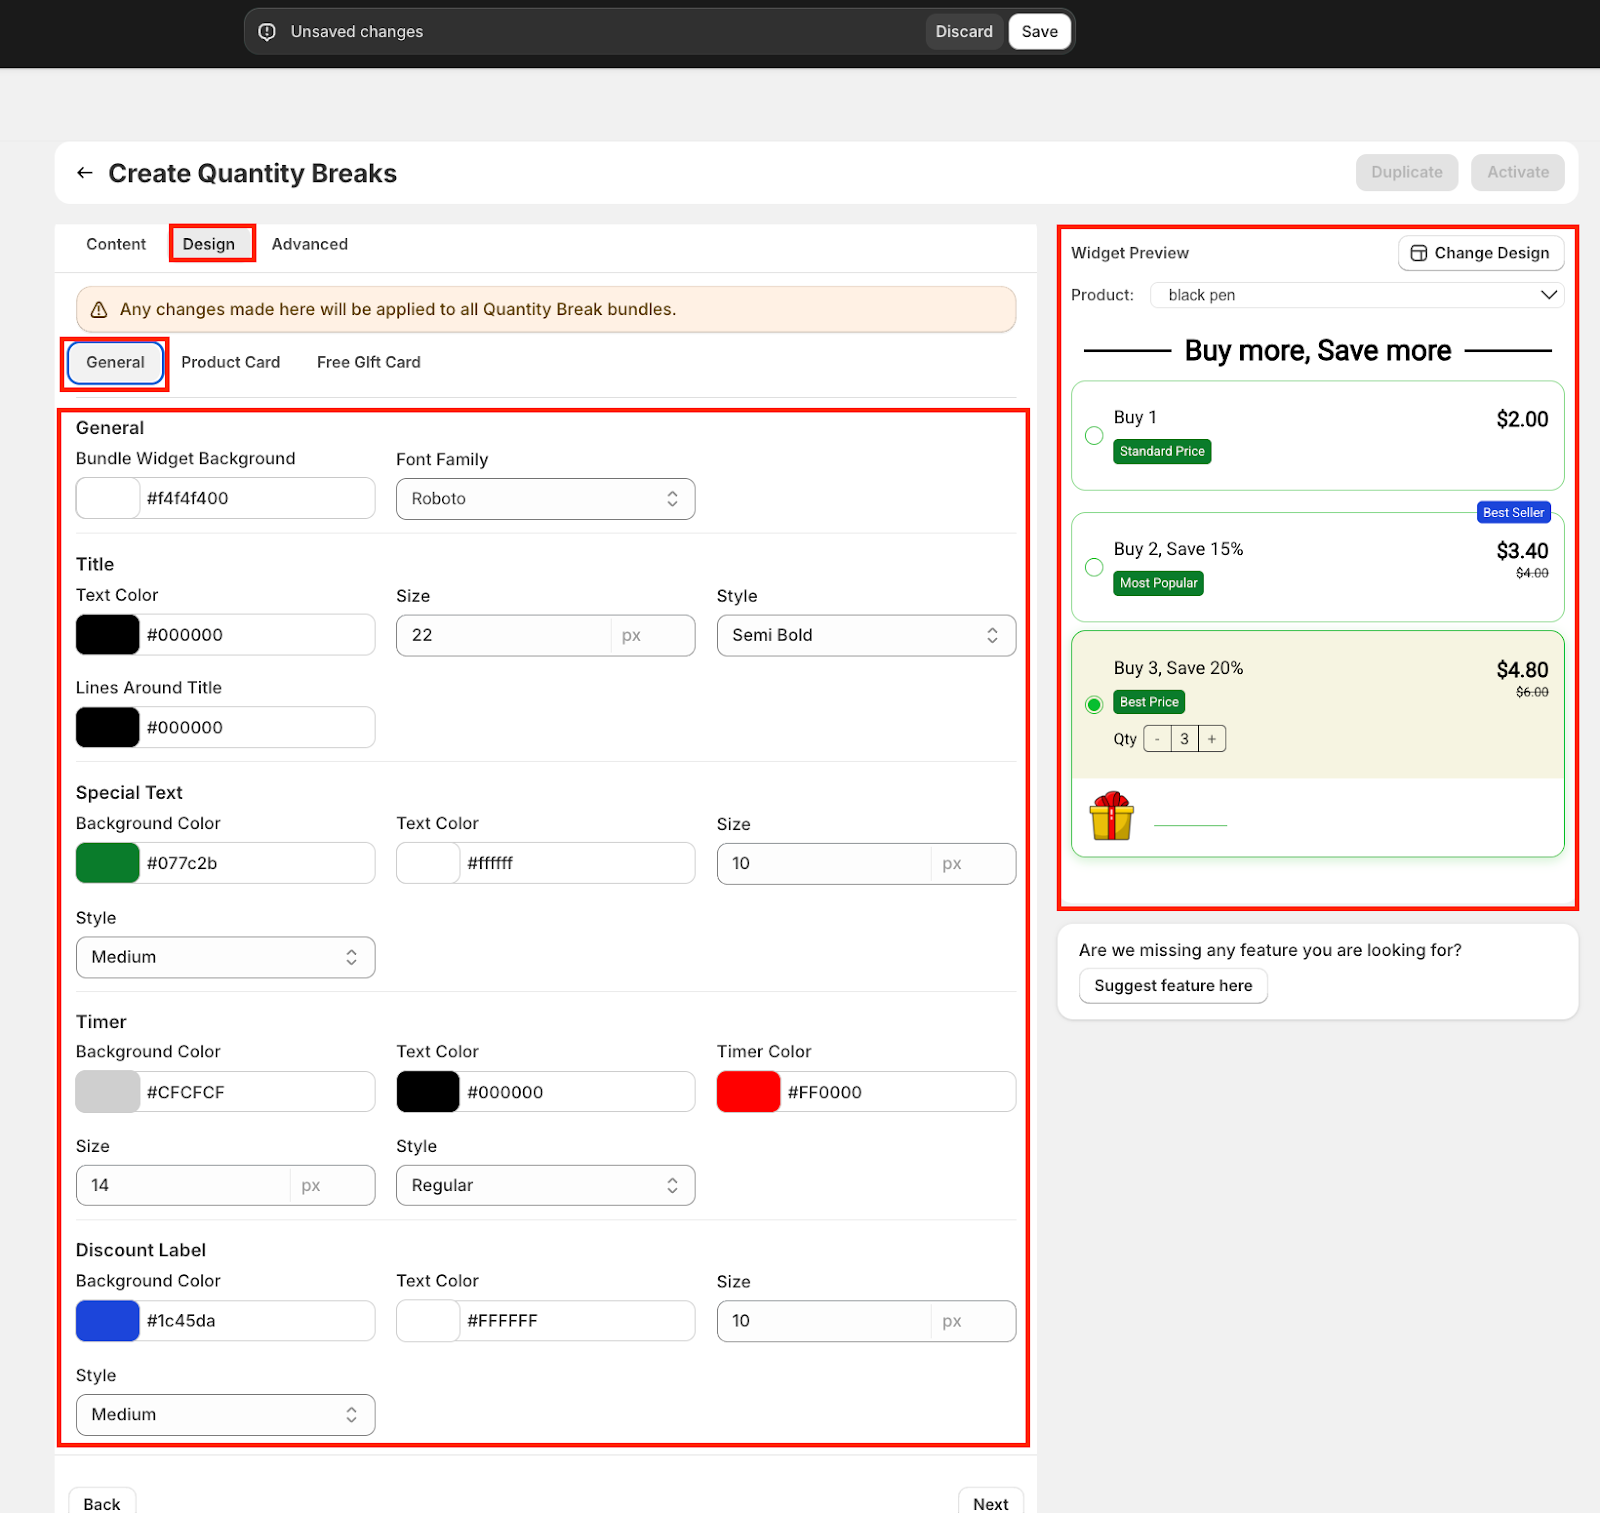
The Design tab lets you control the overall look and feel of your Quantity Breaks bundles so they seamlessly match your store’s branding. Any changes you make here will be applied across all Quantity Breaks bundles.
This tab has three sub-sections:
General –
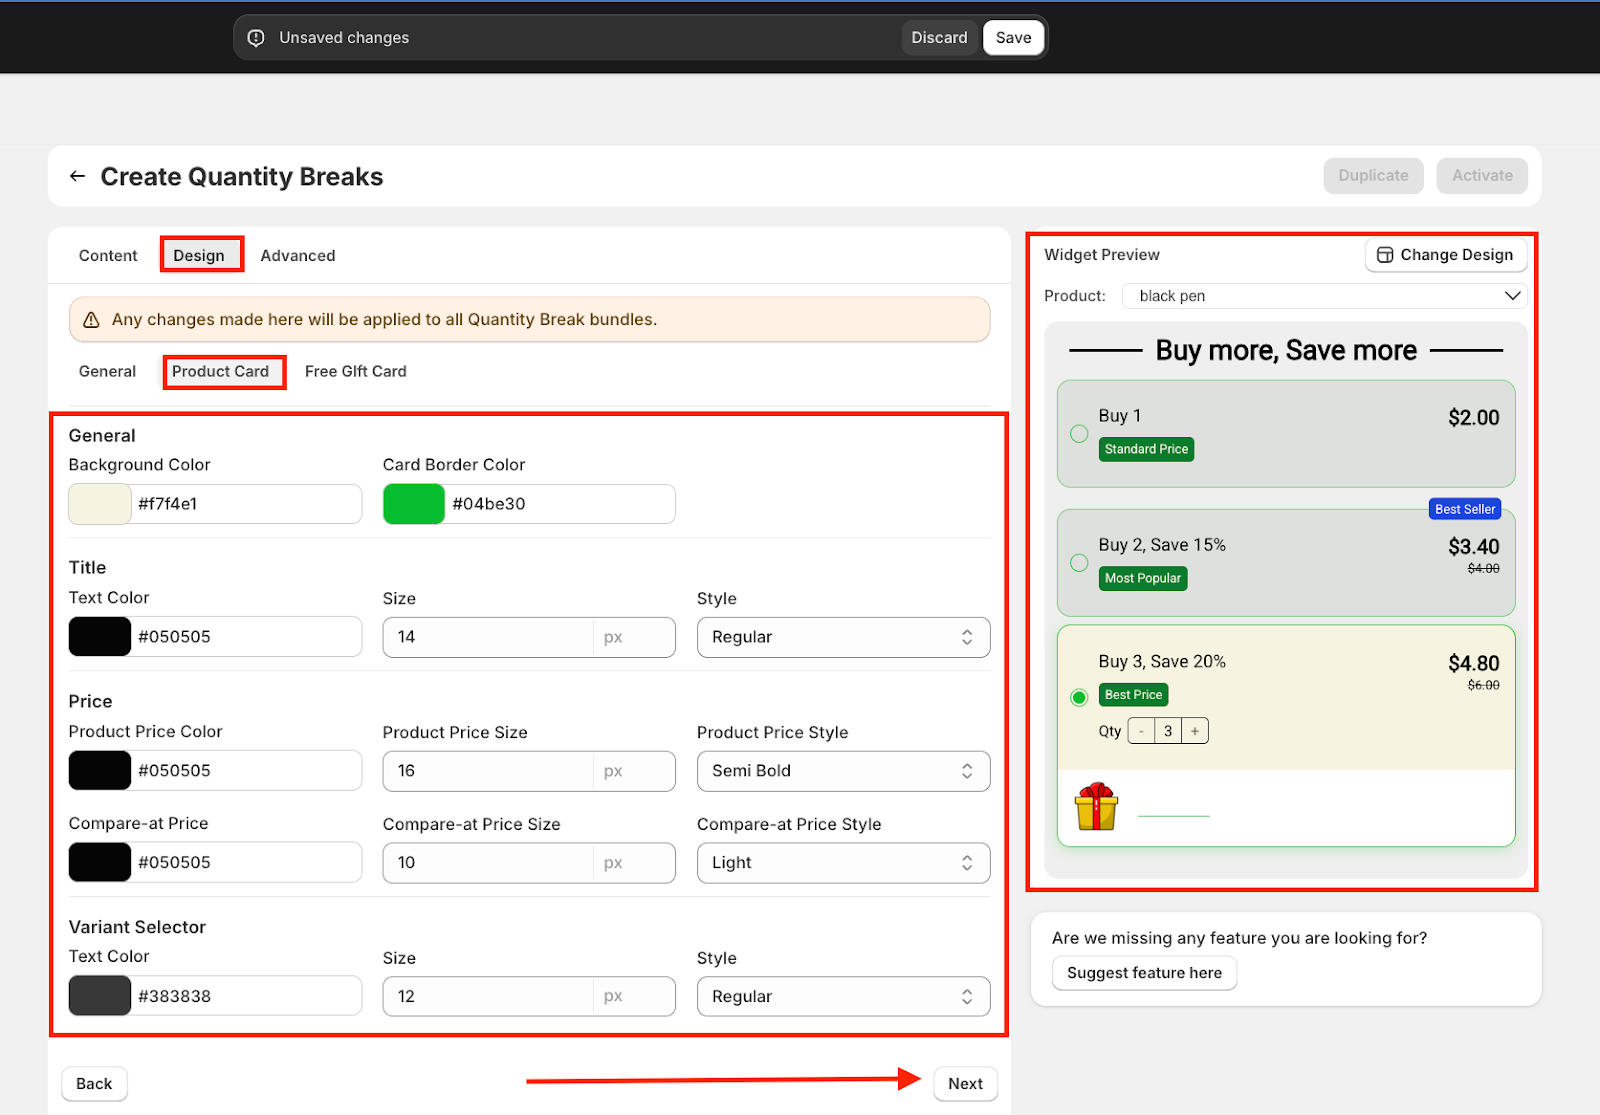
Product Card - The Product Card section in the Design tab allows you to customize how each product card appears within your Quantity Breaks bundle. This ensures your bundle looks polished and aligns with your store’s branding.
General
Background Color – Set the background of the product card for a clean or branded look.
Card Border Color – Define the outline color to make product cards stand out.
Title - Adjust the text color, size, and style for product names, ensuring they’re easy to read and consistent with your brand typography.
Price
Product Price – Customize the color, font size, and style (e.g., bold or semi-bold) to highlight the main selling price.
Compare-at Price – Control the look of the strikethrough/old price by setting color, font size, and style (e.g., lighter weight to keep focus on the discounted price).
Variant Selector - Style the variant selector text with custom color, size, and font style to match the rest of your cart experience.
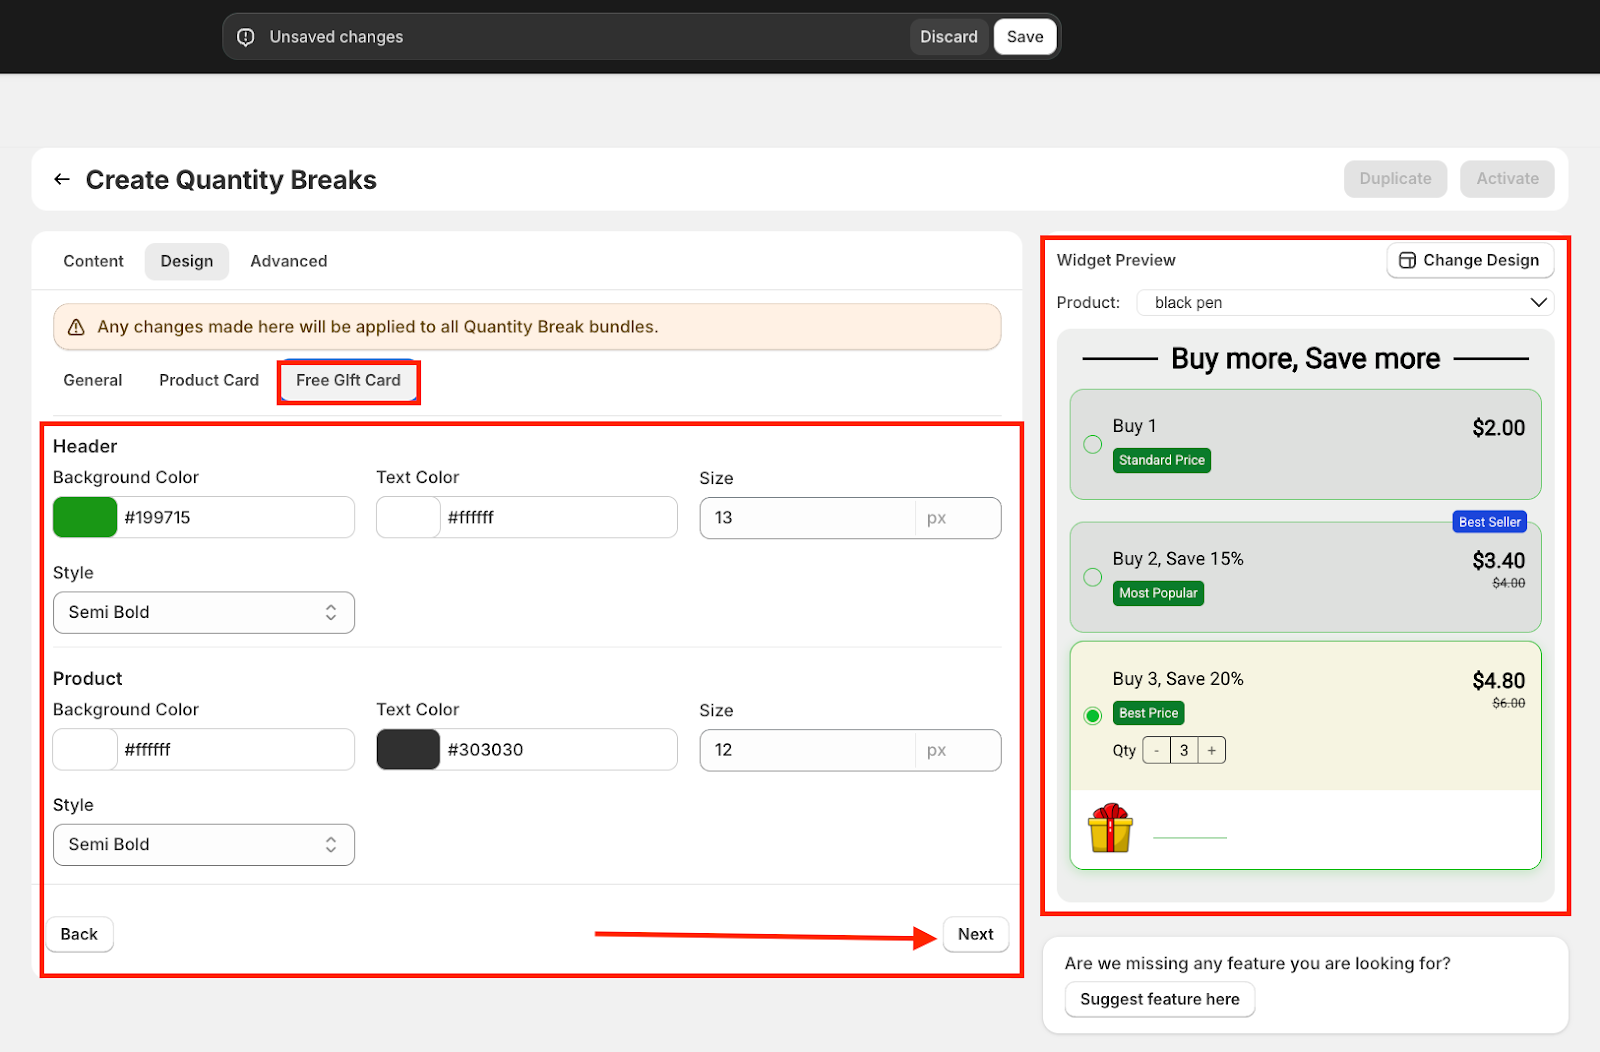
C. Free Gift Card - The Free Gift Card tab lets you customize the look and feel of the free gift section within your Quantity Breaks bundle. This ensures that when a shopper qualifies for a free gift, it’s highlighted in a way that matches your brand style and draws attention.
Header
Product
As you make changes, the Widget Preview on the right updates instantly, showing exactly how the design will appear to your customers before you publish. Click ‘Next’ to move to the Advanced section.
STEP 13
The Advanced tab gives you more control over how your Quantity Breaks bundle is displayed, priced, and targeted to customers.
1. Widget Position - By default, the bundle widget appears above the Add to Cart button. You can reposition it using the Shopify Theme Editor by dragging the app block to your preferred spot.

2. Hide Shopify Elements - Add selectors here if you want to hide specific Shopify elements from the cart or product page for a cleaner look.

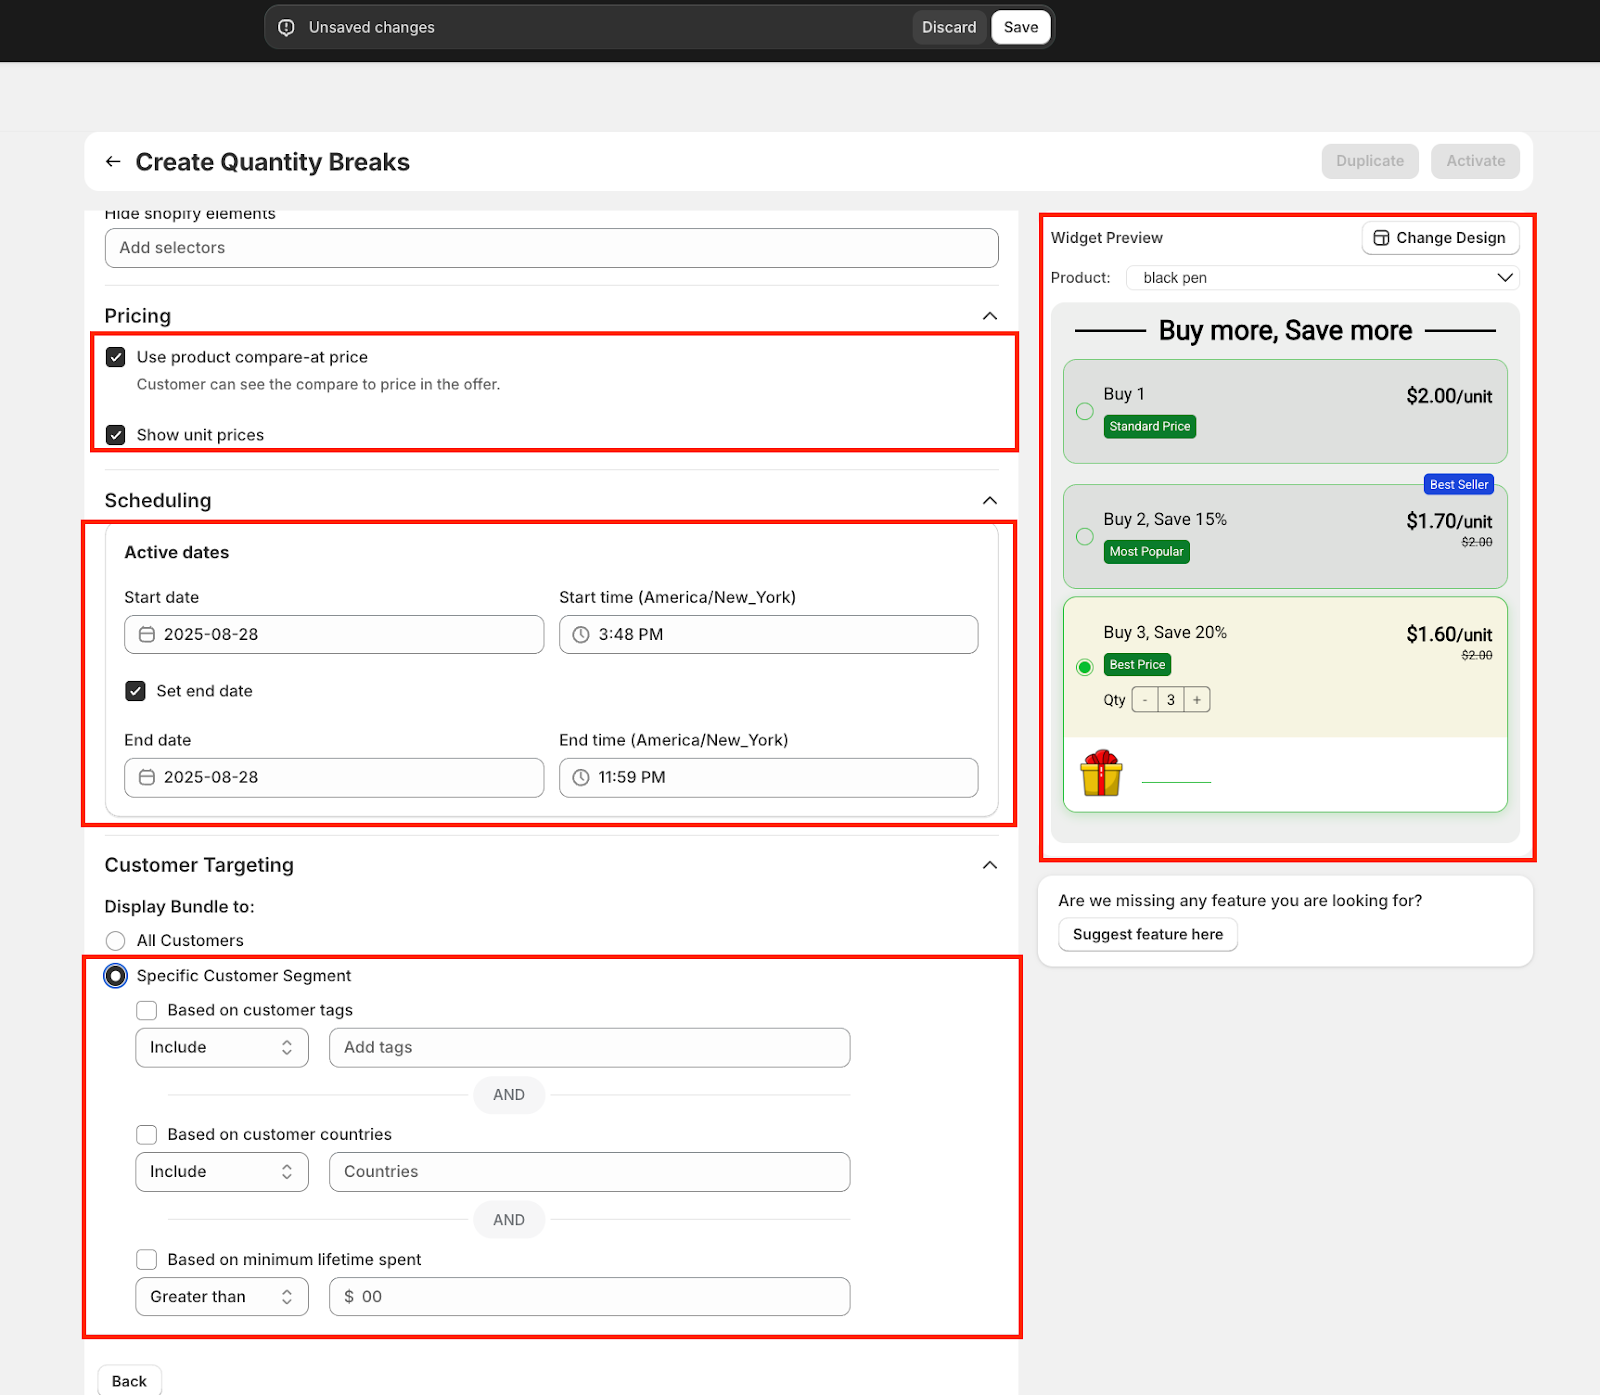
3. Pricing
Use product compare-at price (Checkbox): When checked, customers will see the original “compare-at” price alongside the discounted offer, emphasizing savings.
Show unit prices (Checkbox): When checked, displays unit pricing (e.g., per item cost), which is especially useful for consumables or multipack products.

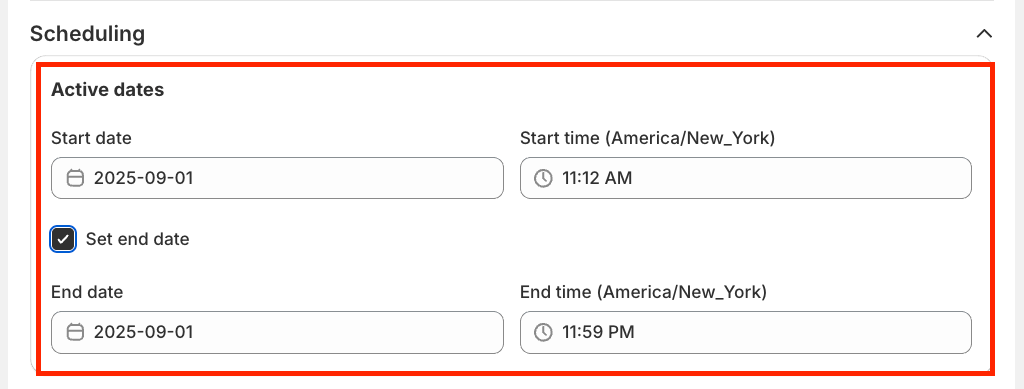
4. Scheduling - Set when your bundle goes live:
Active Dates – Choose a start date and time for when the offer should appear.
Set End Date (Checkbox): When checked, you can define an end date to automatically stop the offer at a specific time, perfect for flash sales or seasonal campaigns.
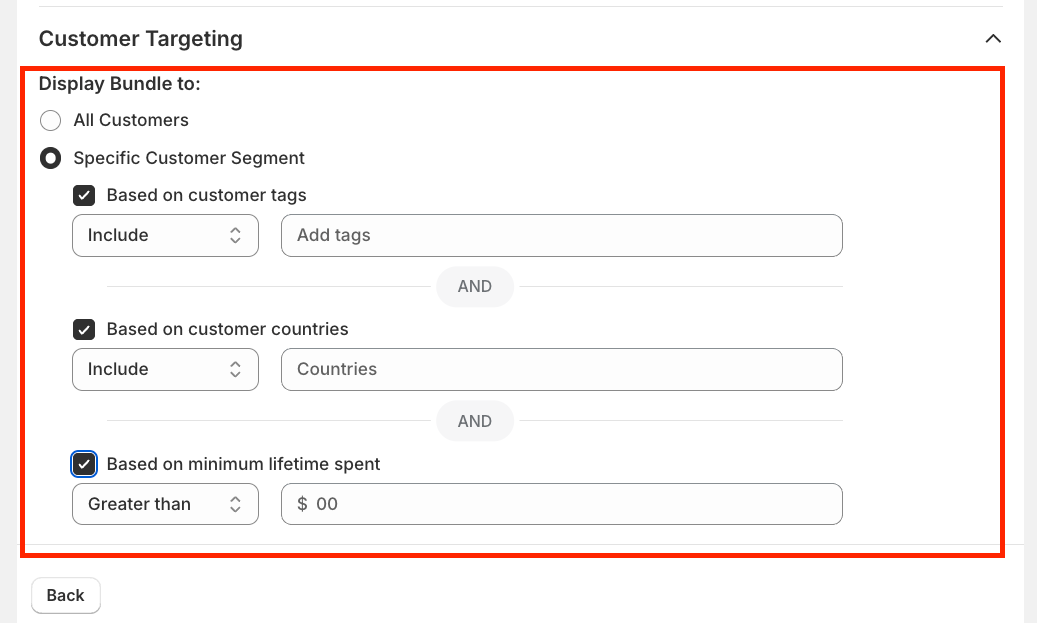
5. Customer Targeting - Control who sees the bundle:
All Customers – Display the offer to everyone.
Specific Customer Segment – Restrict visibility to certain groups
STEP 14
For Specific Customer Segment – You can narrow targeting with advanced filters:
STEP 15
Click ‘Save’ to apply the customizations.

STEP 16
Finally, activate the Quantity Breaks/Volume Discount Bundle by simply clicking on ‘Activate’.

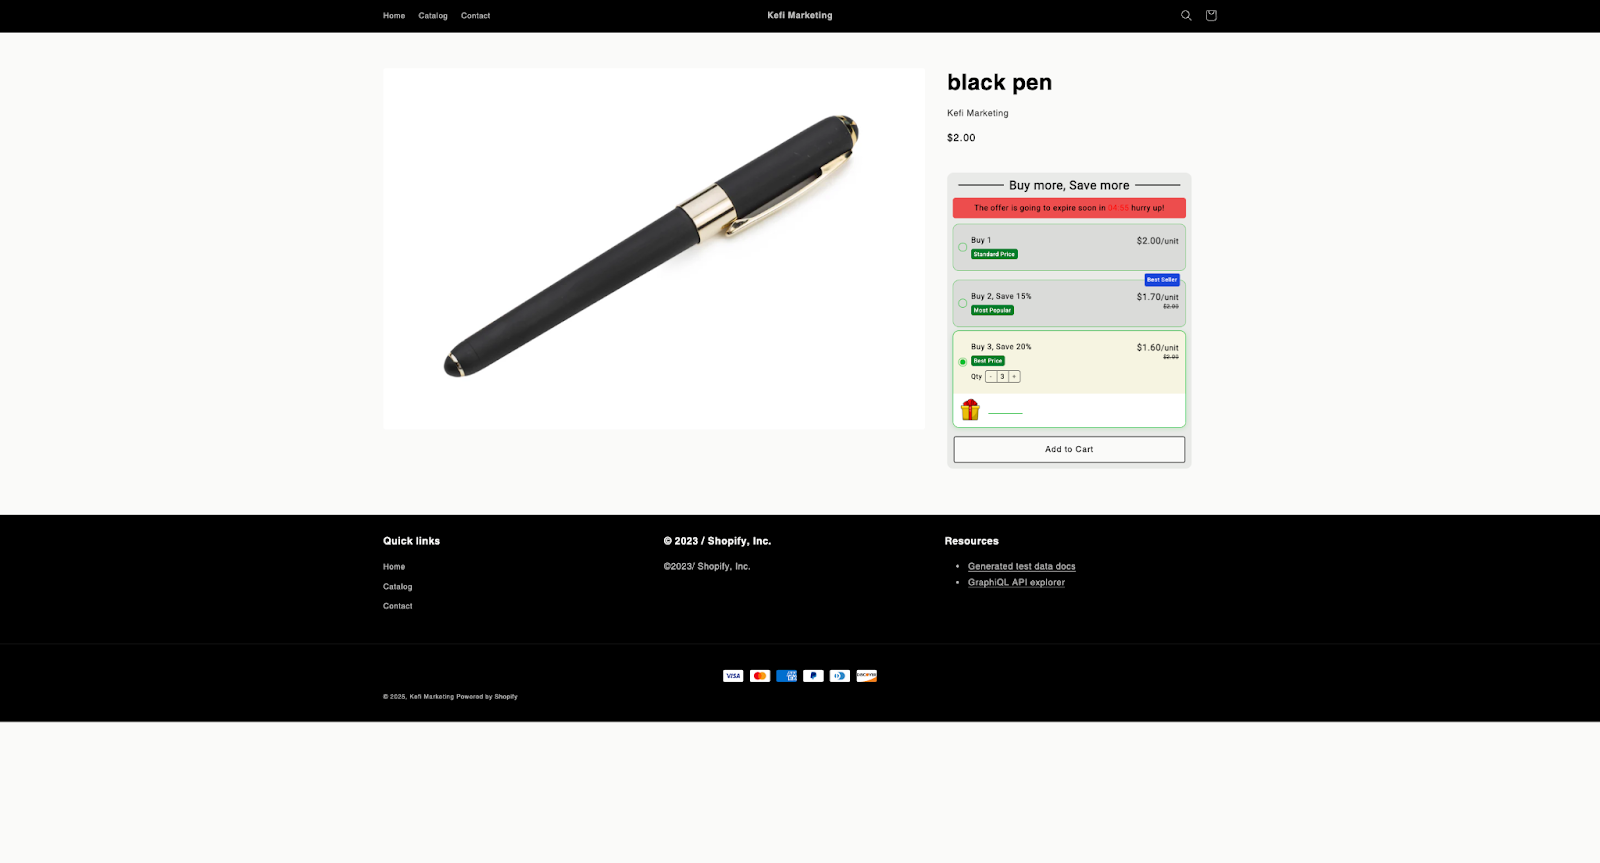
Once you’ve activated the bundle, you can also view it in the store. Simply click ‘Show on Store’
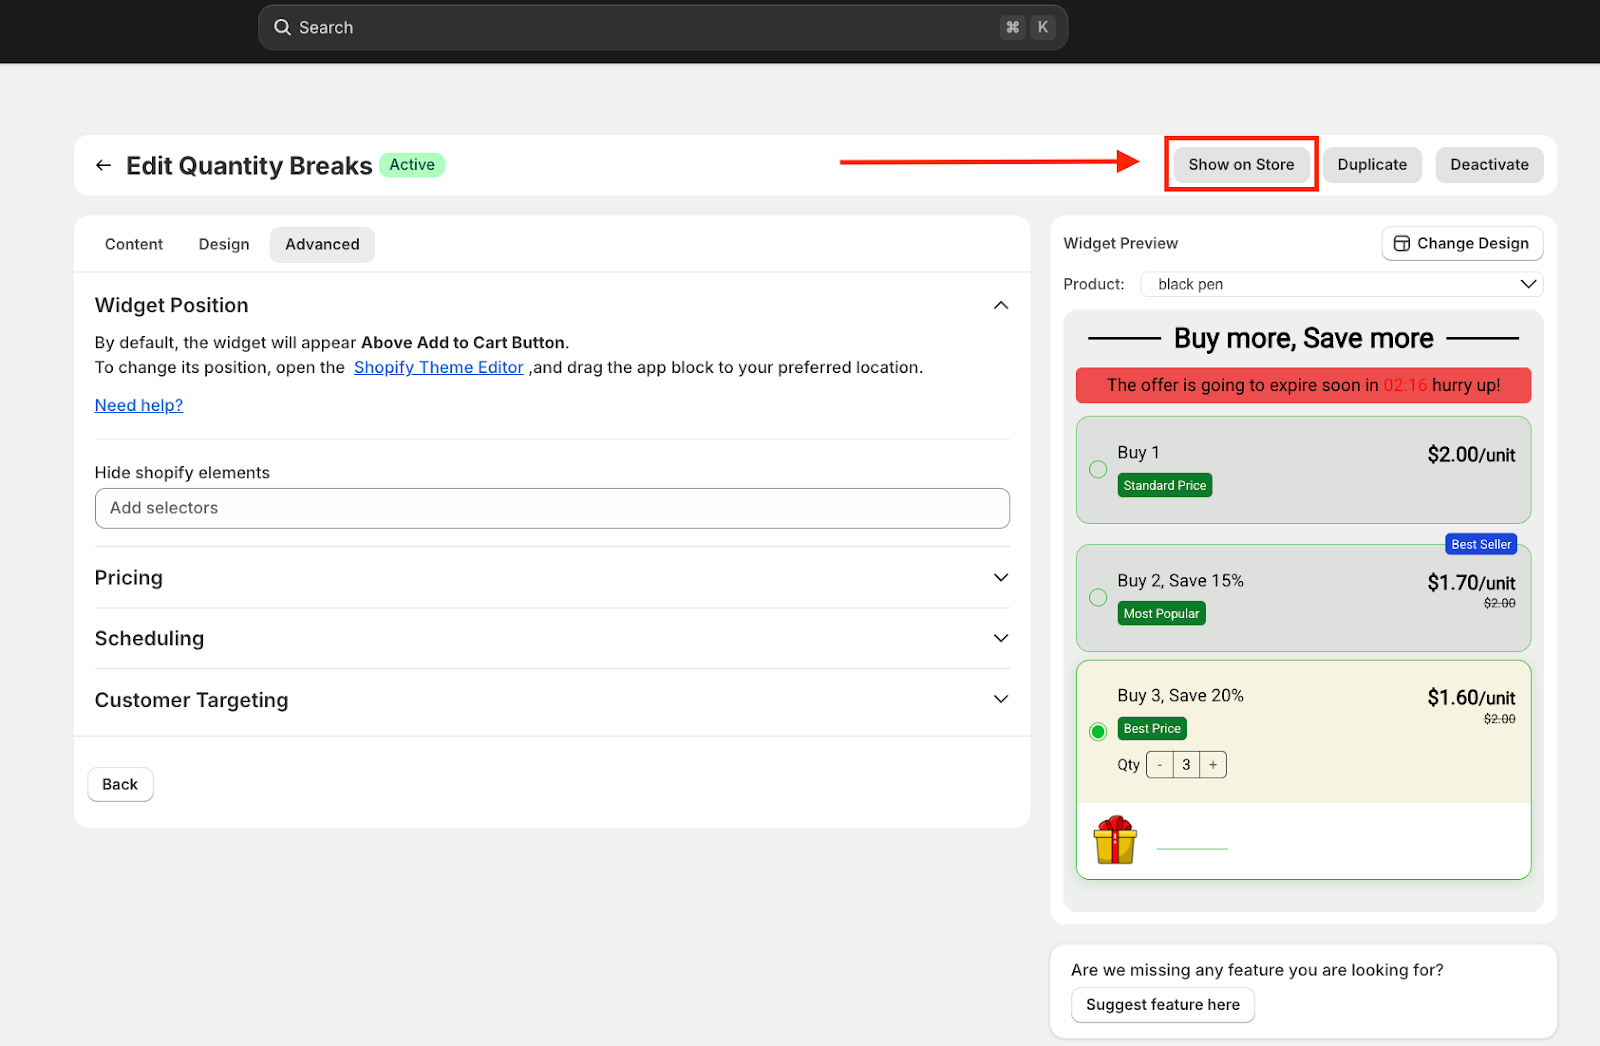
Here’s how the bundle would appear on the store -
STEP 17
If you want to deactivate the bundle, simply click on deactivate.

If you have any questions or need assistance, feel free to contact us:
.svg)
