Want to boost sales and reward bulk buyers? Setting up Quantity Breaks (also known as Volume Discounts) is a smart way to encourage larger purchases by offering irresistible deals as customers buy more. In this guide, we’ll walk you through the simple setup process so you can start offering tiered pricing in no time.
Now, let’s dive into how to set it up step by step.
STEP 1
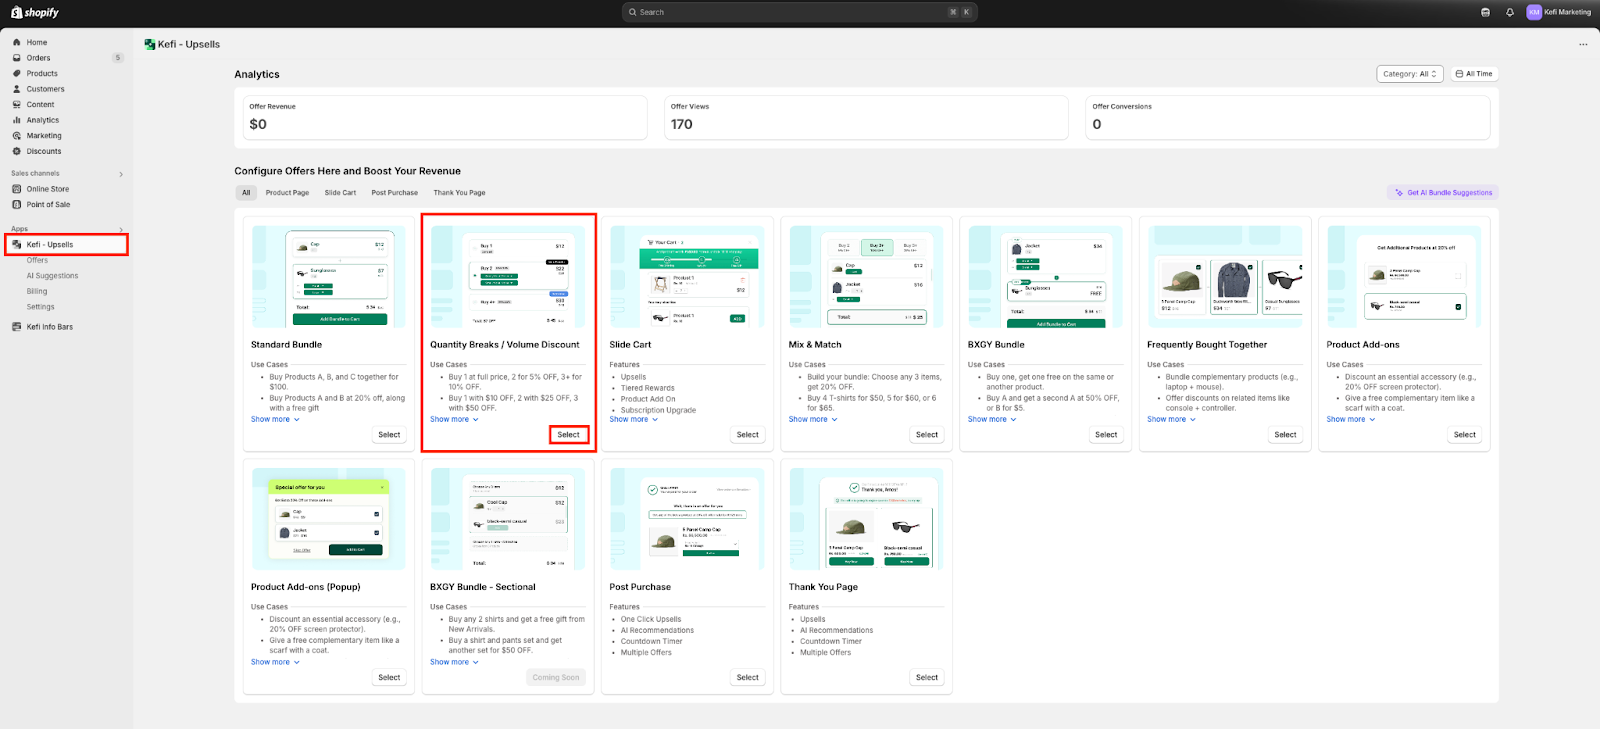
Create a Quantity Breaks Bundle
Go to the homepage and select the Quantity Breaks Bundle option to create the bundle. Click ‘Select’.
STEP 2
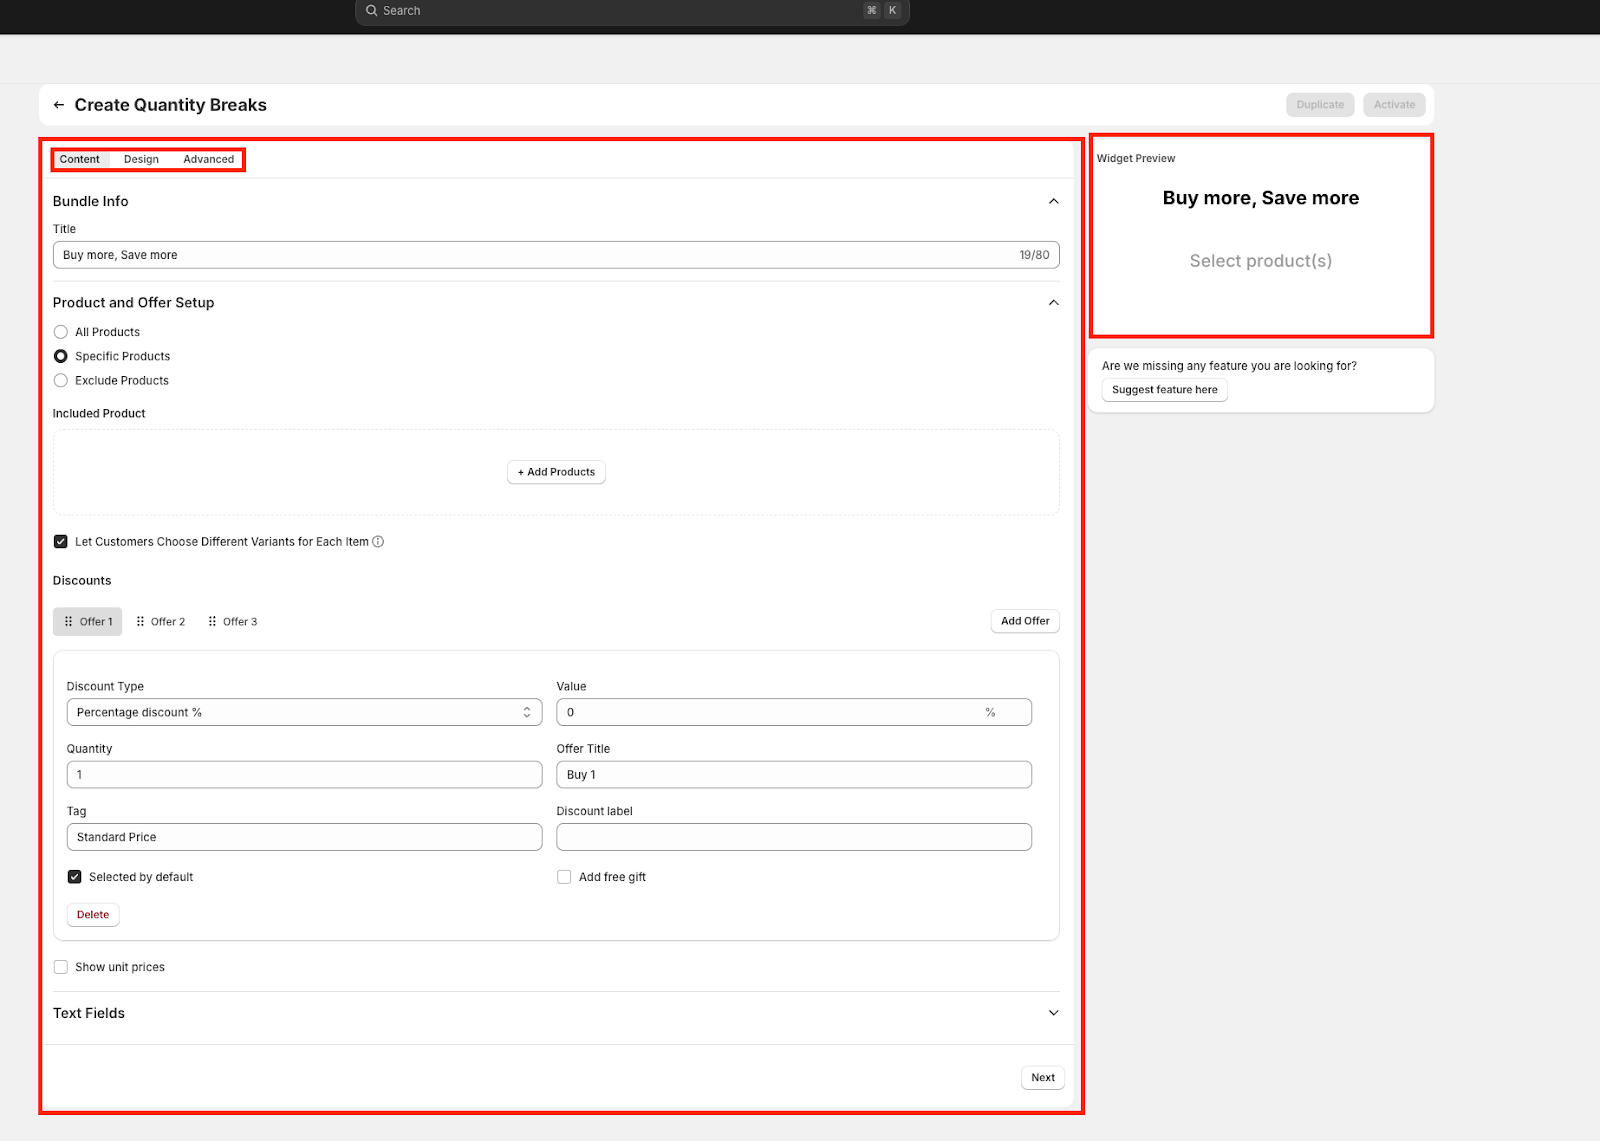
There are 3 sections available: Content, Design and Advanced.
The Widget Preview is available on the right side.
STEP 3
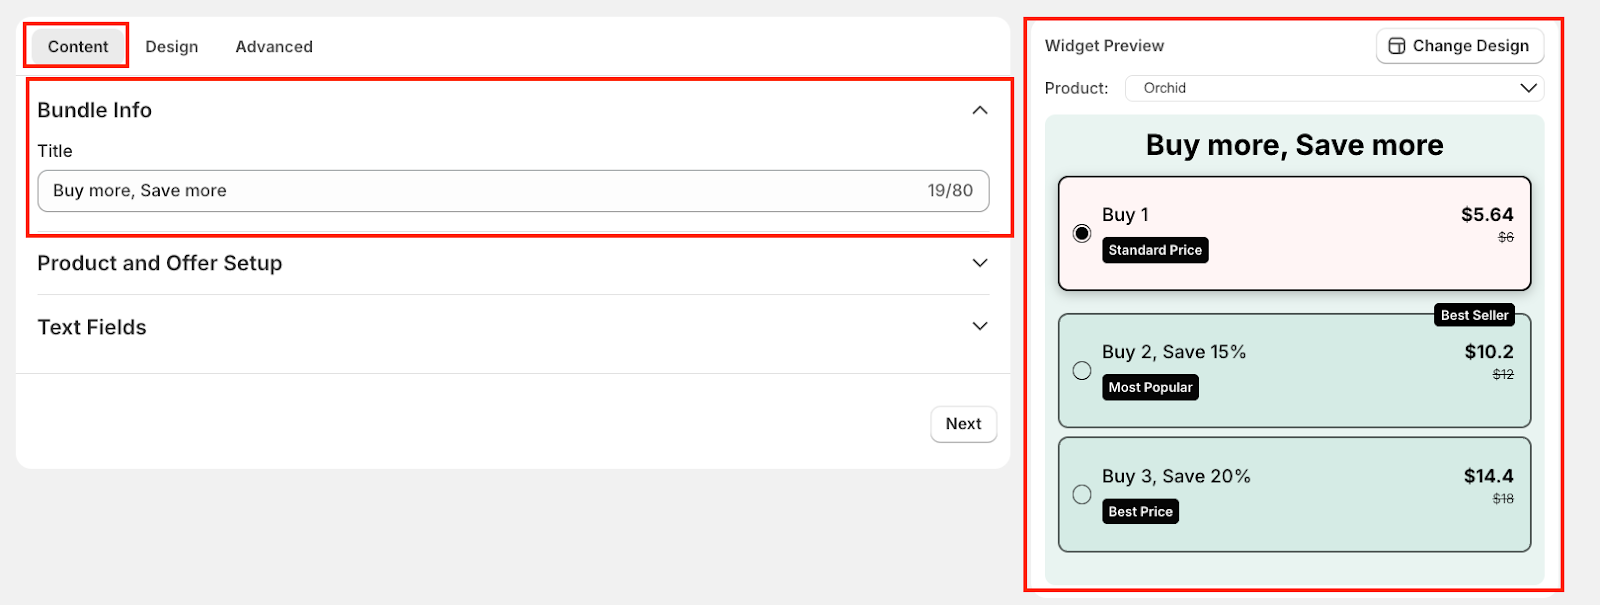
The Content tab is where you define the structure, logic, and messaging of your Quantity Breaks offer. This section allows you to set bundle titles, eligible products, discount tiers, and how offers are displayed to customers.
1. Bundle Info
STEP 4
2. Product and Offer Setup - You can decide which products this offer applies to:

STEP 5
On clicking ‘Add Products’, your entire product list will be visible. Select the boxes beside the product you wish to add. Once done, click ‘Select’.

STEP 6
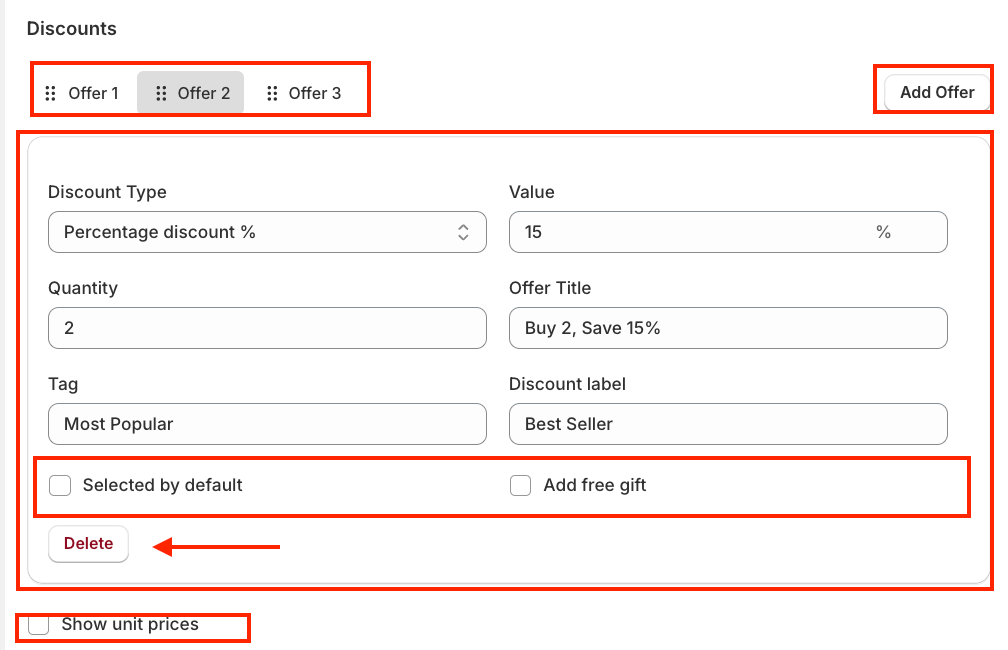
3. Discounts - Set multiple discount tiers using the tabs (Offer 1, Offer 2, Offer 3, etc.).
OFFER 1
Discount Type: Choose from: Percentage Discount (%), Fixed Amount Discount ($), Fixed Bundle Price, Without Discount
Value: The actual discount value in percentage
Quantity: Minimum number of items required to unlock this offer tier.
Offer Title: The label shown to customers (e.g., “Buy 3, Save 15%”).
Tag: An optional internal label to organize or filter offers.
Discount Label: An optional short text shown alongside the price to indicate savings (e.g., “You save $5”).
Selected by Default: Determines which discount tier appears selected when a customer first sees the offer.
Add Free Gift: You can link a free gift with the offer, automatically added when a certain quantity is reached.
Add Offer: Add more discount tiers to create progressive incentives.
Show Unit Prices (Toggle) - Enable this if you want to display per-unit pricing after discounts are applied — useful for bulk deals.

STEP 7
Please note- Each offer tab (Offer 1, 2, and 3) includes the same fields:
You can use "Add Offer" to create more discount tiers or click "Delete" to remove any.
This setup helps you create flexible, tiered discounts that encourage larger purchases.
STEP 8
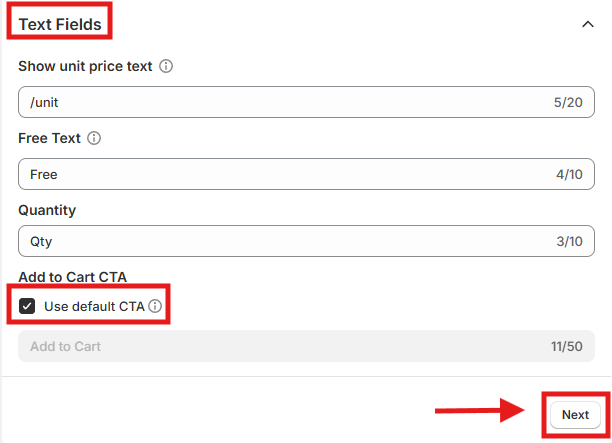
4. Text Field
This section allows you to customize the text displayed in the bundle widget in your preferred language. You can modify labels and messages to better align with your store’s tone and customer base.
The following options are available for customization:
Once you're done customizing the text fields, click Next to proceed to the Design section of the bundle setup.
STEP 9
The Design tab allows you to personalize the visual appearance of all your Quantity Breaks offers to match your brand identity. Any changes made here will apply universally across all Quantity Breaks widgets in your store.
1. Colors - Customize background, text, and border colors for different elements in the widget:

STEP 10
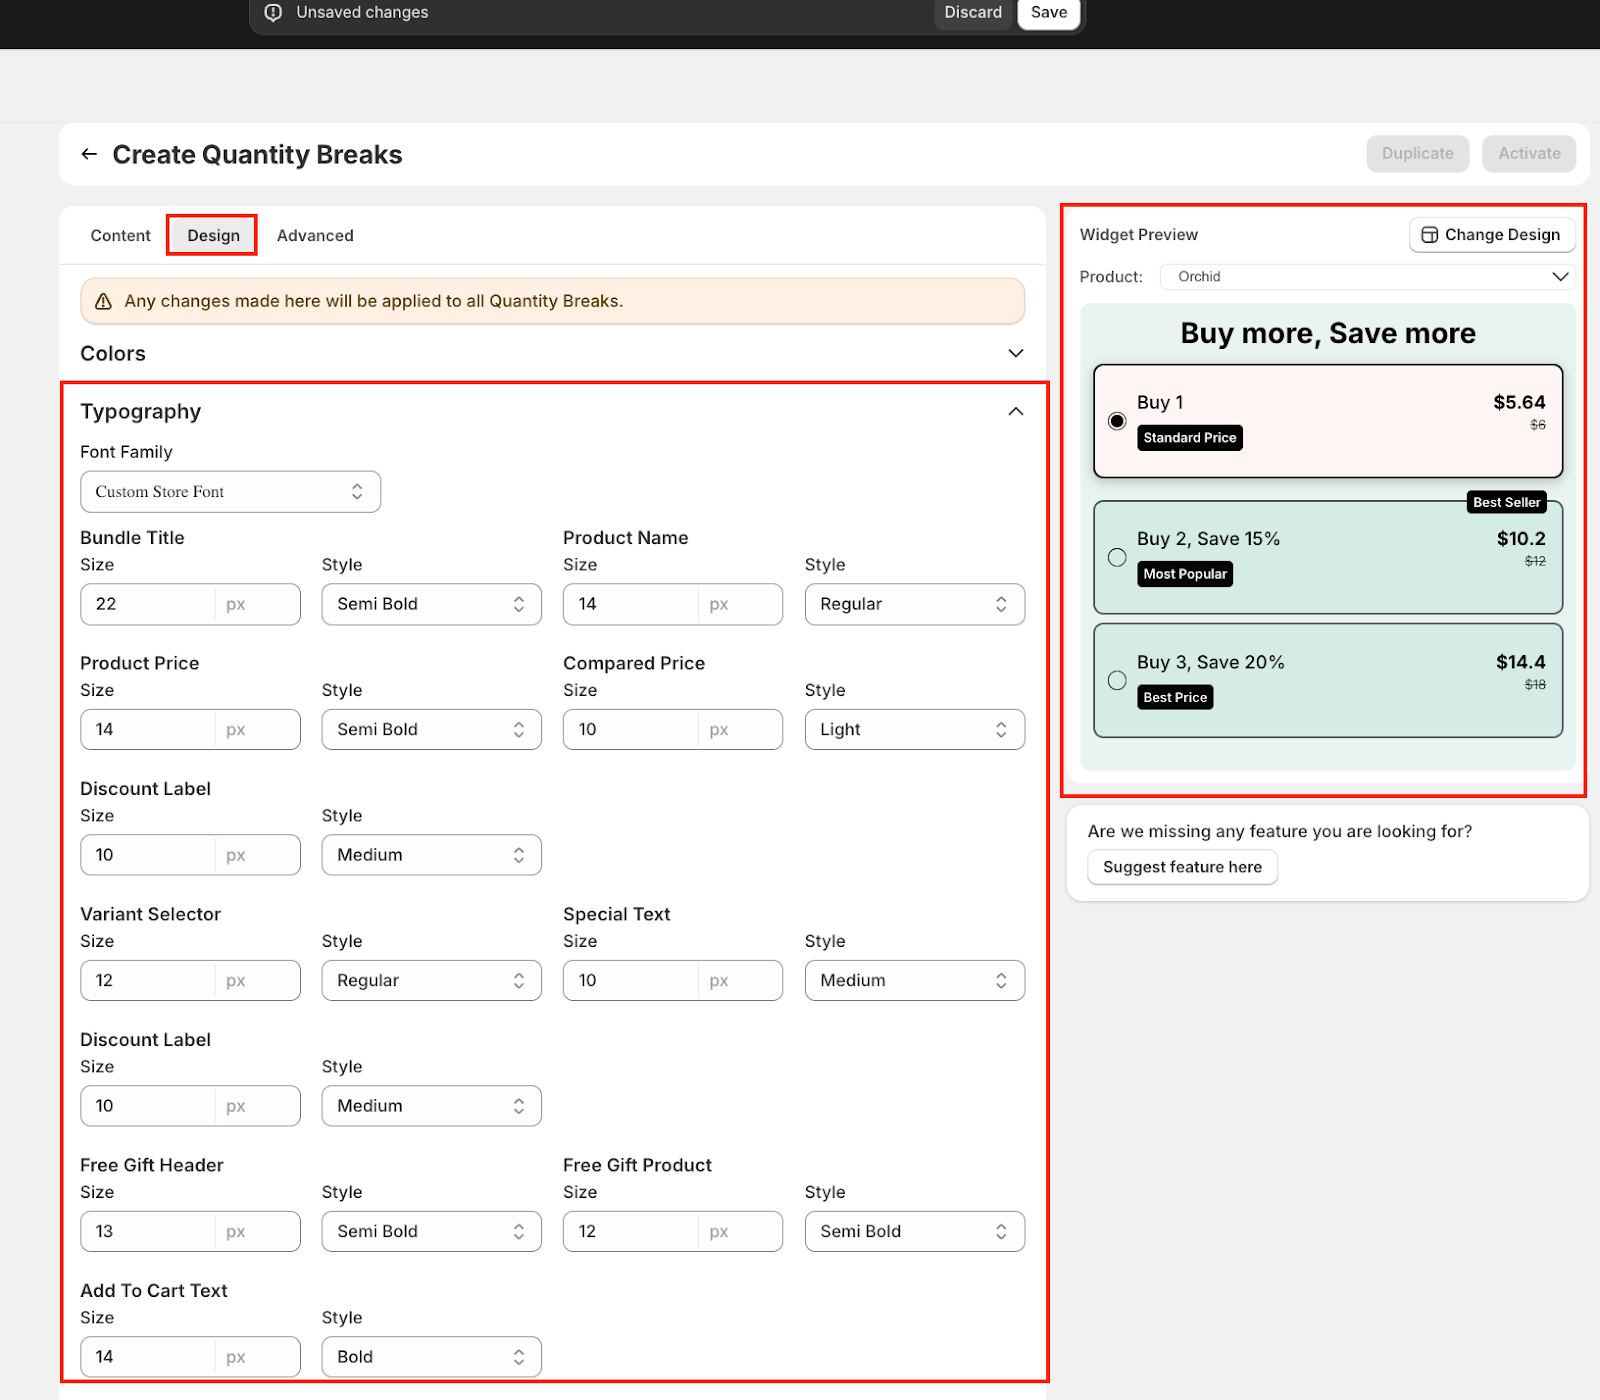
2. Typography - The Typography section allows you to fine-tune the font sizes and styles of various text elements shown in the Quantity Breaks bundle widget. This helps you match the widget’s appearance with your store’s branding and visual consistency.
Font Customization Options -
STEP 11
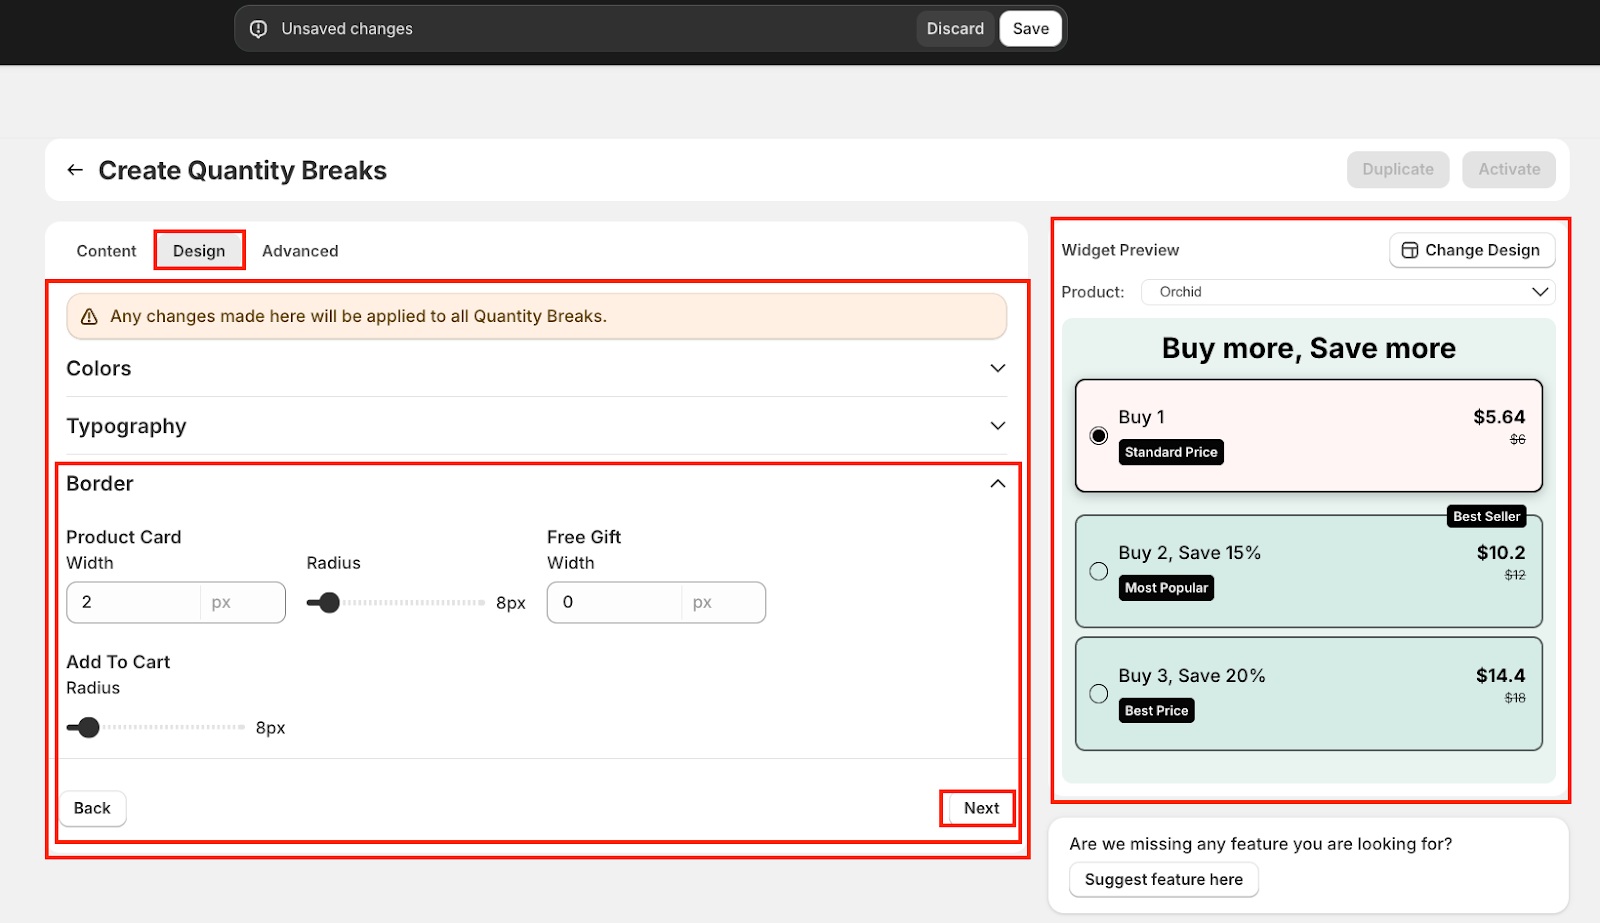
3. Border - The Border section lets you control the look and feel of borders around different elements in the Quantity Breaks bundle widget. This helps tailor the visual structure to better match your store’s branding or design tone.
Live Widget Preview - All changes made here are instantly reflected in the right-side widget preview, so you can see exactly how your updates will appear to shoppers before saving them. This ensures you create a visually consistent and conversion-friendly cart experience without guesswork.
STEP 12
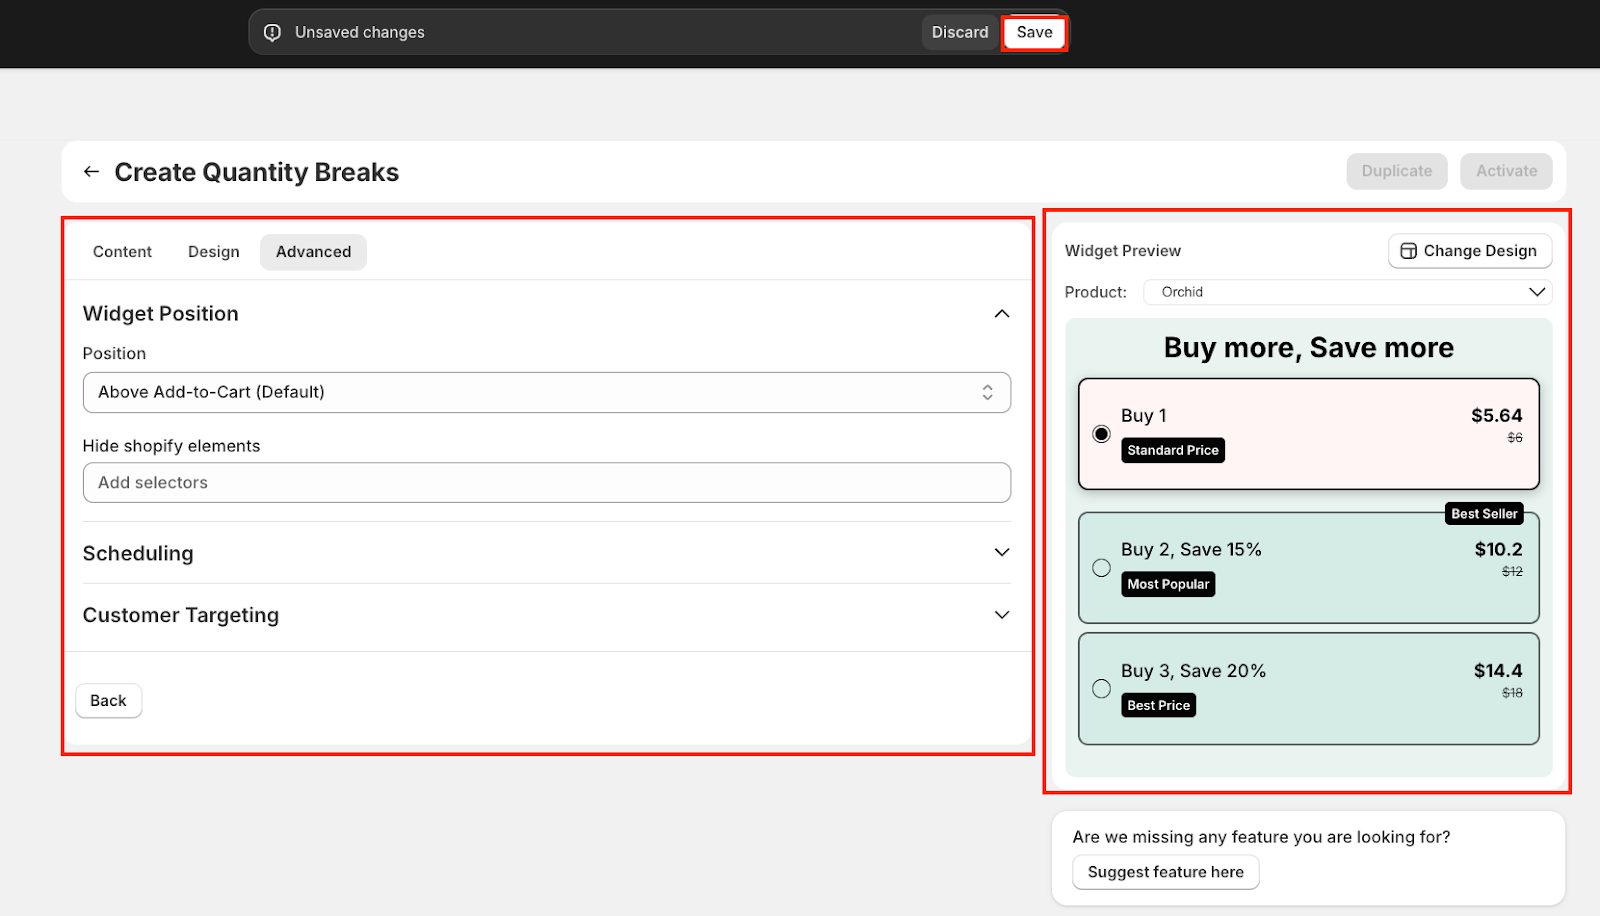
The Advanced tab gives you control over how, when, and to whom the Quantity Breaks widget appears. These settings help tailor the offer experience to match your store's layout and marketing strategy.
1. Widget Position - Choose where the widget appears on your product page.
You can select from the following positions: [Above Add to Cart (default position), Below Add to Cart, Above Custom Element, Below Custom Element]
For a detailed step-by-step guide, refer to this help article: How to Position Bundles on Your Product Page

STEP 13
2. Pricing
Control how pricing details are displayed within the widget to enhance clarity and highlight offers:
(Note: You can customize the unit price text from the Text Field section.)

STEP 14
3. Scheduling -
Set a start date and time, and even an end date for your Quantity Breaks offer.
Ideal for limited-time campaigns, flash sales, or seasonal promos.

STEP 15
4. Customer Targeting - The Customer Targeting section allows you to control who sees your Quantity Breaks offer based on customer attributes. This is ideal for delivering exclusive deals, loyalty rewards, or geo-specific promotions.
Display Bundle To:
In case of Specific Customer Segment -

STEP 16
Click ‘Save’ to apply the customizations.
STEP 17
Finally, activate the Quantity Breaks/Volume Discount Bundle by simply clicking on ‘Activate’.
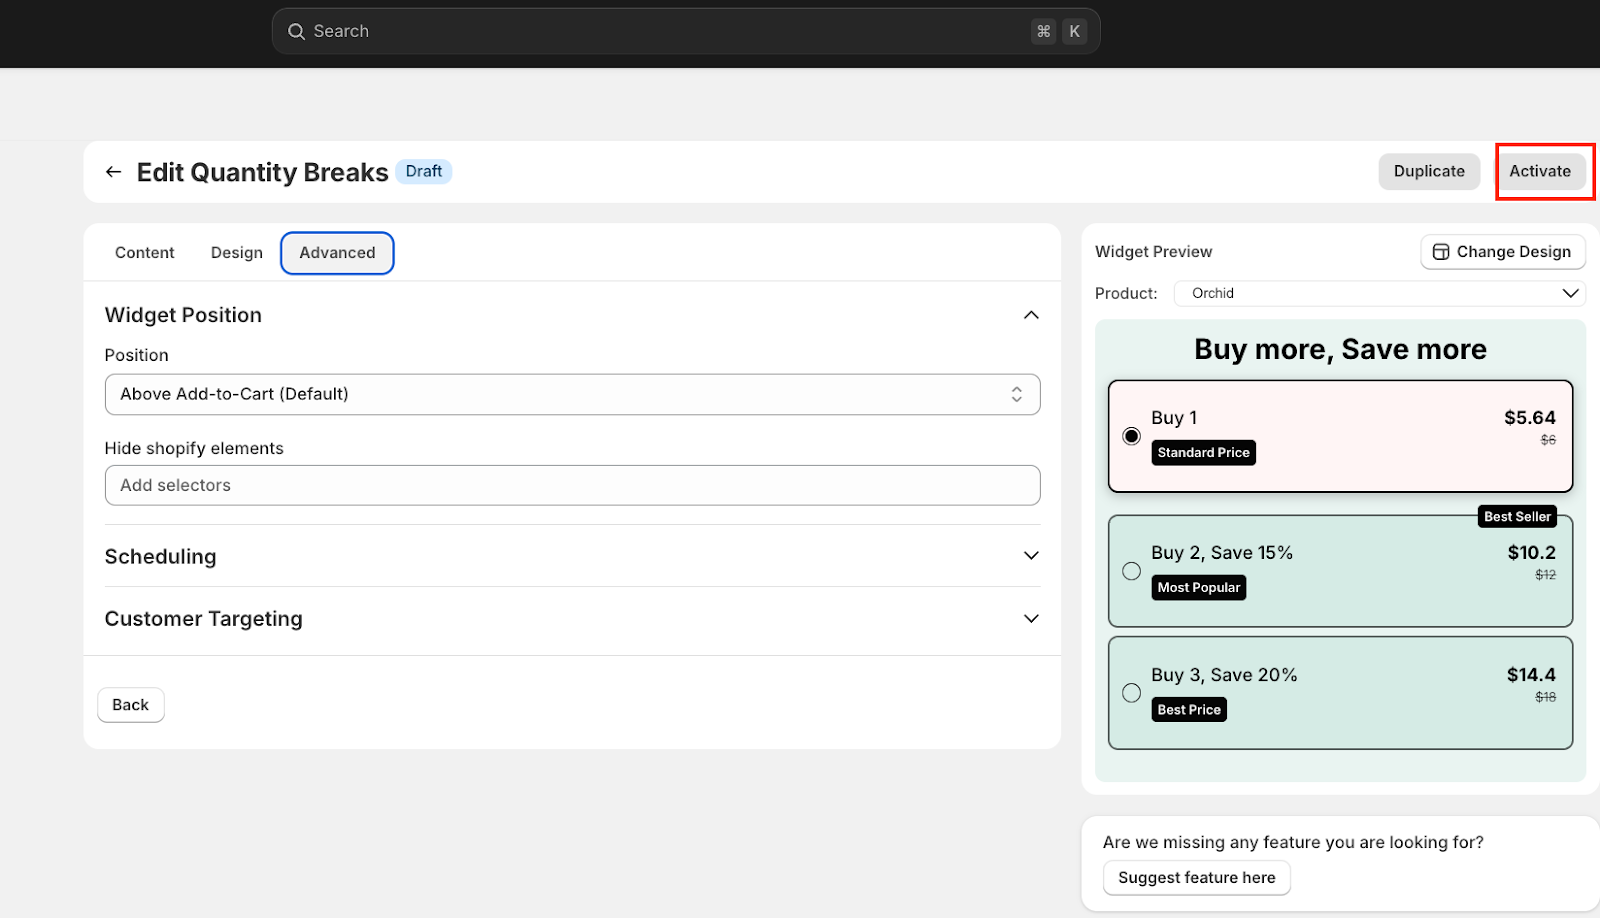
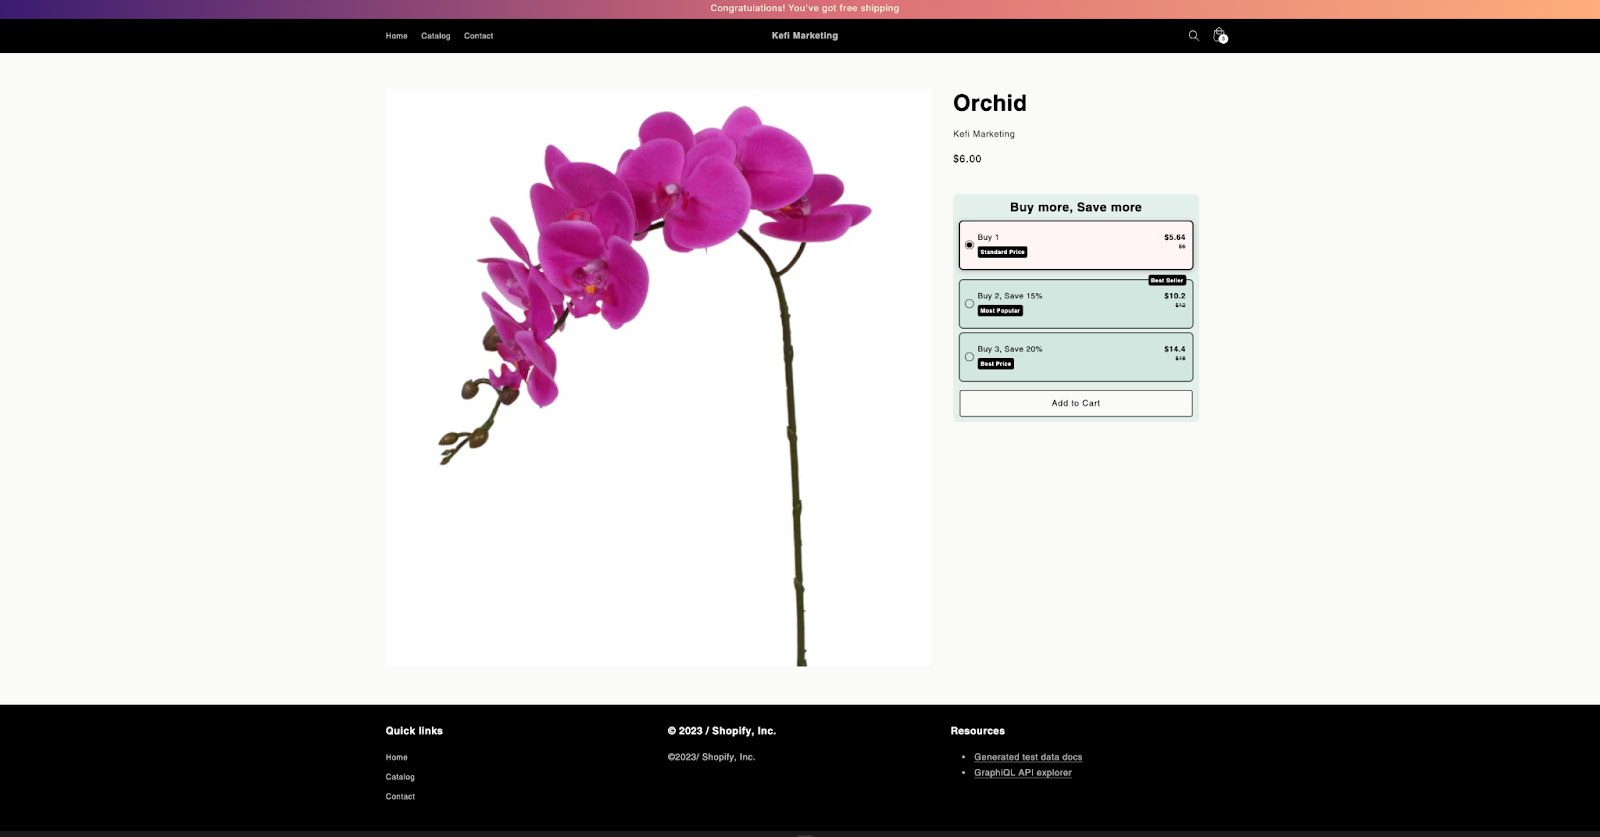
Once you’ve activated the bundle, you can also view it in the store. Simply click ‘Show on Store’

For example -
If you have any questions or need assistance, feel free to contact us:
.svg)
